featured

Create React App alternative: 5 times leaner, 0 vulnerabilities

Create React App is gone.

Yes, it’s no longer the recommended tool for starting React apps. Some of us were surprised, but many of us knew it was a long time coming.

There are much faster and leaner alternatives available today.

Why shouldn’t you use Create React App anymore?

Create React App was great.

Setting up React apps become as easy as ever without any need to bother with tedious Webpack and Babel configs. But despite the convenience, it had notable issues we just couldn’t ignore:

1. Bulky and slow

Create React App is a bloated tool.

It installs an unbelievable number of packages and takes forever to finish. If you’re a long-time CRA user like me, you’ve probably gotten used to this process, but it’s far from normal.

Once you enter the command to start a new project, you will quickly realize the insane number of packages CRA needs to set up.

Look at how large the node_modules folder is for CRA compared to Vite, a superior alternative. And both folders were just newly set up.
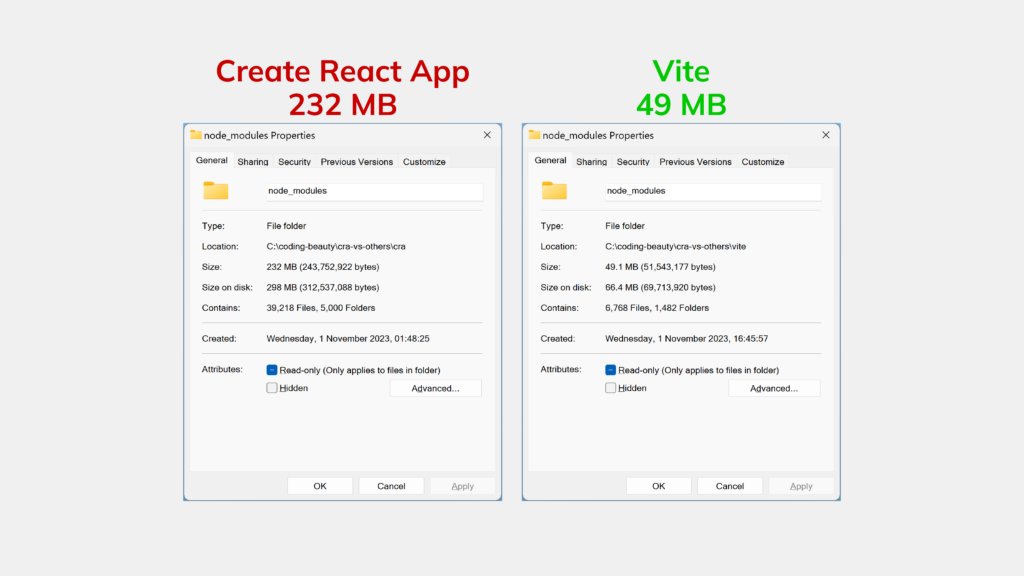
Many packages mean longer install times, even if you’re using PNPM or Yarn 2.

2. Insecure and outdated packages

Bundling so many packages makes it harder to keep track of them all, and many become abandoned and insecure later.

Things improved but any insecure package is something to worry about, and there are still quite a few.
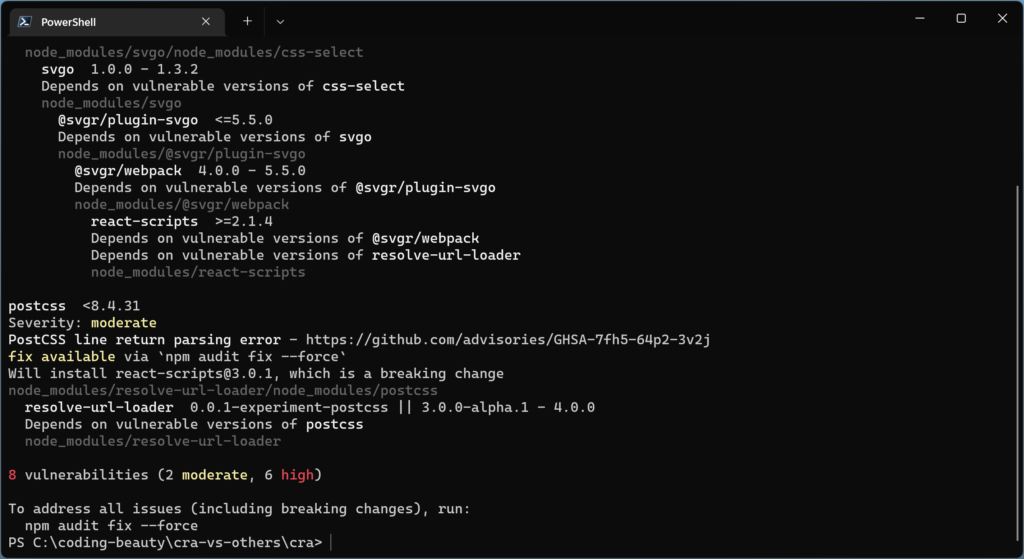
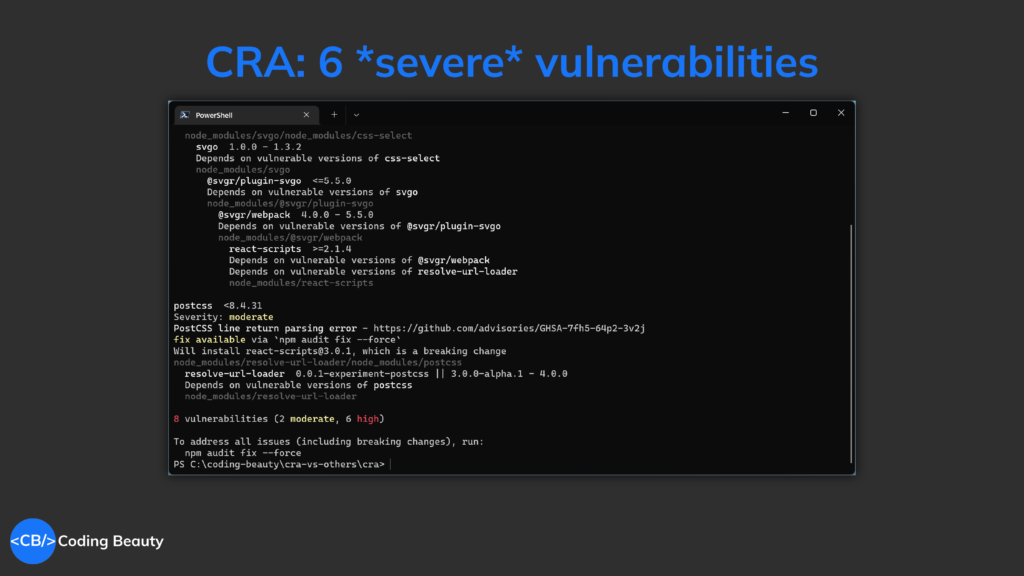
Create React App has 8 high security vulnerabilities.
8 high security vulnerabilities! And that’s even better than what it used to be.

In my GitHub repos using CRA, I get several Dependabot alerts at every turn – even from one of my first GitHub projects.

And they’re almost always about security flaws in packages CRA installed.
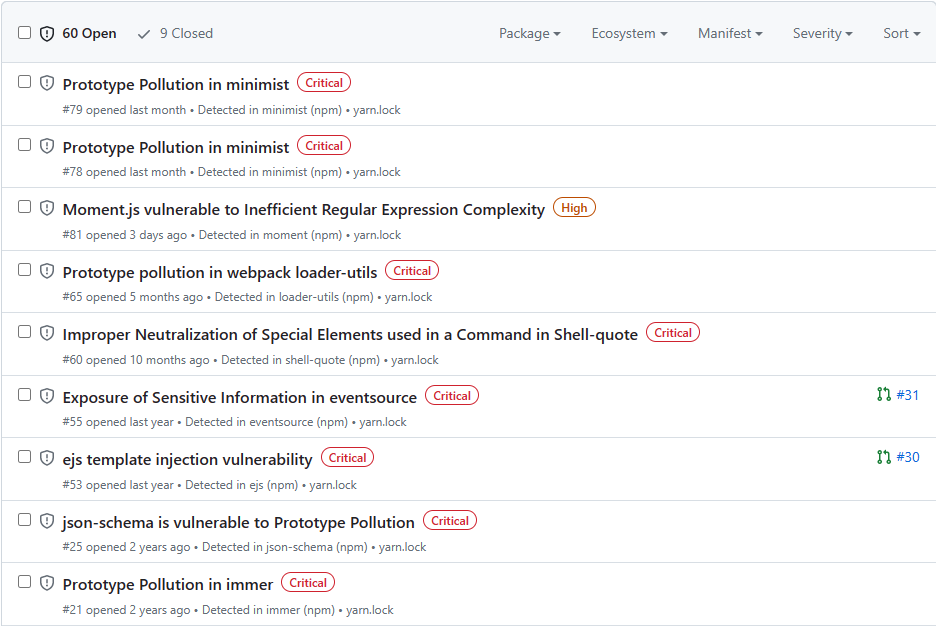
Security weaknesses found in npm packages installed during Create React App setup.

3. Limited customization options

Create React App is a black box.

To add new libraries and customize it you usually have to depend on libraries like Craco – heck, before CRA version 5, Craco was pretty much our only way to get Tailwind CSS support.

I remember my earlier days of creating various Electron + React desktop apps, where I had to install react-app-rewired just to set the target to 'electron-renderer' to access Node modules in the React part of the app.

For total control, you can always do npm eject, but of course, then you become responsible for all the dependencies installed by CRA, which has trade-offs that may not be worth it for you.

What to use instead of Create React App

Old habits die hard, sure.

If you’ve been hesitating to switch to a superior tool, hopefully, the React team dumping CRA should finally do it for you. There are far more modern and better-maintained alternatives out there; let’s check out some of the most popular ones:

Vite

It’s a fast way to build modern web projects, designed for efficiency and smoother development.

The VueJS team is responsible for developing and maintaining Vite, so you can trust it’s a reliable tool.

  • “Extremely fast” Hot Module Replacement (HMR).
  • Out-of-the-box support for TypeScript.
  • A lightning-fast SWC compiler.

HMR means that code changes show instantly in the browser, avoiding full-page refreshes and saving valuable time.

It provides just about everything CRA does – but better and without the bloat. And it’s constantly being updated.

Vite logo

Here you don’t worry about outdated dependencies or vulnerable packages:
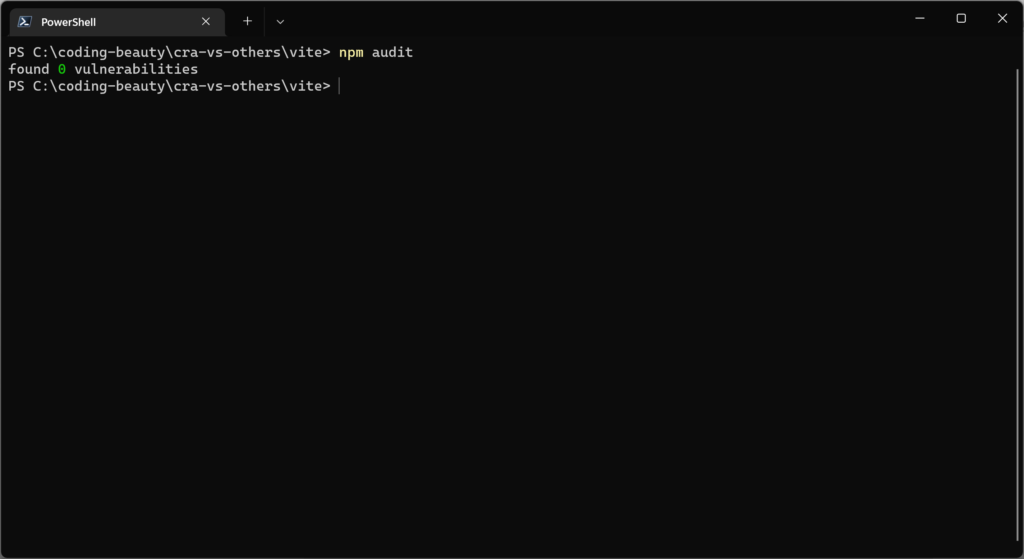
The Vite project has zero vulnerabilities.
Zero vulnerabilities.

Parcel

It’s a zero-config bundler with no setup required, yet it’s still more flexible than Create React App.

Parcel supports all the latest web technologies, including React, Vue, and TypeScript, and it can bundle any type of asset, from images and CSS to HTML and JavaScript.

Plus, it has excellent performance, thanks to its use of worker threads, which allows it to parallelize tasks and speed up builds.

Parcel logo

Parcel also has HMR support and is updated often with the latest features and optimizations like Vite. You can trust the team to keep up with the latest web technologies and best practices.

And what’s the result: your projects are built with the best tools available.

Custom Webpack configuration

Webpack is still king if you know what you’re doing.

The level of control of flexibility it gives you is unmatched as there are a massive number of options you can set, far more than just path and filename.

Another benefit to note: Webpack can generate a development build without a local server, unlike Parcel and others.

This particular feature saved me when I was debugging React in a VSCode extension. Loading data from localhost didn’t work properly for a Webview; I had to build to a local file and read the contents.

With source maps enabled and dev mode turned on, I could easily see the exact line where the error occurred in the TS code. Unlike with Parcel, where all I got was a minified build.

Of course, setting up a Webpack config can be complex and more involved – which is why CRA came around in the first place. You must configure various options to get everything working perfectly.

But once you’re set-up, you’ll have a heavily personalized build process for your project. It’s a trade-off that may or may not be worth it for you.

Frameworks to replace Create React App

Need React’s state and UI capabilities without extras? The tools we’ve seen are great.

Want high-performance apps with advanced features like SSR? Then consider frameworks with built-in routing, data fetching, etc.

Frameworks like:

Next.js

Many of us already know Next.js with advanced features like server-side rendering and static website generation.

Server-side rendering renders pages on the server and sends them to the client, greatly boosting performance, user experience, and SEO scores.

With intuitive file-based routing and built-in image optimization, Next.js is a smart option for building high-flying web apps with speed.

Remix

Another SSR-enable framework with powerful data features like:

  • Intelligent network error handling
  • Parallel fetching of CSS, JavaScript, and other assets to save time
  • Automatically ensuring the UI data is in sync with the server data after a user action.

One stand-out Remix feature is nested routes, which makes it possible to associate a specific section of a page with a particular route segment so that only that section updates when the route segment changes. This accelerates page transitions as no time is wasted re-rendering the entire page.

Gatsby

Gatsby is another awesome one – for scalable & fast-loading static sites.

There are a variety of starter kits and plugins to easily extend your site’s functionality and build a blog, e-commerce site, or portfolio site in no time at all.

With Gatsby, it’s effortless to power up your app with data from a CMS, especially with the GraphQL data layer for rapid integration with various APIs and services.

Final thoughts

CRA was a popular tool.

But it had its issues. It was bulky, outdated, and had limited customization.

Adaptation is crucial in the dynamic landscape of web development. By embracing modern tools, such as Vite, and Parcel, and in-depth frameworks like Next.js, Remix, and Gatsby, we can build faster and more efficient React apps.
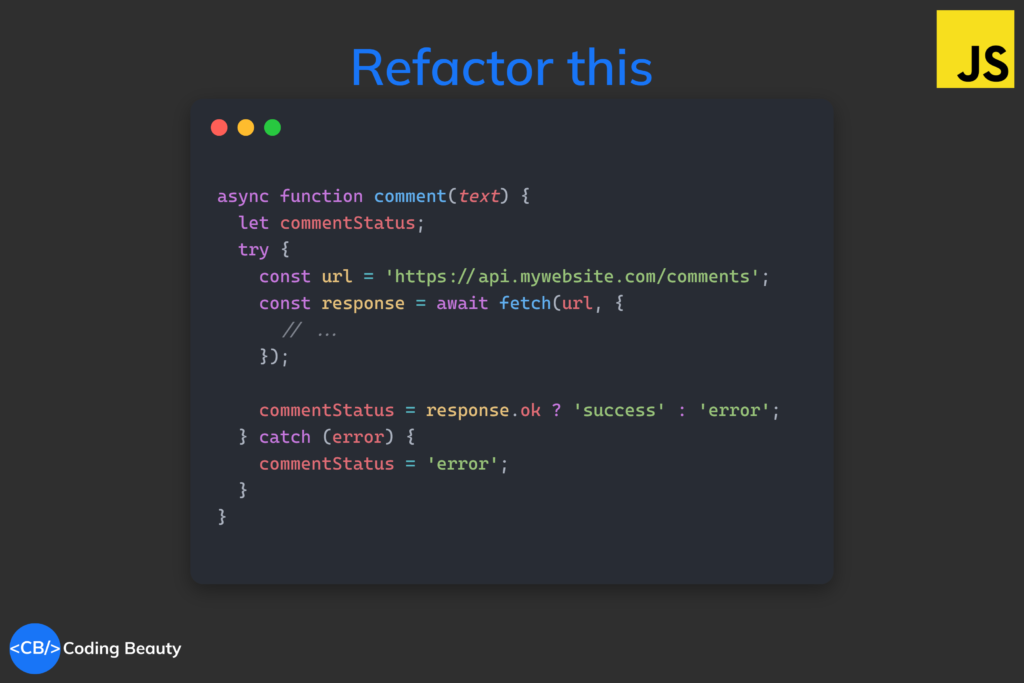
This is how functional try-catch transforms your JavaScript code

How common is this?

JavaScript
function writeTransactionsToFile(transactions) { let writeStatus; try { fs.writeFileSync('transactions.txt', transactions); writeStatus = 'success'; } catch (error) { writeStatus = 'error'; } // do something with writeStatus... }

It’s yet another instance where we want a value that depends on whether or not there’s an exception.

Normally, you’d most likely create a mutable variable outside the scope for error-free access within and after the try-catch.

But it doesn’t always have to be this way. Not with a functional try-catch.

A pure tryCatch() function avoids mutable variables and encourages maintainability and predictability in our codebase. No external states are modified – tryCatch() encapsulates the entire error-handling logic and produces a single output.

Our catch turns into a one-liner with no need for braces.
JavaScript
function writeTransactionsToFile(transactions) { // 👇 we can use const now const writeStatus = tryCatch({ tryFn: () => { fs.writeFileSync('transactions.txt', transactions); return 'success'; }, catchFn: (error) => 'error'; }); // do something with writeStatus... }
The tryCatch() function

So what does this tryCatch() function look like anyway?

From how we used it above you can already guess the definition:

JavaScript
function tryCatch({ tryFn, catchFn }) { try { return tryFn(); } catch (error) { return catchFn(error); } }

To properly tell the story of what the function does, we ensure explicit parameter names using an object argument – even though there are just two properties. Because programming isn’t just a means to an end — we’re also telling a story of the objects and data in the codebase from start to finish.

TypeScript is great for cases like this, let’s see how a generically typed tryCatch() could look like:

TypeScript
type TryCatchProps<T> = { tryFn: () => T; catchFn: (error: any) => T; }; function tryCatch<T>({ tryFn, catchFn }: TryCatchProps<T>): T { try { return tryFn(); } catch (error) { return catchFn(error); } }

And we can take it for a spin, let’s rewrite the functional writeTransactionsToFile() in TypeScript:

JavaScript
function writeTransactionsToFile(transactions: string) { // 👇 returns either 'success' or 'error' const writeStatus = tryCatch<'success' | 'error'>({ tryFn: () => { fs.writeFileSync('transaction.txt', transactions); return 'success'; }, catchFn: (error) => return 'error'; }); // do something with writeStatus... }

We use the 'success' | 'error' union type to clamp down on the strings we can return from try and catch callbacks.

Asynchronous handling

No, we don’t need to worry about this at all – if tryFn or catchFn is async then writeTransactionToFile() automatically returns a Promise.

Here’s another try-catch situation most of us should be familiar with: making a network request and handling errors. Here we’re setting an external variable (outside the try-catch) based on whether the request succeeded or not – in a React app we could easily set state with it.

Obviously in a real-world app the request will be asynchronous to avoid blocking the UI thread:

JavaScript
async function comment(comment: string) { type Status = 'error' | 'success'; let commentStatus; try { const response = await fetch('https://api.mywebsite.com/comments', { method: 'POST', headers: { 'Content-Type': 'application/json', }, body: JSON.stringify({ comment }), }); if (!response.ok) { commentStatus = 'error'; } else { commentStatus = 'success'; } } catch (error) { commentStatus = 'error'; } // do something with commentStatus... }

Once again we have to create a mutable variable here so it can go into the try-catch and come out victoriously with no scoping errors.

We refactor like before and this time, we async the try and catch functions thereby awaiting the tryCatch():

JavaScript
async function comment(comment: string) { type Status = 'error' | 'success'; // 👇 await because this returns Promise<Status> const commentStatus = await tryCatch<Status>({ tryFn: async () => { const response = await fetch<('https://api.mywebsite.com/comments', { method: 'POST', headers: { 'Content-Type': 'application/json', }, body: JSON.stringify({ comment }), }); // 👇 functional conditional return response.ok ? 'success' : 'error'; }, catchFn: async (error) => 'error'; }); // do something with commentStatus... }

Readability, modularity, and single responsibility

Two try-catch rules of thumb to follow when handling exceptions:

  1. The try-catch should be as close to the source of the error as possible, and
  2. Only use one try-catch per function

They will make your code easier to read and maintain in the short- and long-term.

Look at processJSONFile() here, it respects rule 1. The 1st try-catch is solely responsible for handling file-reading errors and nothing else. No more logic will be added to try, so catch will also never change.

And next try-catch in line is just here to deal with JSON parsing.

JavaScript
function processJSONFile(filePath) { let contents; let jsonContents; // First try-catch block to handle file reading errors try { contents = fs.readFileSync(filePath, 'utf8'); } catch (error) { // log errors here contents = null; } // Second try-catch block to handle JSON parsing errors try { jsonContents = JSON.parse(contents); } catch (error) { // log errors here jsonContents = null; } return jsonContents; }

But processJsonFile() completely disregards rule 2, with both try-catch blocks in the same function.

So let’s fix this by refactoring them to their separate functions:

JavaScript
function processJSONFile(filePath) { const contents = getFileContents(filePath); const jsonContents = parseJSON(contents); return jsonContents; } function getFileContents(filePath) { let contents; try { contents = fs.readFileSync(filePath, 'utf8'); } catch (error) { contents = null; } return contents; } function parseJSON(content) { let json; try { json = JSON.parse(content); } catch (error) { json = null; } return json; }

But we have tryCatch() now – we can do better:

JavaScript
function processJSONFile(filePath) { return parseJSON(getFileContents(filePath)); } const getFileContents = (filePath) => tryCatch({ tryFn: () => fs.readFileSync(filePath, 'utf8'), catchFn: () => null, }); const parseJSON = (content) => tryCatch({ tryFn: () => JSON.parse(content), catchFn: () => null, });

We’re doing nothing more than silencing the exceptions – that’s the primary job these new functions have.

If this occurs frequently, why not even create a “silencer” version, returning the try function’s result on success, or nothing on error?

JavaScript
function tryCatch<T>(fn: () => T) { try { return fn(); } catch (error) { return null; } }

Further shortening our code to this:

JavaScript
function processJSONFile(filePath) { return parseJSON(getFileContents(filePath)); } const getFileContents = (filePath) => tryCatch(() => fs.readFileSync(filePath, 'utf8')); const parseJSON = (content) => tryCatch(() => JSON.parse(content));

Side note: When naming identifiers, I say we try as much as possible to use nouns for variables, adjectives for functions, and… adverbs for higher-order functions! Like a story, the code will read more naturally and could be better understood.

So instead of tryCatch, we could use silently:

JavaScript
const getFileContents = (filePath) => silently(() => fs.readFileSync(filePath, 'utf8')); const parseJSON = (content) => silently(() => JSON.parse(content));

If you’ve used @mui/styles or recompose, you’ll see how a ton of their higher-order functions are named with adverbial phrases — withStyles, withState, withProps, etc., and I doubt this was by chance.

Final thoughts

Of course try-catch works perfectly fine on its own.

We aren’t discarding it, but transforming it into a more maintainable and predictable tool. tryCatch() is even just one of the many declarative-friendly functions that use imperative constructs like try-catch under the hood.

If you prefer to stick with direct try-catch, do remember to use the 2 try-catch rules of thumb, to polish your code with valuable modularity and readability enhancements.

7 amazing new JavaScript features in ES14 (ES2023)

The world’s most popular programming language just got a new update.

Ever since 2015, a new JavaScript version has come out every year with tons of powerful features to make life much easier, and 2023 has been no different. Let’s look at what ES14 has to offer.

1. Array toSorted() method

Sweet syntactic sugar.

ES14 comes with a new toSorted() method that makes it easier to sort an array and return a copy without mutation.

So instead of doing this:

JavaScript
const nums = [5, 2, 6, 3, 1, 7, 4]; const clone = [...nums]; const sorted = clone.sort(); console.log(sorted); // [1, 2, 3, 4, 5, 6, 7]

We now get to do this:

JavaScript
const nums = [5, 2, 6, 3, 1, 7, 4]; const sorted = nums.toSorted(); console.log(sorted); // [1, 2, 3, 4, 5, 6, 7] console.log(nums); // [5, 2, 6, 3, 1, 7, 4]

And just like sort(), toSorted() takes a callback function that lets you decide how the sort should happen – ascending or descending, alphabetical or numeric.

JavaScript
const nums = [5, 2, 6, 3, 1, 7, 4]; const sorted = nums.toSorted((a, b) => b - a); console.log(sorted); // [7, 6, 5, 4, 3, 2, 1]

2. Hashbang grammar

What’s a hashbang?

Basically, it’s a sequence of characters in a file that tells the Linux Shell what interpreter or engine it should use to run the file. For example:

codingbeauty.sh
#!/bin/bash echo "How are you all doing today?"

With this hashbang, we can now easily run codingbeauty.sh directly in the shell, after using the chmod command to make the script executable.

Hashbangs also let us hide all the juicy implementation details in our scripts and indicate specific interpreter versions to execute the script files.

So with ES14, we can now do this effortlessly in JavaScript files, like this:

codingbeauty.js
#!/usr/bin/env node console.log("I'm doing great, how are you?");

3. Array toSpliced() method

Those immutability purists out there will no doubt be pleased with all these new Array methods.

toSorted() is to sort() as toSpliced() is to splice():

JavaScript
const colors = ['red', 'green', 'blue', 'yellow', 'pink']; const spliced = colors.toSpliced(1, 2, 'gray', 'white'); console.log(spliced); // [ 'red', 'gray', 'white', 'yellow', 'pink' ] // Original not modified console.log(colors); // ['red', 'green', 'blue', 'yellow', 'pink'];

Here toSpliced() removes 2 of the array elements, starting from index 1, and inserts 'gray' and 'white' in their place.

4. Symbols as WeakMap keys

WeakMaps; not very popular, are they?

Well, they’re a lot like Maps, except their keys can only contain non-primitive objects – no strings or numbers allowed here. These keys are stored as weak references, meaning the JavaScript engine can carry out garbage collection on the objects when it needs to if there is no other reference to the objects in memory apart from the keys.

One powerful use of WeakMaps is custom caching: by using objects as keys, you can associate cached values with specific objects. When the objects are garbage collected, the corresponding WeakMap entries are automatically removed, clearing the cache immediately.

JavaScript
const map = new Map(); const weakMap = new WeakMap(); const obj1 = { name: 'React' }; const obj2 = { name: 'Angular' }; map.set(obj1, 'Value for obj1 at Coding Beauty'); weakMap.set(obj2, 'Value for obj2 at Coding Beauty'); console.log(map.get(obj1)); // Output: Value for obj1 console.log(weakMap.get(obj2)); // Output: Value for obj2 obj1 = null; obj2 = null; console.log(map.get(obj1)); // Output: Value for obj1 console.log(weakMap.get(obj2)); // Output: undefined (obj2 has been garbage collected)

So ES14 makes it possible to define JavaScript Symbols as keys. This can make the role a key-value pair plays in a WeakMap clearer.

JavaScript
let mySymbol = Symbol('mySymbol'); let myWeakMap = new WeakMap(); let obj = { name: 'Coding Beauty' }; myWeakMap.set(mySymbol, obj); console.log(myWeakMap.get(mySymbol)); // Output: object

And what are they meant for?

5. Array toReversed() method

Another new Array method to promote immutability and functional programming.

The name’s self-explanatory: give me the reversed version of my array.

Before – with reverse().

JavaScript
const arr = [5, 4, 3, 2, 1] const reversed = arr.reverse(); console.log(reversed); // [1, 2, 3, 4, 5] // Original modified console.log(arr); // [1, 2, 3, 4, 5]

Now:

JavaScript
const arr = [5, 4, 3, 2, 1] const reversed = arr.toReversed(); console.log(reversed); // [5, 4, 3, 2, 1] // Original NOT modified console.log(arr); // [1, 2, 3, 4, 5]

6. Array find from last

Sure we can already use the Array find() method to find an element in an array that passes a specified test condition. And findIndex() will give us the index of such an element.

But find() and findIndex() both start searching from the first element of the array. What if it’ll be better for us to search from the last element instead?

Here we’re trying to get the item in the array with the value prop equal to y. With find() and findIndex():

JavaScript
const letters = [ { value: 'v' }, { value: 'w' }, { value: 'x' }, { value: 'y' }, { value: 'z' }, ]; const found = letters.find((item) => item.value === 'y'); const foundIndex = letters.findIndex((item) => item.value === 'y'); console.log(found); // { value: 'y' } console.log(foundIndex); // 3

This works, but as the target object is closer to the tail of the array, we could make this program run faster if we use the new ES2022 findLast() and findLastIndex() methods to search the array from the end.

JavaScript
const letters = [ { value: 'v' }, { value: 'w' }, { value: 'x' }, { value: 'y' }, { value: 'z' }, ]; const found = letters.findLast((item) => item.value === 'y'); const foundIndex = letters.findLastIndex((item) => item.value === 'y'); console.log(found); // { value: 'y' } console.log(foundIndex); // 3

Another use case might require that we specifically search the array from the end to get the correct item. For example, if we want to find the last even number in a list of numbers, find() and findIndex() would produce a totally wrong result.

JavaScript
const nums = [7, 14, 3, 8, 10, 9]; // gives 14, instead of 10 const lastEven = nums.find((value) => value % 2 === 0); // gives 1, instead of 4 const lastEvenIndex = nums.findIndex((value) => value % 2 === 0); console.log(lastEven); // 14 console.log(lastEvenIndex); // 1

Yes, we could call the reverse() method on the array to reverse the order of the elements before calling find() and findIndex().

But this approach would cause unnecessary mutation of the array, as reverse() reverses the elements of an array in place. The only way to avoid this mutation would be to make a new copy of the entire array, which could cause performance problems for large arrays.

And this beside the fact that findIndex() would still not work on the reversed array, as reversing the elements would also mean changing the indexes they had in the original array. To get the original index, we would need to perform an additional calculation, which means writing more code.

JavaScript
const nums = [7, 14, 3, 8, 10, 9]; // Copying the entire array with the spread syntax before // calling reverse() const reversed = [...nums].reverse(); // correctly gives 10 const lastEven = reversed.find((value) => value % 2 === 0); // gives 1, instead of 4 const reversedIndex = reversed.findIndex((value) => value % 2 === 0); // Need to re-calculate to get original index const lastEvenIndex = reversed.length - 1 - reversedIndex; console.log(lastEven); // 10 console.log(reversedIndex); // 1 console.log(lastEvenIndex); // 4

It’s in cases like where the findLast() and findLastIndex() methods come in handy.

JavaScript
const nums = [7, 14, 3, 8, 10, 9]; const lastEven = nums.findLast((num) => num % 2 === 0); const lastEvenIndex = nums.findLastIndex((num) => num % 2 === 0); console.log(lastEven); // 10 console.log(lastEvenIndex); // 4

This code is shorter and more readable. Most importantly, it produces the correct result.

7. Array with() method

Unlike the others, with() has no complementary mutating method. But once you see it in action, you’ll know that it’s the immutable approach to changing a single element.

In so many languages, you typically modify a single array element like this:

JavaScript
const arr = [5, 4, 7, 2, 1] // Mutates array to change element arr[2] = 3; console.log(arr); // [5, 4, 3, 2, 1]

But see what we can do now, in ES2023 JavaScript:

JavaScript
const arr = [5, 4, 7, 2, 1]; const replaced = arr.with(2, 3); console.log(replaced); // [5, 4, 3, 2, 1] // Original not modified console.log(arr); // [5, 4, 7, 2, 1]

Final thoughts

This year was all about easier functional programming and immutability.

Indeed, the reliability and consistency that immutability brings cannot be overstated. With the rise of declarative frameworks like React and Vue as well as Redux and other libraries, we’ve seen immutable JavaScript array methods explode in popularity; it’s only natural that we see more and more of them come baked into the language as it matures.

They stole the show in 2023, just like JavaScript took over a huge chunk of the language ecosystem a while back, with many millions of developers keeping that fire burning today. Let’s see what the future holds.

One-liners: far more than just one line

Here’s one:

JavaScript
const groupBy = (arr, groupFn) => arr.reduce( (grouped, obj) => ({ ...grouped, [groupFn(obj)]: [...(grouped[groupFn(obj)] || []), obj], }), {} );

and another:

JavaScript
const randomHexColor = () => `#${Math.random().toString(16).slice(2, 8).padEnd(6, '0')}`; console.log(randomHexColor()); // #7a10ba (varies) console.log(randomHexColor()); // #65abdc (varies)

Indeed, they are impressive when done right; a nice way to show off language mastery.

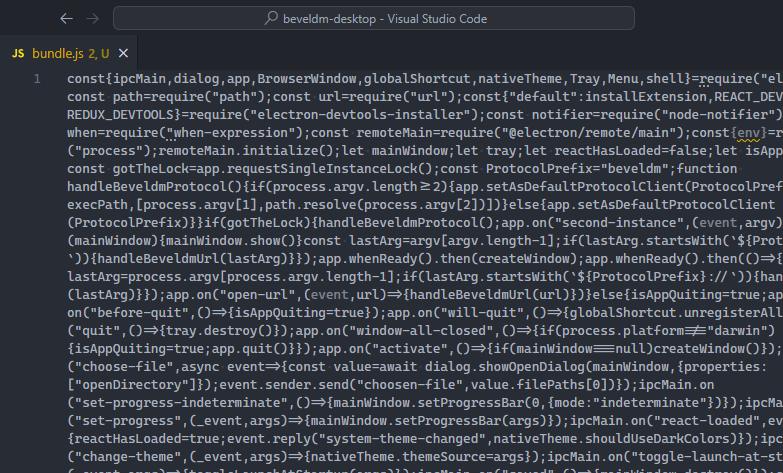
But exactly is a one-liner? Is it really code that takes only one line? If so, then can’t every piece of code qualify as a one-liner, if we just remove all the newline characters? Think about it.

A minified JavaScript file with only one line of code.

It seems like we need a more rigorous definition of what qualifies as a one-liner. And, after a few minutes of thought when writing a previous article on one-liners, I came up with this:

A one-liner is a code solution to a problem, implemented with a single statement in a particular programming language, optionally using only first-party utilities.

Tari Ibaba (😎)

You can clearly see those particular keywords that set this definition apart from others

1. “…single statement…”

Single line or single statement? I go with the later.

Because the thing is, we squeeze every program ever made in a single line of code if we wanted; all the whitespace and file separation is only for us and our fellow developers.

If you’ve used Uglify.js or a similar minifier, you know what it does to all those pitiful lines of code; why it’s called Uglify.

Uglify changes this:

JavaScript
/** Obviously redudant comments here. Just meant to emphasize what Uglify does Class Person */ class Person { /** Constructor */ constructor(name, age) { this.name = name; this.age = age; } /** Print Message */ printMessage() { console.log(`Hello! My name is ${this.name} and I am ${this.age} years old.`); } } /** Creating Object */ var person = new Person('John Doe', 25); /** Printing Message */ person.printMessage();

to this:

JavaScript
class Person{constructor(e,n){this.name=e,this.age=n}printMessage(){console.log(`Hello! My name is ${this.name} and I am ${this.age} years old.`)}}var person=new Person("John Doe",25);person.printMessage();

Would you be impressed by someone who actually wrote code like in this minified way? I would say it’s just badly formatted code.

Would you call this a one-liner?

JavaScript
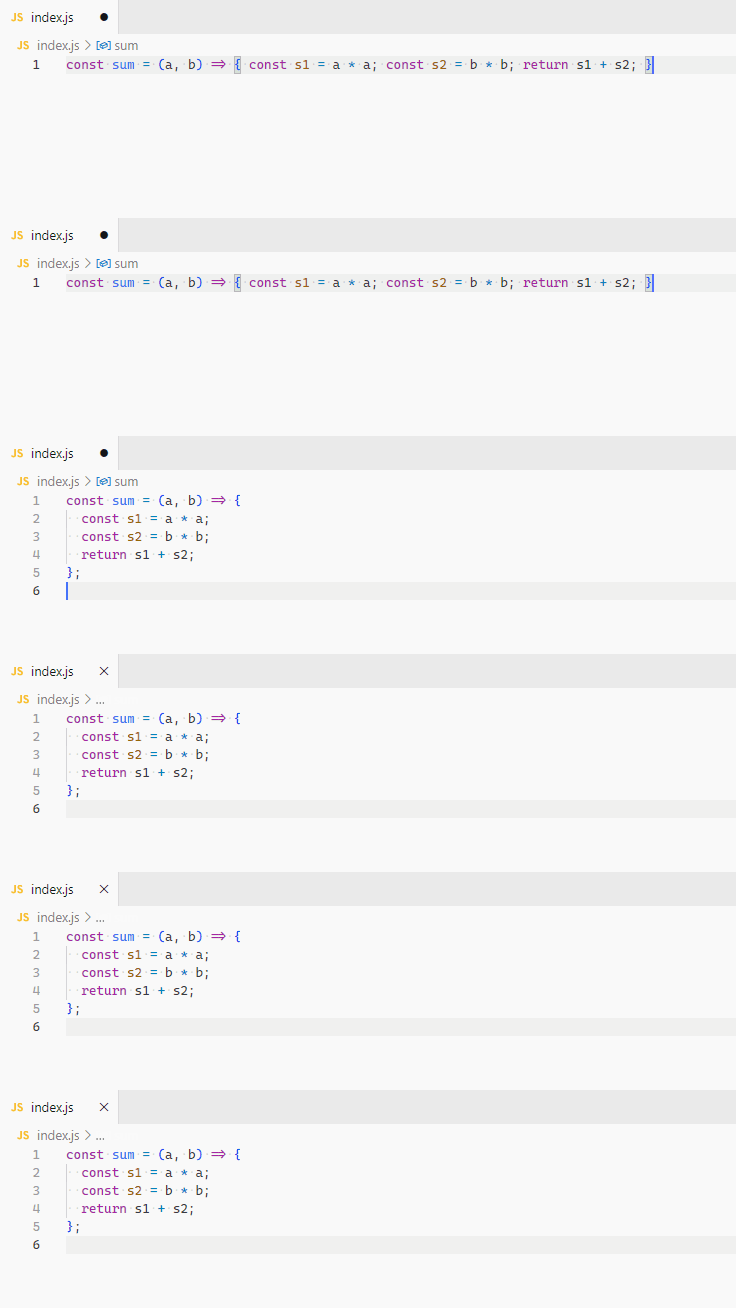
const sum = (a, b) => { const s1 = a * a; const s2 = b * b; return s1 + s2; }

Tools like the VS Code Prettier extension will easily split up those 3 statements into multiple lines:

The three statements are separated after VS Code Prettier auto-format on save.

A true one-liner way to get the sum of two squares would be something like this:

JavaScript
const sum = (a, b) => a * a + b * b;

One short, succinct statement does the same job with equal clarity.

On the other hand, what about code that spans multiple lines but only uses one statement? Like this:

JavaScript
const capitalizeWithoutSpaces = (str) => str .split('') .filter((char) => char.trim()) .map((char) => char.toUpperCase()) .join('');

I would say this function’s body is far more qualified to be a one-line than the two examples we saw above; single statement.

“…particular programming language”

We need this part because of abstraction.

int sum(int a, int b) { return a * a + b * b; }

This is a one-liner, isn’t it? Very harmless-looking and easy to understand.

How about now? :

sum(int, int): push rbp mov rbp, rsp mov DWORD PTR [rbp-4], edi mov DWORD PTR [rbp-8], esi mov eax, DWORD PTR [rbp-4] imul eax, eax mov edx, eax mov eax, DWORD PTR [rbp-8] imul eax, eax add eax, edx pop rbp ret

Wait, this is just another piece of code, right? Well, it is, except that they do exactly the same thing, but in different languages. One in C++, and the other in Assembly.

Now imagine how much more an equivalent machine language program will have. Clearly, we can only our sum() a one-liner function in the context of C++.

“…using only first-party utilities”

Once again, we need this part because of abstraction.

For us to consider a piece of code as a one-liner, it should only use built-in functions and methods that are part of the language’s standard library or core functionality. For example: array methods, the http module in Node.js, the os module in Python, and so on.

Without this, capitalizeWithoutSpaces() below would easily pass as a JavaScript one-liner:

JavaScript
// Not a one-liner const capitalizeWithoutSpaces = (str) => filter(str.split(''), (char) => char.trim()) .map((char) => char.toUpperCase()) .join(''); function filter(arr, callback) { // Look at all these lines const result = []; for (const item of arr) { if (callback(item)) { result.push(item); } } return result; }

filter could have contained many thousands of lines, yet capitalizeWithoutSpaces would still be given one-liner status.

It’s kind of controversial because a lot of these so-called first-party utilities are abstractions themselves with logic spanning dozens of lines. But just like the “single statement” specifier, it makes it impossible to have an unlimited number of one-liners.

Final thoughts

The essence of a one-liner in programming extends beyond the literal interpretation of its name. It lies not only in the minimalism of physical lines but also in the elegance and sophistication of its execution. It often requires a sound comprehension of the language at hand, an ability to concisely solve a problem, and the art of utilizing the language’s core functionalities with finesse.

A one-liner isn’t merely about squeezing code into a single line; It is where the clarity of thought, the elegance of language mastery, and the succinctness of execution converge. It’s the realm where brevity meets brilliance and the art of coding truly shines.

Mojo: 7 brilliant Python upgrades in the new AI language

It is 35,000 times faster than Python. It is quicker than C. It is as easy as Python.

Enter Mojo: a newly released programming language made for AI developers and made by Modular, a company founded by Chris Lattner, the original creator of Swift.

This 35000x claim came from a benchmark comparison between Mojo and other languages, using the Mandelbrot algorithm on a particular AWS instance.

It’s a superset of Python, combining Python’s usability, simplicity, and versatility with C’s incredible performance.

If you’re passionate about AI and already have a grasp on Python, then Mojo is definitely worth a try. So, let’s dive in and explore 7 powerful features of this exciting language together.

Mojo’s features

I signed up for Mojo access shortly after it was announced and got access a few days later.

I got access to the Mojo playground.

I started exploring all the cool new features they had to offer and even had the chance to run some code and see the language in action. Here are 7 interesting Python upgrades I found:

1. let and var declarations

Mojo introduces new let and var statements that let us create variables.

If we like we can specify a type like Int or String for the variable, as we do in TypeScript. var allows variables to change; let doesn’t. So it’s not like JavaScript’s let and var – There’s no hoisting for var and let is constant.

Mojo
def your_function(a, b): let c = a # Uncomment to see an error: # c = b # error: c is immutable if c != b: let d = b print(d) your_function(2, 3)

2. structs for faster abstraction

We have them in C++, Go, and more.

Structs are a Mojo feature similar to Python classes, but they’re different because Mojo classes are static: you can’t add more methods are runtime. This is a trade-off, as it’s less flexible, but faster.

Mojo
struct MyPair: var first: Int var second: Int # We use 'fn' instead of 'def' here - we'll explain that soon fn __init__(inout self, first: Int, second: Int): self.first = first self.second = second fn __lt__(self, rhs: MyPair) -> Bool: return self.first < rhs.first or (self.first == rhs.first and self.second < rhs.second)

Here’s one way struct is stricter than class: all fields must be explicitly defined:

Fields must be explicitly defined in Mojo structs.

3. Strong type checking

These structs don’t just give us flexibility, they let us check variable types at compile-time in Mojo, like the TypeScript compiler does.

Mojo
def pairTest() -> Bool: let p = MyPair(1, 2) # Uncomment to see an error: # return p < 4 # gives a compile time error return True

The 4 is an Int, the p is a MyPair; Mojo simply can’t allow this comparison.

4. Method overloading

C++, Java, Swift, etc. have these.

Function overloading is when there are multiple functions with the same name that accept parameters with different data types.

Look at this:

Mojo
struct Complex: var re: F32 var im: F32 fn __init__(inout self, x: F32): """Makes a complex number from a real number.""" self.re = x self.im = 0.0 fn __init__(inout self, r: F32, i: F32): """Makes a complex number from its real and imaginary parts.""" self.re = r self.im = i

Typeless languages like JavaScript and Python simply can’t have function overloads, for obvious reasons.

Although overloading is allowed in module/file functions and class methods based on parameter/type, it won’t work based on return type alone, and your function arguments need to have types. If don’t do this, overloading won’t work; all that’ll happen is the most recently defined function will overwrite all those previously defined functions with the same name.

5. Easy integration with Python modules

Having seamless Python support is Mojo’s biggest selling point by far.

And using Python modules in Mojo is straightforward. As a superset, all you need to do is call the Python.import_module() method, with the module name.

Here I’m importing numpy, one of the most popular Python libraries in the world.

Mojo
from PythonInterface import Python # Think of this as `import numpy as np` in Python let np = Python.import_module("numpy") # Now it's like you're using numpy in Python array = np.array([1, 2, 3]) print(array)

You can do the same for any Python module; the one limitation is that you have to import the whole module to access individual members.

All the Python modules will run 35,000 times faster in Mojo.

6. fn definitions

fn is basically def with stricter rules.

def is flexible, mutable, Python-friendly; fn is constant, stable, and Python-enriching. It’s like JavaScript’s strict mode, but just for def.

Mojo
struct MyPair: fn __init__(inout self, first: Int, second: Int): self.first = first self.second = second

fn‘s rules:

  • Immutable arguments: Arguments are immutable by default – including self – so you can’t mistakenly mutate them.
  • Required argument types: You have to specify types for its arguments.
  • Required variable declarations: You must declare local variables in the fn before using them (with let and var of course).
  • Explicit exception declaration: If the fn throws exceptions, you must explicitly indicate so – like we do in Java with the throws keyword.

7. Mutable and immutable function arguments

Pass-by-value vs pass-by-reference.

You may have across this concept in languages like C++.

Python’s def function uses pass-by-reference, just like in JavaScript; you can mutate objects passed as arguments inside the def. But Mojo’s def uses pass-by-value, so what you get inside a def is a copy of the passed object. So you can mutate that copy all you want; the changes won’t affect the main object.

Pass-by-reference improves memory efficiency as we don’t have to make a copy of the object for the function.

But what about the new fn function? Like Python’s def, it uses pass-by-reference by default, but a key difference is that those references are immutable. So we can read the original object in the function, but we can’t mutate it.

Immutable arguments

borrowed a fresh, new, redundant keyword in Mojo.

Because what borrowed does is to make arguments in a Mojo fn function immutable – which they are by default. This is invaluable when dealing with objects that take up a substantial amount of memory, or we’re not allowed to make a copy of the object we’re passing.

For example:

Mojo
fn use_something_big(borrowed a: SomethingBig, b: SomethingBig): """'a' and 'b' are both immutable, because 'borrowed' is the default.""" a.print_id() // 10 b.print_id() // 20 let a = SomethingBig(10) let b = SomethingBig(20) use_something_big(a, b)

Instead of making a copy of the huge SomethingBig object in the fn function, we simply pass a reference as an immutable argument.

Mutable arguments

If we want mutable arguments instead, we’ll use the new inout keyword instead:

Mojo
struct Car: var id_number: Int var color: String fn __init__(inout self, id: Int): self.id_number = id self.color = 'none' # self is passed by-reference for mutation as described above. fn set_color(inout self, color: String): self.color = color # Arguments like self are passed as borrowed by default. fn print_id(self): # Same as: fn print_id(borrowed self): print('Id: {0}, color: {1}') car = Car(11) car.set_color('red') # No error

self is immutable in fn functions, so we here we needed inout to modify the color field in set_color.

Key takeaways

  • Mojo: is a new AI programming language that has the speed of C, and the simplicity of Python.
  • let and var declarations: Mojo introduces let and var statements for creating optionally typed variables. var variables are mutable, let variables are not.
  • Structs: Mojo features static structs, similar to Python classes but faster due to their immutability.
  • Strong type checking: Mojo supports compile-time type checking, akin to TypeScript.
  • Method overloading: Mojo allows function overloading, where functions with the same name can accept different data types.
  • Python module integration: Mojo offers seamless Python support, running Python modules significantly faster.
  • fn definitions: The fn keyword in Mojo is a stricter version of Python’s def, requiring immutable arguments and explicit exception declaration.
  • Mutable and immutable arguments: Mojo introduces mutable (inout) and immutable (borrowed) function arguments.

Final thoughts

As we witness the unveiling of Mojo, it’s intriguing to think how this new AI-focused language might revolutionize the programming realm. Bridging the performance gap with the ease-of-use Python offers, and introducing powerful features like strong type checking, might herald a new era in AI development. Let’s embrace this shift with curiosity and eagerness to exploit the full potential of Mojo.

Why “Yarn 2” is actually Yarn 3

What do we know as Yarn 2?

It’s the modern version of Yarn that comes with important upgrades to the package manager including PNMP-style symlinks, and an innovative new Plug ‘n’ Play module installation method for much-reduced project sizes and rapid installations.

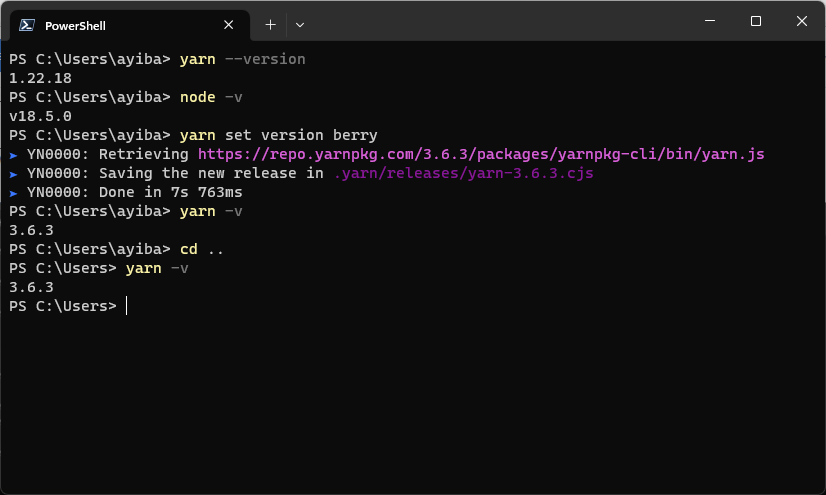
But after migrating from Yarn 1, you’ll find something interesting, as I did – the thing widely known as Yarn 2 is actually… version 3?

After migrating to "Yarn 2" and checking the version, it was shown to be version 3.

Why is “Yarn 2” using version 3?

It’s because Yarn 1 served as the initial codebase which was completely overhauled in the Yarn v2.0 (the actual version 2), enhancing its efficiency and effectiveness, with its launch taking place in January 2020. As time moved on, the introduction of a fresh major, Yarn v3.0, happened, thankfully without the need for another codebase rewrite. The upcoming major update is expected to be Yarn v4.0, and so on.

Despite the historical tendency of releasing few major updates, there was a growing trend among some individuals to label everything that used the new codebase as “Yarn 2”, which includes Yarn 2.x versions and future ones such as 3.x. This, however, was a misinterpretation as “Yarn 2” strictly refers to the 2.x versions. A more accurate way to reference the new codebase would be “Yarn 2+” or “Yarn Berry” – a codename that the team selected for the new codebase when they started developing it.

As once stated by one of the maintainers in a related GitHub discussion:

Some people have started to colloquially call “Yarn 2” everything using this new codebase, so Yarn 2.x and beyond (including 3.x). This is incorrect though (“Yarn 2” is really just 2.x), and a better term to refer to the new codebase would be Yarn 2+, or Yarn Berry (which is the codename I picked for the new codebase when I started working on it).

arcanis, a Yarn maintainer

How to migrate from Yarn v1 to Yarn Berry

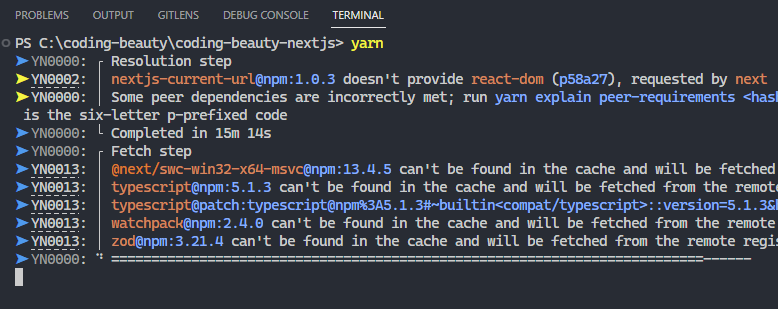
A Yarn Berry installation in progress.

If you’re still using Yarn version 1 – or worse, NPM – you’re missing out.

The new Yarn is loaded with a sizable number of upgrades that will significantly improve your developer experience when you start using it. These range from notable improvements in stability, flexibility, and extensibility, to brand new features, like Constraints.

You can migrate from Yarn v1 to Yarn Berry in 7 easy steps:

  1. Make sure you’re using Node version 18+.
  2. Run corepack enable to activate Corepack.
  3. Navigate to your project directory.
  4. Run yarn set version berry.
  5. Convert your .npmrc and .yarnrc files into .yarnrc.yml (as explained here).
  6. Run yarn install to migrate the lockfile.
  7. Commit all changes.

In case you experience any issues due to breaking changes, this official Yarn Berry migration guide should help.

Final thoughts

The Yarn versioning saga teaches us an important lesson: terminology matters.

What many of us dub as “Yarn 2” is actually “Yarn 2+” or “Yarn Berry”, the game-changing codebase. This misnomer emphasizes our need to stay current, not just with evolving tools and features, but with their rightful names as well. After all, how we understand and converse about these improvements shapes our effectiveness and fluency as developers.

Fine-tuning for OpenAI’s GPT-3.5 Turbo model is finally here

Some great news lately for AI developers from OpenAI.

Finally, you can now fine-tune the GPT-3.5 Turbo model using your own data. This gives you the ability to create customized versions of the OpenAI model that perform incredibly well at specific tasks and give responses in a customized format and tone, perfect for your use case.

For example, we can use fine-tuning to ensure that our model always responds in a JSON format, containing Spanish, with a friendly, informal tone. Or we could make a model that only gives one out of a finite set of responses, e.g., rating customer reviews as critical, positive, or neutral, according to how *we* define these terms.

As stated by OpenAI, early testers have successfully used fine-tuning in various areas, such as being able to:

  • Make the model output results in a more consistent and reliable format.
  • Match a specific brand’s style and messaging.
  • Improve how well the model follows instructions.

The company also claims that fine-tuned GPT-3.5 Turbo models can match and even exceed the capabilities of base GPT-4 for certain tasks.

Before now, fine-tuning was only possible with weaker, costlier GPT-3 models, like davinci-002 and babbage-002. Providing custom data for a GPT-3.5 Turbo model was only possible with techniques like few-shot prompting and vector embedding.

OpenAI also assures that any data used for fine-tuning any of their models belongs to the customer, and then don’t use it to train their models.

What is GPT-3.5 Turbo, anyway?

Launched earlier this year, GPT-3.5 Turbo is a model range that OpenAI introduced, stating that it is perfect for applications that do not solely focus on chat. It boasts the capability to manage 4,000 tokens at once, a figure that is twice the capacity of the preceding model. The company highlighted that preliminary users successfully shortened their prompts by 90% after applying fine-tuning on the GPT-3.5 Turbo model.

What can I use GPT-3.5 Turbo fine-tuning for?

  • Customer service automation: We can use a fine-tuned GPT model to make virtual customer service agents or chatbots that deliver responses in line with the brand’s tone and messaging.
  • Content generation: The model can be used for generating marketing content, blog posts, or social media posts. The fine-tuning would allow the model to generate content in a brand-specific style according to prompts given.
  • Code generation & auto-completion: In software development, such a model can provide developers with code suggestions and autocompletion to boost their productivity and get coding done faster.
  • Translation: We can use a fine-tuned GPT model for translation tasks, converting text from one language to another with greater precision. For example, the model can be tuned to follow specific grammatical and syntactical rules of different languages, which can lead to higher accuracy translations.
  • Text summarization: We can apply the model in summarizing lengthy texts such as articles, reports, or books. After fine-tuning, it can consistently output summaries that capture the key points and ideas without distorting the original meaning. This could be particularly useful for educational platforms, news services, or any scenario where digesting large amounts of information quickly is crucial.

How much will GPT-3.5 Turbo fine-tuning cost?

There’s the cost of fine-tuning and then the actual usage cost.

  • Training: $0.008 / 1K tokens
  • Usage input: $0.012 / 1K tokens
  • Usage output: $0.016 / 1K tokens

For example, a gpt-3.5-turbo fine-tuning job with a training file of 100,000 tokens that is trained for 3 epochs would have an expected cost of $2.40.

OpenAI, GPT 3.5 Turbo fine-tuning and API updates

When will fine-tuning for GPT-4 be available?

This fall.

OpenAI has announced that support for fine-tuning GPT-4, its most recent version of the large language model, is expected to be available later this year, probably during the fall season. This upgraded model has been proven to perform at par with humans across diverse professional and academic benchmarks. It surpasses GPT-3.5 in terms of reliability, creativity, and its capacity to deal with instructions that are more nuanced.

10 powerful JavaScript animation libraries for engaging user experiences

Animations. A fantastic way to stand out from the crowd and grab the attention of your visitors.

With creative object motion and fluid page transitions, you not only add a unique aesthetic appeal to your website but also enhance user engagement and create a memorable first impression.

And creating animations can’t get any easier with these 10 powerful JavaScript libraries. Scroll animations, handwriting animations, SPA page transitions, typing animations, color animations, SVG animations… they are endlessly capable. They are the best.

1. Anime.js

An animation creating with Anime.js
An animation created with Anime.js.

With over 43k stars on GitHub, Anime.js is easily one of the most popular animation libraries out there.

It’s a lightweight JavaScript animation library with a simple API that can be used to animate CSS properties, SVG, DOM attributes, and JavaScript objects. With Anime.js, you can play, pause, restart or reverse an animation. The library also provides staggering features for animating multiple elements with follow-through and overlapping actions. There are various animation-related events also included, which we can listen to using callbacks and Promises.

Visit the Anime.js website

2. Lottie

An animation created with Lottie.js
An animation created with Lottie.

Lottie is a library that parses Adobe After Effects animations exported as JSON with the Bodymovin plugin and renders them natively on mobile and web applications. This eliminates the need to manually recreate the advanced animations created in After Effects by expert designers. The Web version alone has over 27k stars on GitHub.

Visit the Lottie website

3. Velocity

An animation created with Velocity.

With Velocity you create color animations, transforms, loops, easings, SVG animations, and more. It uses the same API as the $.animate() method from the jQuery library, and it can integrate with jQuery if it is available. The library provides fade, scroll, and slide effects. Besides being able to control the duration and delay of an animation, you can reverse it sometime after it has been completed, or stop it altogether when it is in progress. It has over 17k stars on GitHub and is a good alternative to Anime.js.

Visit the Velocity website

4. Rough Notation

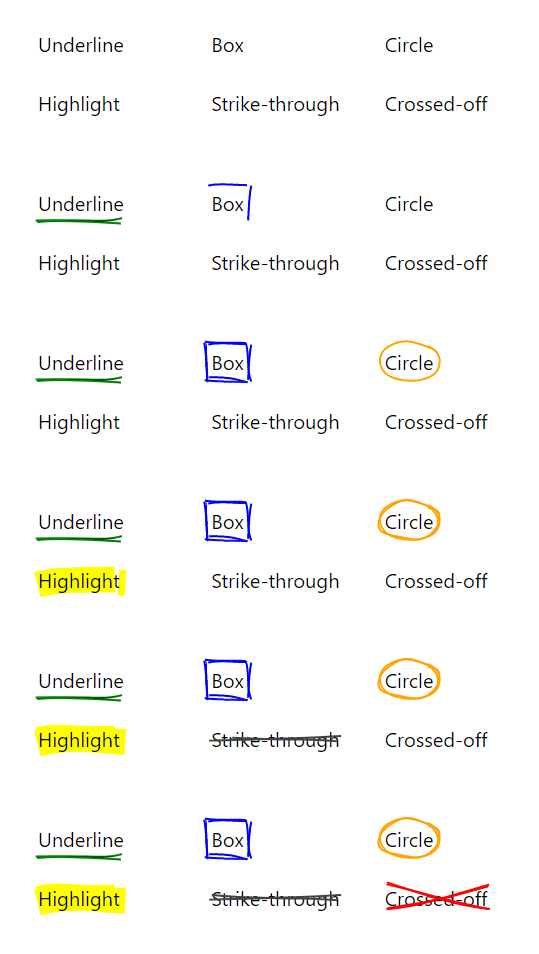
Som Rough Notation annotation styles.
Some Rough Notation annotation styles.

Rough Notation is a JavaScript library for creating and animating colorful annotations on a web page. It uses RoughJS to create a hand-drawn look and feel. You can create several annotation styles, including underline, box, circle, highlight, strike-through, etc., and control the duration and color of each annotation style.

Visit the Rough Notation website

5. Popmotion

An animation created with Popmotion.

Popmotion is a functional library for creating prominent and attention-grabbing animations. What makes it stand out? – there are zero assumptions about the object properties you intend to animate, but instead provides simple, composable functions that can be used in any JavaScript environment.

The library supports keyframes, spring and inertia animations on numbers, colors, and complex strings. It is well-tested, actively maintained, and has over 19k stars on GitHub.

Visit the Popmotion website

6. Vivus

An animation created with Vivus.

Vivus is a JavaScript library that allows you to animate SVGs, giving them the appearance of being drawn. It is fast and lightweight with exactly zero dependencies, and provides three different ways to animate SVGs: Delayed, Sync, and OneByOne. You can also use a custom script to draw an SVG in your preferred way.

Vivus also allows you to customize the duration, delay, timing function, and other animation settings. Check out Vivus Instant for live, hands-on examples.

Visit the Vivus website

7. GreenSock Animation Platform (GSAP)

An animation created with GSAP

The GreenSock Animation Platform (GSAP) is a library that lets you create wonderful animations that work across all major browsers. You can use it in React, Vue, WebGL, and the HTML canvas to animate colors, strings, motion paths, and more. It also comes with a ScrollTrigger plugin that lets you create impressive scroll-based animations with little code.

Used in over 11 million sites, with over 15k stars on GitHub, it is a versatile and popular indeed. You can use the GSDevTools from GreenSock to easily debug animations created with GSAP.

Visit the GSAP website

8. Three.js

An animation created with Three.js

Three.js is a lightweight library for displaying complex 3D objects and animations. It makes use of WebGL, SVG, and CSS3D renderers to create engaging three-dimensional experiences that work across a wide range of browsers and devices. It is a well-known library in the JavaScript community, with over 85k stars on GitHub.

Visit Three.js website

9. ScrollReveal

ScrollReveal animations.

The ScrollReveal library lets you easily animate a DOM element as it enters or leaves the browser viewport. It provides various types of elegant effects to reveal or hide an element on-scroll in multiple browsers. And quite easy to use too, with with zero dependencies and over 21k stars on GitHub.

Visit the ScrollReveal website

10. Barba.js

Page transitions created with Barba.js.

One creative way to make your website outstanding is to add lively transitions between the pages as your users navigate between them. This produces a better user experience than simply displaying the new webpage or reloading the browser.

And that’s why Barba.js is so useful; this library lets you create enjoyable page transitions by making the site run like a Single Page Application (SPA). It reduces the delay between pages and minimizes the number of HTTP requests that the browser makes. It’s gotten almost 11k stars on GitHub.

Visit Barba.js website

Bonus

11. Mo.js

An animation created with Mo.js
An animation created with Mo.js.

Great library for creating compelling motion graphics.

It provides simple, declarative APIs for effortlessly creating smooth animations and effects that look great on devices of various screen sizes. You can move HTML or SVG DOM elements, or you can create a special Mo.js object, which comes with a set of unique capabilities. It is a reliable and well-tested library, with over 1500 tests written and over 17k stars on GitHub.

Visit the Mo.js website

12. Typed.js

An animation created with Typed.js

The name says it all; an animated typing library.

It types out a specific string character by character as if someone was typing in real-time, allowing you pause the typing speed, and even pause the typing for a specific amount of time. With smart backspacing, it types out successive strings starting with the same set of characters as the current one without backspacing the entire preceding string – as we saw in the demo above.

Also included is support for bulk typing, which types out a group of characters on the screen at the same time, instead of one after the other. Typed.js has over 12k stars on GitHub and is trusted by Slack and Envato.

Visit the Typed.js website

Final thoughts

The world of web animation is vast and dynamic, constantly evolving with the advent of new technologies and libraries. The animation libraries highlighted in this article offer an array of features to create engaging, interactive, and visually appealing experiences for users. They are a testament to the power and flexibility of JavaScript, and demonstrate how animations greatly enhance the user experience.

As a developer, harnessing these tools will no doubt elevate your projects, making them stand out in an increasingly competitive digital landscape.

10 essential VS Code tips & tricks for greater productivity

73%.

Did you know that 73% of developers worldwide rely on the same code editor?

Yes, the 2023 Stack Overflow Developer Survey results are in, and yet again, Visual Studio Code was by far the most used development environment.

73% of
“Visual Studio Code remains the preferred IDE across all developers, increasing its use among those learning to code compared to professional developers”, survey.stackoverflow.co/2023

And we all know why: it’s awesome.

But are we fully exploring its potential? In this article, we unfold some compelling VS Code features that enhance productivity with local source control, animated typing, and rapid line deletion, amongst others. Let us start using them to achieve our coding goals faster than ever.

1. Timeline view: local source control

The Timeline view gives us local source control.

Many of us know how useful Git and other source control tools are, helping us easily track file changes and revert back to a previous point when needed.

So the Timeline view in VS Code provides an automatically updated timeline of important events related to a file, such as Git commits, file saves, and test runs.

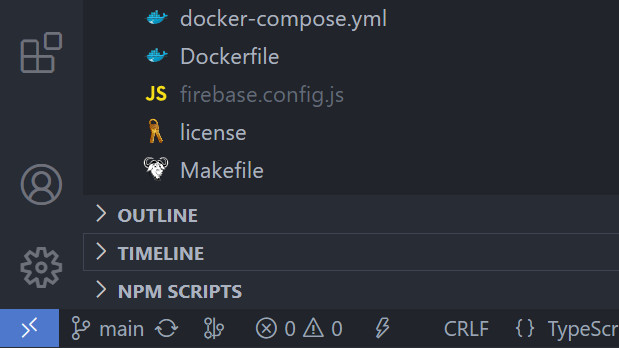
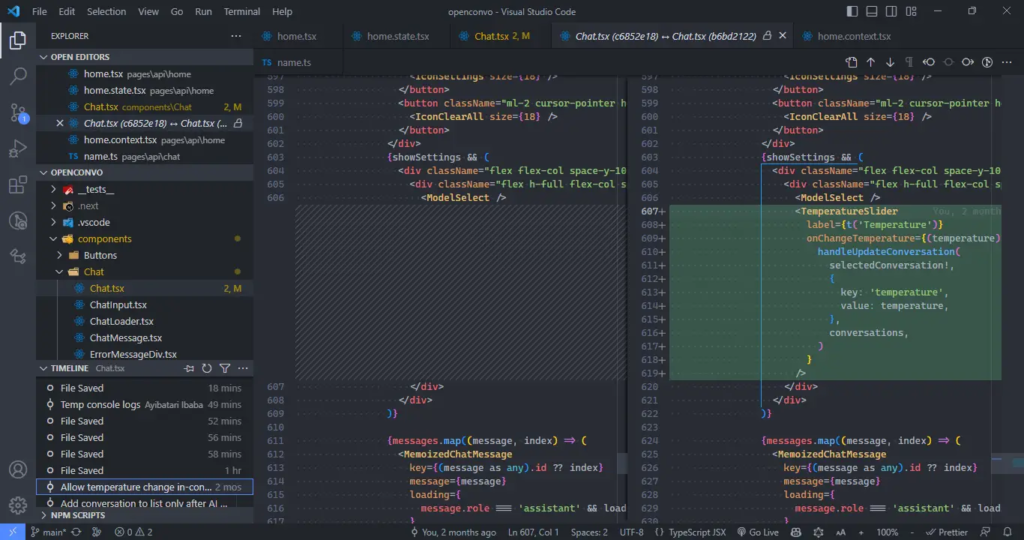
The Visual Studio Code Timeline view is available by default in the Explorer pane.

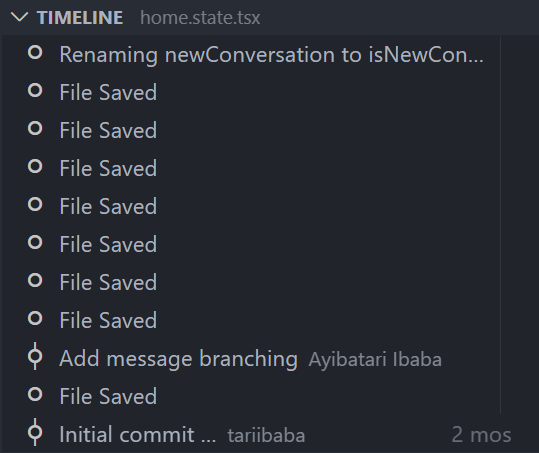
Expand this view to see a list of snapshot of events related to the current file. Here it’s file saves, but also Git commits where the file was staged.

The Timeline view shows a list of snapshot of events related to the current file.

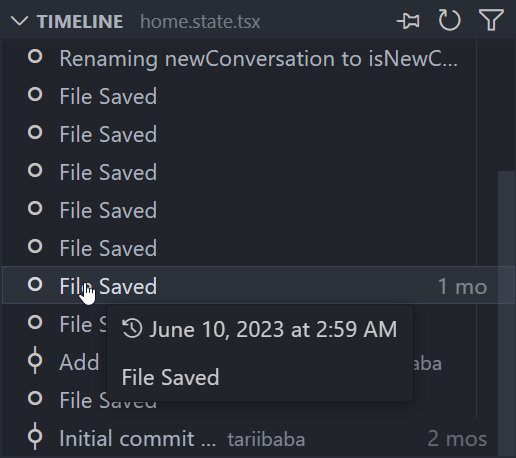
Hover over the snapshot item to view the date and time when VS Code made the snapshot.

Hover over the snapshot item to view the date and time when VS Code made the snapshot.

Select a snapshot item to see a diff view showing the changes between the file at the snapshot time and the file presently.

Select a snapshot item to see a diff view showing the changes between the file at the snapshot time and the file presently.

2. Autosave: no more Ctrl + S

Can you count how many times you’ve used this shortcut? You probably do it unconsciously now.

The Autosave feature automatically saves files as we work on them, removing the need for manual saving. With autosave, we eliminate Ctrl + S fatigue, save time, and gain certainty of always working with the latest changes to the files.

It’s not perfect though, and it’s up to you to weigh the pros and cons – which we comprehensively cover here.

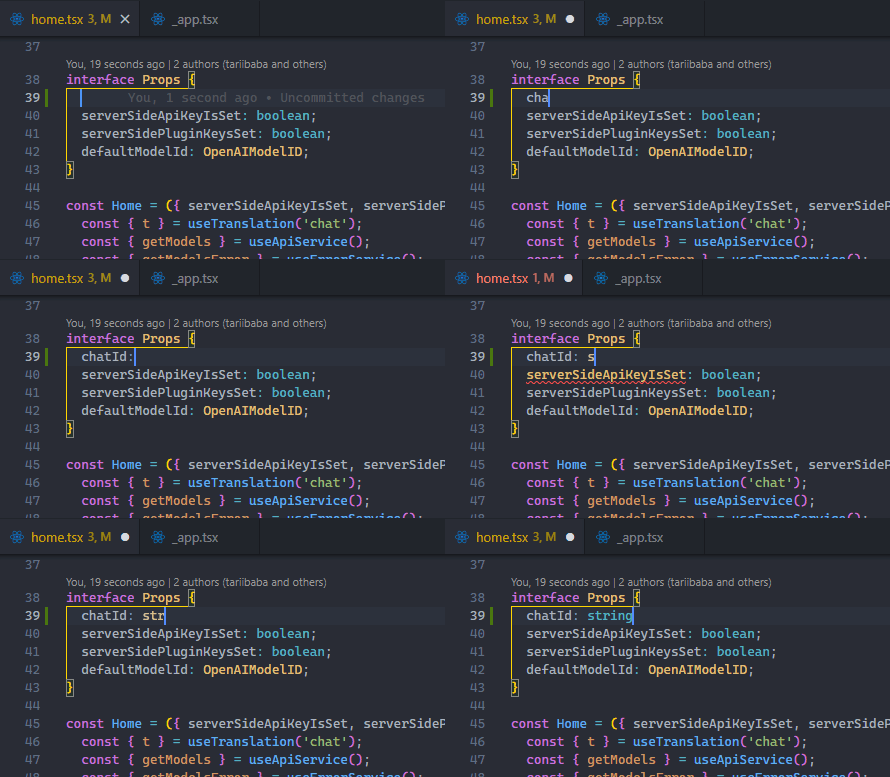
Visual Studio Code without autosave.
No autosave.
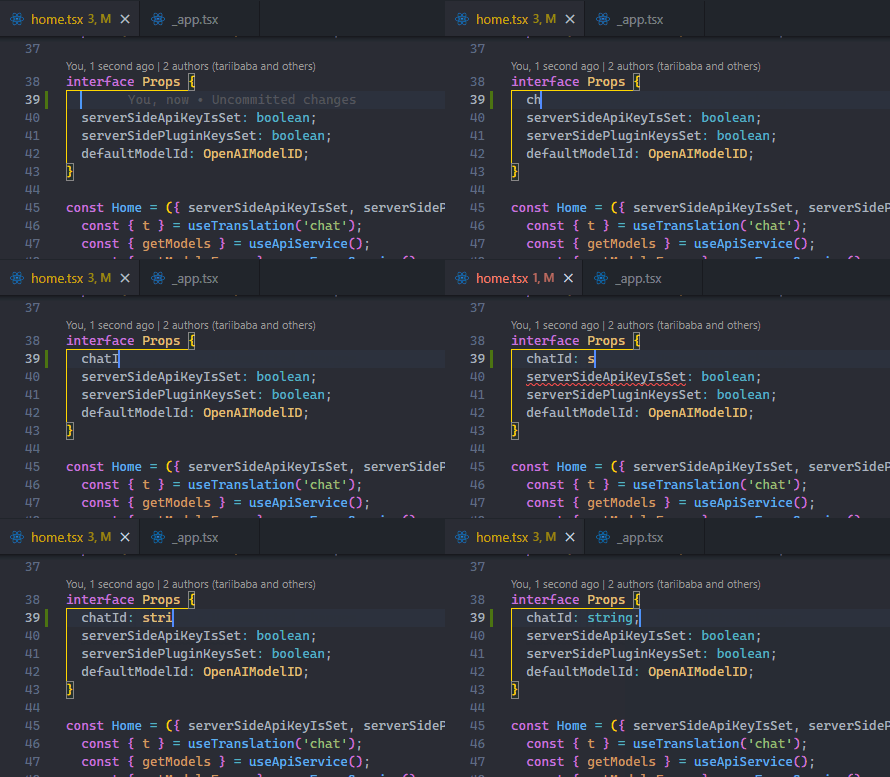
Visual Studio Code with autosave.
Autosave enabled – the unsaved indicator no longer shows.

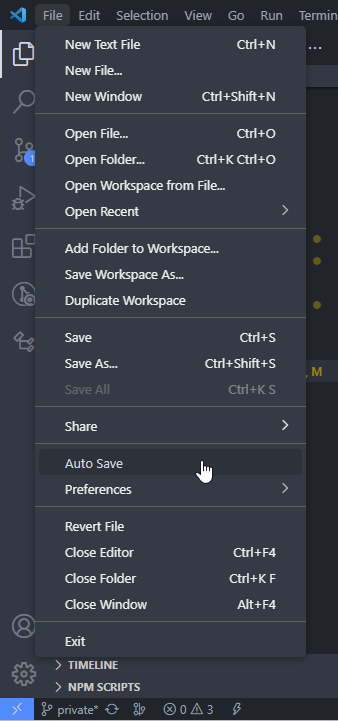
Use File > Auto Save to enable the feature easily.

File > Autosave enables autosave in VS Code.

3. Do anything with Command Palette

Almost anything you do in VS Code apart from typing is a “Command”.

Commands let us accomplish tasks within the editor, and they include file-related commands, navigation commands, editing commands, and terminal commands, each optimally designed to enhance different aspects of your editing experience.

So with Command Palette we simply search for a command and select to perform the associated action.

To open the Command Palette, use this keyboard shortcut:

  • Windows/Linux: Ctrl + Shift + P
  • Mac: Shift + Command+ P
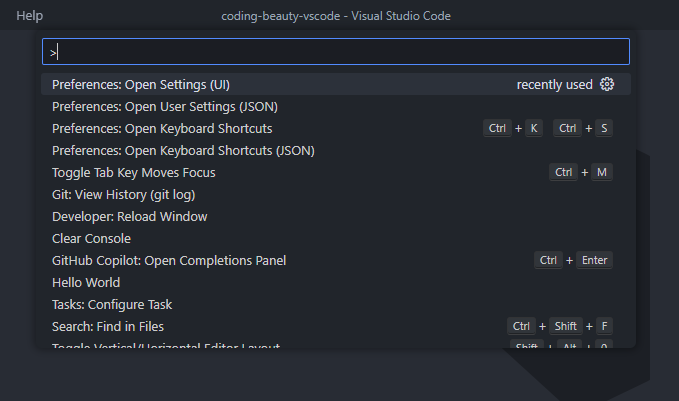
The VS Code Command Palette.

As you guessed correctly, those keyboard shortcuts to the right are a faster way to run the commands with the keyboard.

The key benefit of the Command Palette over shortcuts is when there’s a command without a shortcut, or you’re looking for a command you’re not sure exists.

4. Go to file quickly

The mouse is too slow.

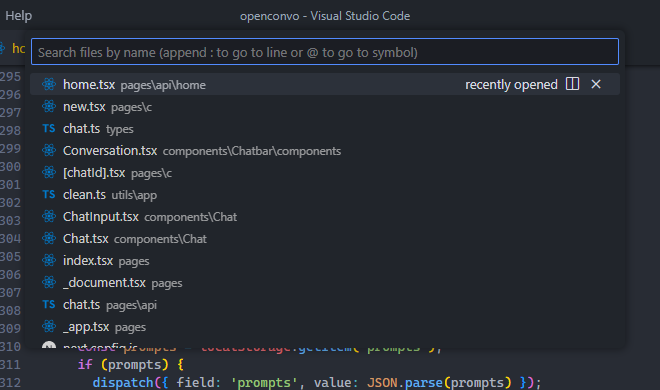
Yes, you can click on the file in the Explorer pane, but for a much faster alternative use Ctrl + P to search for and open a specific file in your project.

Use Ctrl + P to search for an open a specific file in a VS Code project.

Hold Ctrl and press Tab to cycle through the list of files currently open in an editor instance.

Hold Ctrl and press Tab to cycle through the list of files currently open in an editor instance.

You can even use Alt + Left and Alt + Right to quickly navigate between these open files.

All these are much faster ways to get to a file than using the cursor.

5. Go to line quickly

Jump, don’t scroll.

Quickly navigating to a line is invaluable during debugging when you need to encounter errors at specific line numbers. By jumping to those lines, you can examine the code in that particular context, evaluate variables, and troubleshoot the issue.

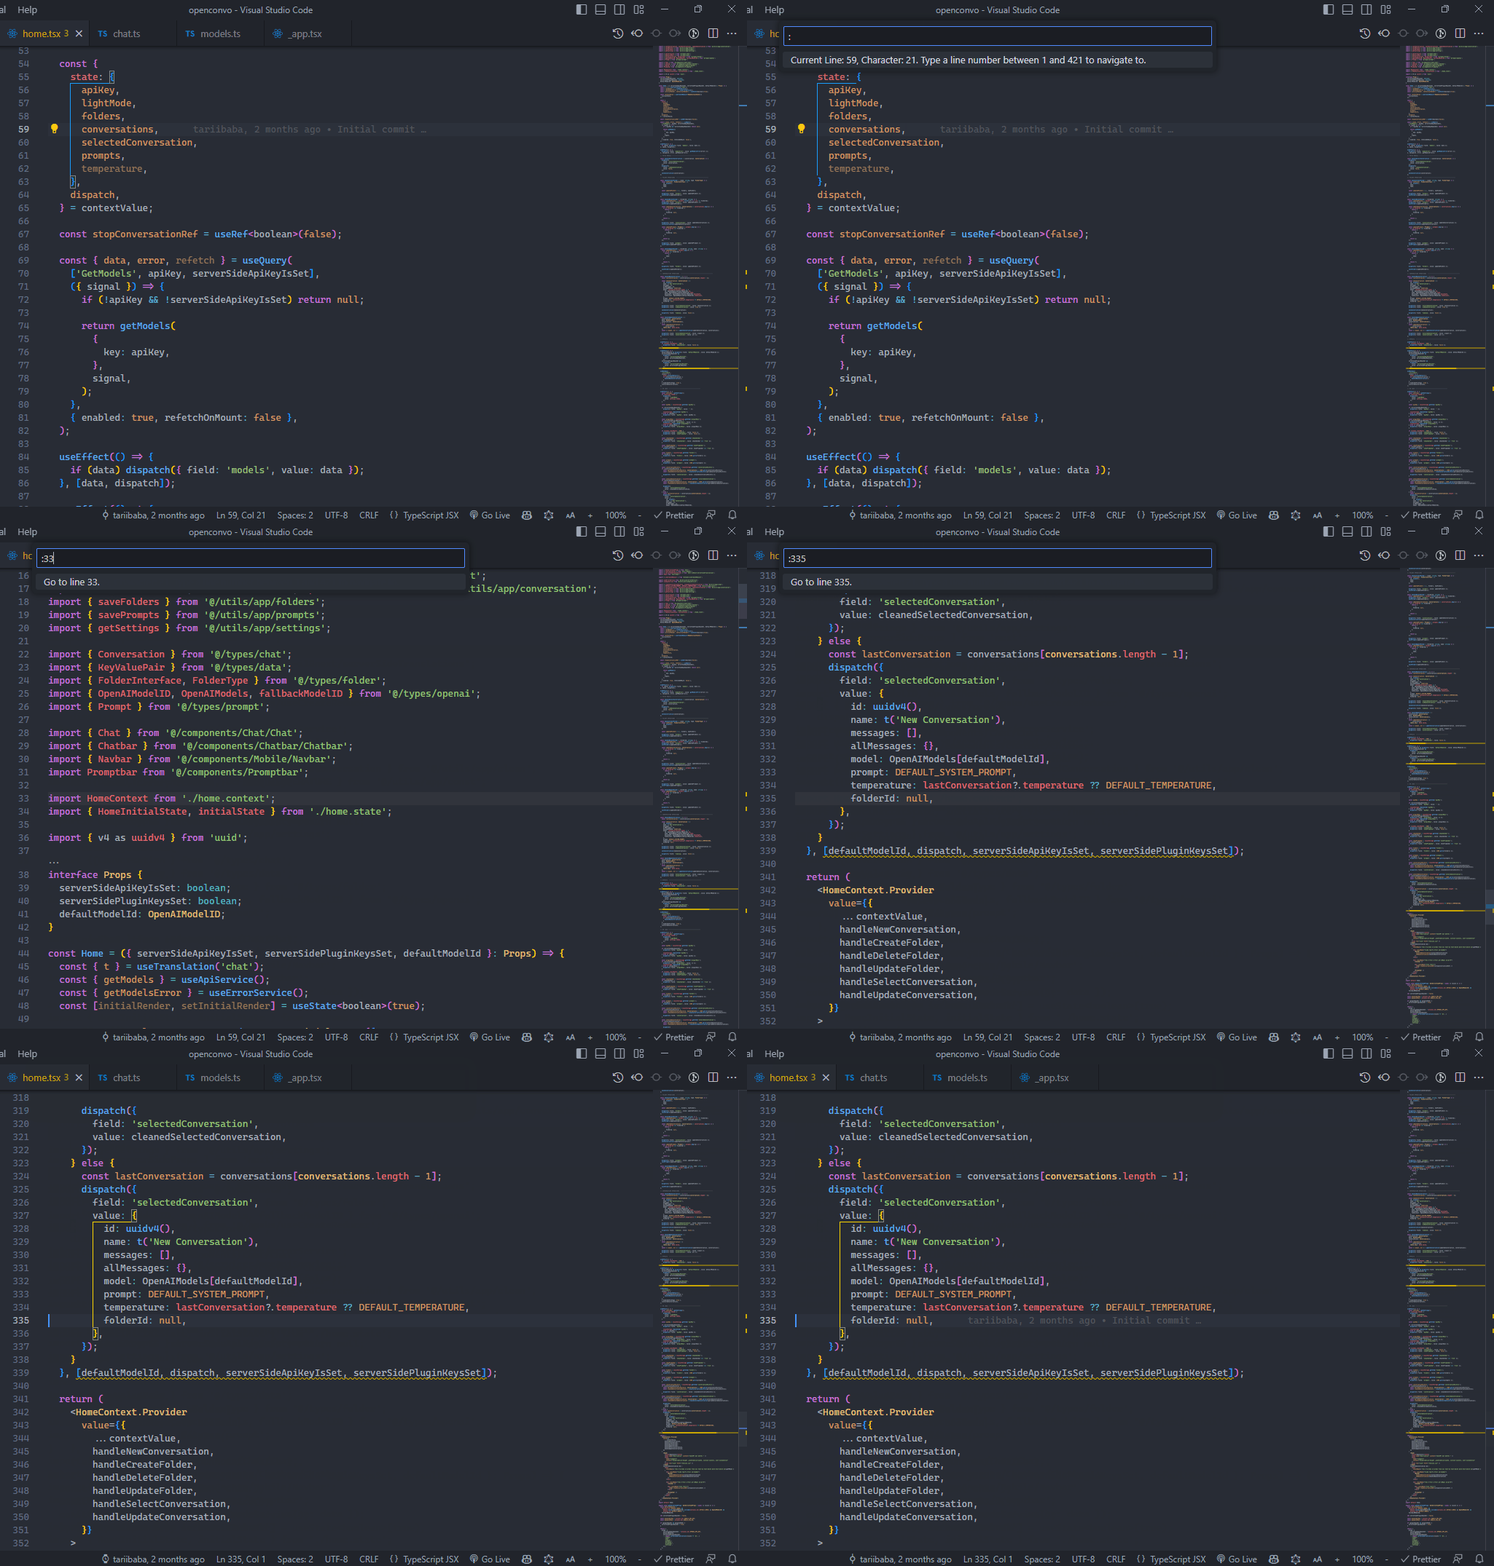
Use the Ctrl + G keyboard shortcut for this.

Use the Ctrl + G keyboard shortcut to quickly navigate to a particular line in Visual Studio Code.

6. Delete line quickly

You’ve got to the line now, what if you want to delete it?

Will you drag and drag to highlight and then press Delete? Will you tirelessly press Backspace until every character is gone?

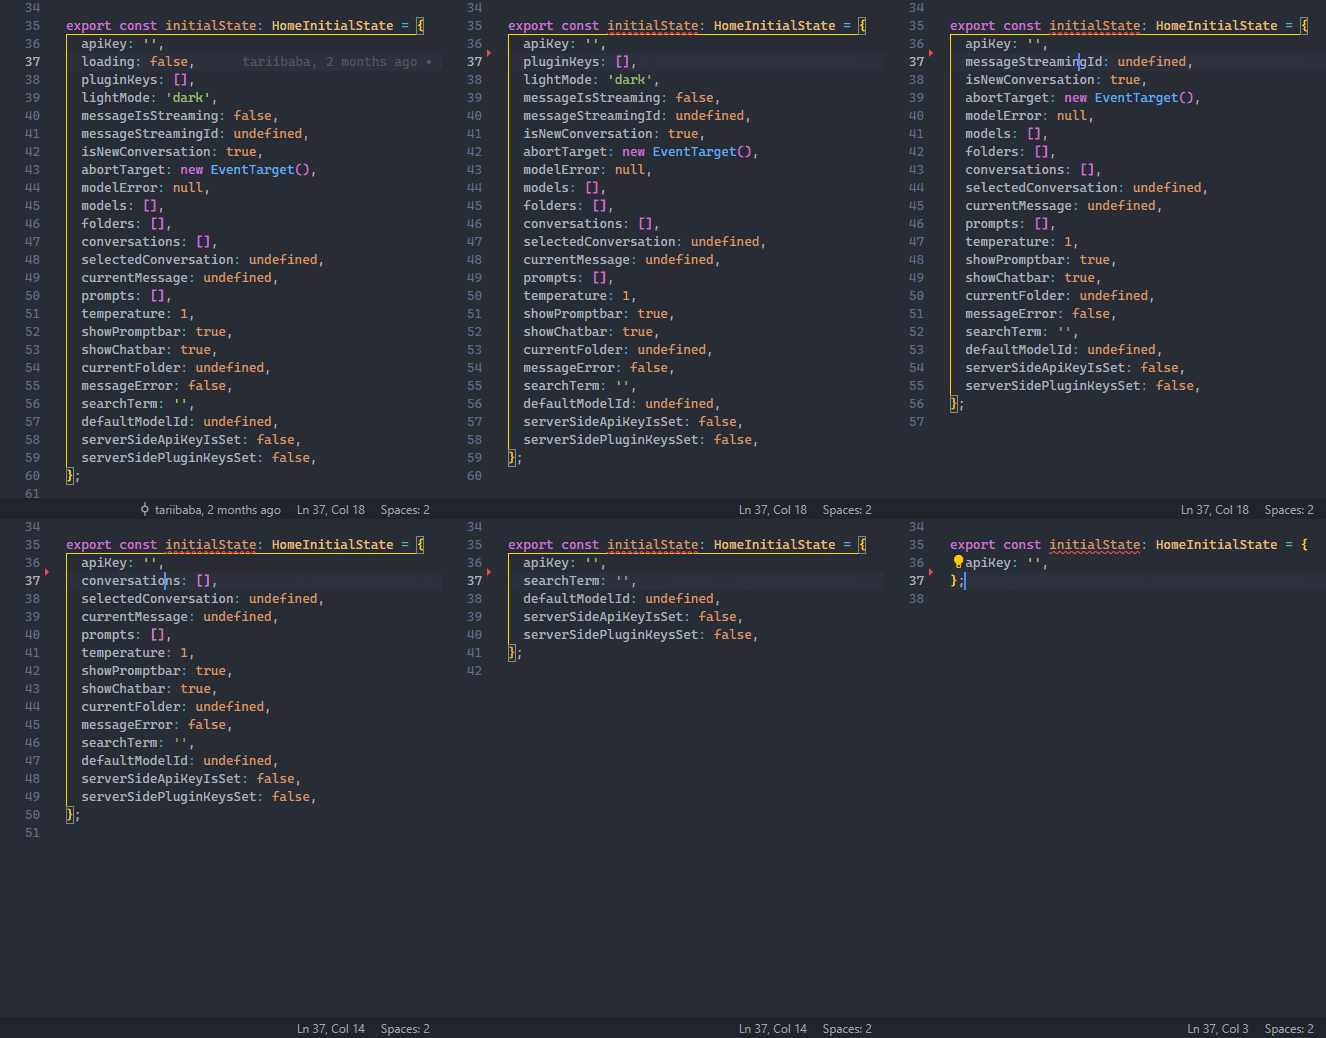
Or, will you use the Ctrl + Shift + K shortcut to rapidly delete that and dozens more lines in a matter of seconds?

Use the Ctrl + Shift + K keyboard shortcut to quickly delete a line.

7. Enjoy typing with smooth cursor

VS Code has this smooth cursor feature that animates the cursor as it moves, like in MS Word. This makes typing feel more fluid and polished, as well as giving us a smoother and more natural feel as we navigate through the lines of code and place the cursor at different points.

Smooth scrolling in Visual Studio Code.

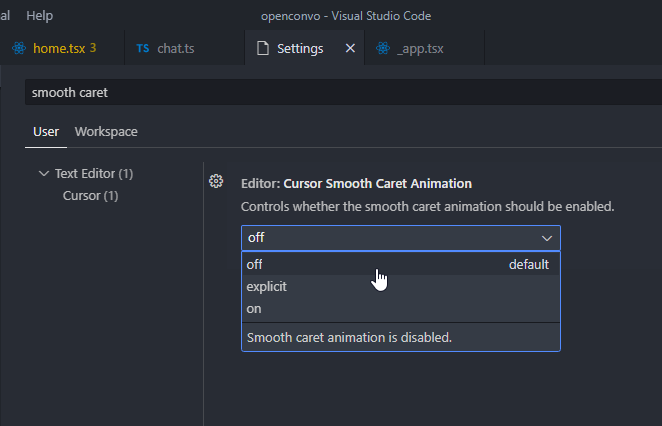
To turn it on, opens Settings UI in the Command Palette and search for “smoot caret”.

We are looking for Editor: Cursor Smooth Caret Animation setting, which has 3 possible options:

The "Editor: Cursor Smooth Caret Animation" setting enables smooth caret animation in Visual Studio Code.
  1. off: No smooth cursor animation
  2. explicit: Only animates the cursor when we explicitly place it somewhere in the code.
  3. on: Smooth cursor animation is always enabled – including when typing.

Set it to on to get the full visual experience.

8. Format code rapidly

Formatting is all about improving code readability by organizing it in a structured and consistent manner.

And if you’ve been doing this manually, you need to know that there’s a better way.

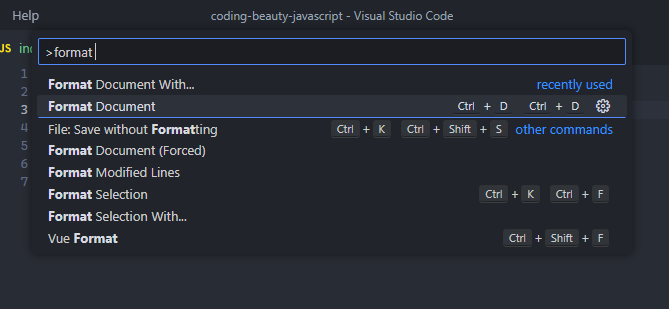
Yes, you need to start formatting code automatically with the Format Document command, easily accessible in the Command Palette. Depending on the current file’s language, a particular “default” formatter will be used to format the code using various rules of indentation, line length, braces and brackets, etc.

The "Format Document" command in the VS Code Command Palette.

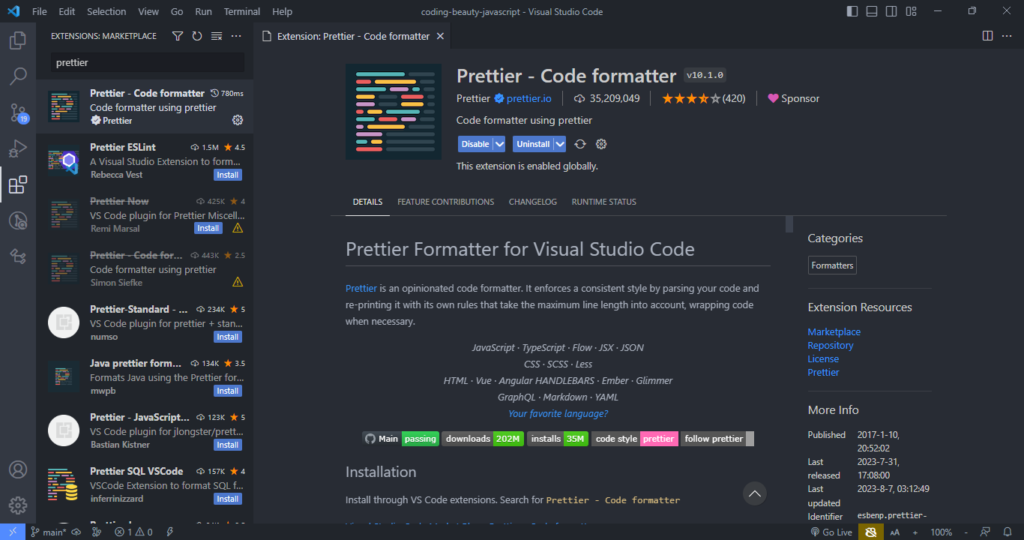
While there’s a pretty decent built-in JS/TS formatter, for a more robust solution, I highly recommend the Prettier extension.

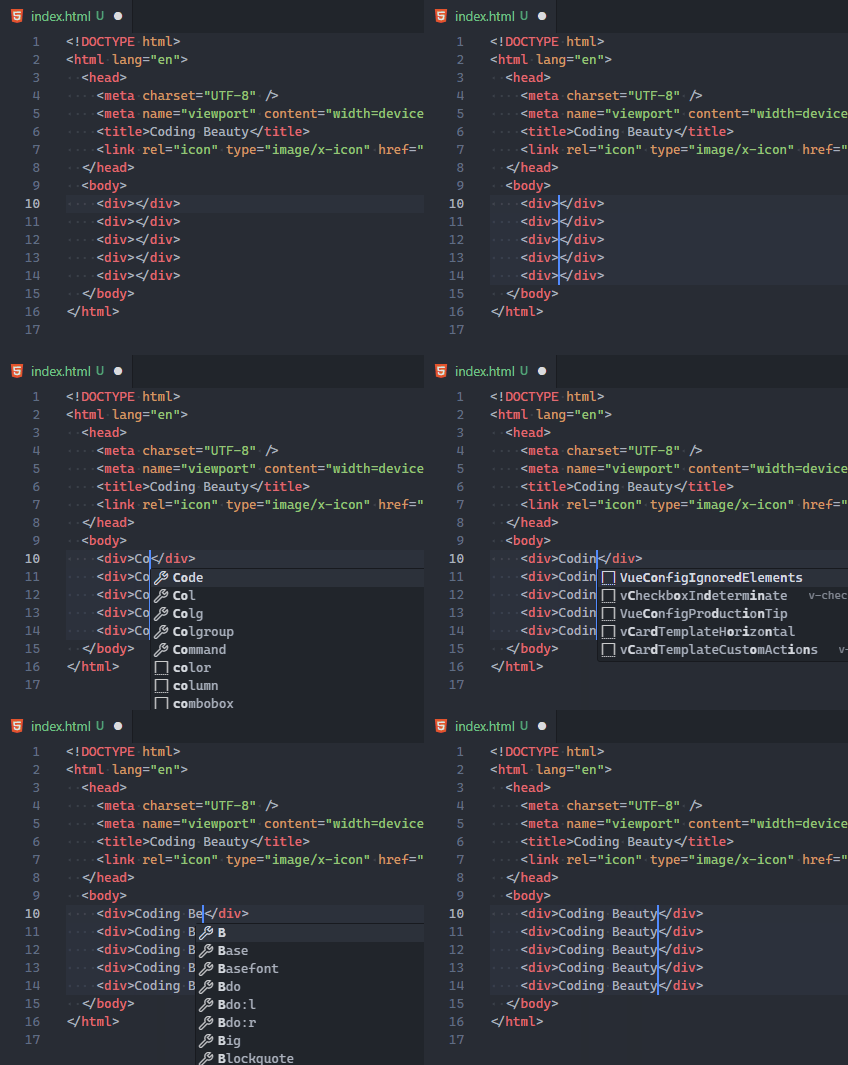
Format On Save in action in Visual Studio Code.
The Prettier formatter for VS Code.

After installing, you’ll set it as your default formatter.

When you use manual over autosave, there’s a feature you should enable to make formatting a bit easier:

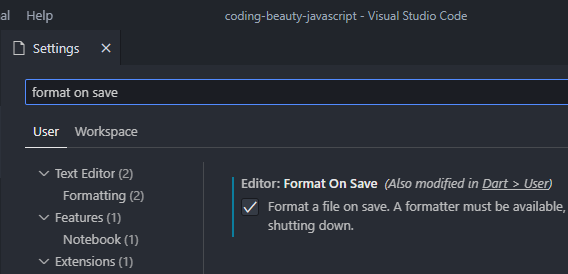
Enabling the "Editor: Format On Save" setting in VS Code.
  • Editor: Format On Save: “Format a file on save. A formatter must be available, the file must not be saved after delay, and the editor must be shutting down”. It is disabled by default.

So with this setting on, VS Code will automatically format your code with the current default formatter when you save the file with Ctrl + S, as you saw in the above demo.

Format On Save in action in Visual Studio Code.

When you do autosave, it can get tedious to continuously open the Command Palette when you’re formatting every now and then. And that’s what keyboard shortcuts are for:

  • Windows: Shift + Alt + F
  • Mac: Shift + Option + F
  • Linux: Ctrl + Shift + I

I’m on Windows and personally, I don’t like this default keyboard shortcut; autosave makes me format every now and then, and Shift + Alt + F got agonizing after a while.

So I changed it to Ctrl + D, Ctrl + D – a keyboard shortcut chord that’s much easier to press and remember, and has no conflicting keybinding. I recommend you do the same.

9. Save time with multi-cursor editing

One of the wow moments in my earliest VS Code days, the multi-cursor editing lets you place multiple cursors at different points, and delete or insert the same text multiple times. This speeds up editing time and boosts productivity greatly, as we get repetitive tasks done efficiently with rapid code creation.

Of course, when editing, there’s always at least one cursor. Use Alt + Click to add more.

Add multiple cursors with Alt + Click in VS Code.

You can also easily add a cursor directly above or below the current line, with Ctrl + Alt + Down or Ctrl + Alt + Up.

Add a cursor below in Visual Studio Code with the Ctrl + Alt + Down keyboard shortcut.

These shortcuts call the Add Cursor Below and Add Cursor Above commands respectively.

10. Create new folder / file quickly

There’s no serious project where we don’t create new folders and files, and if there was a way to accelerate file/folder creation, all the time saved would add up to give us a significant productivity enhancement.

If you’ve been creating new files and folders in VS Code with the new file and new folder button, then yes, there is a way.

Creating a new file/folder in VS Code with the buttons take time.
Yeah, don’t do this.

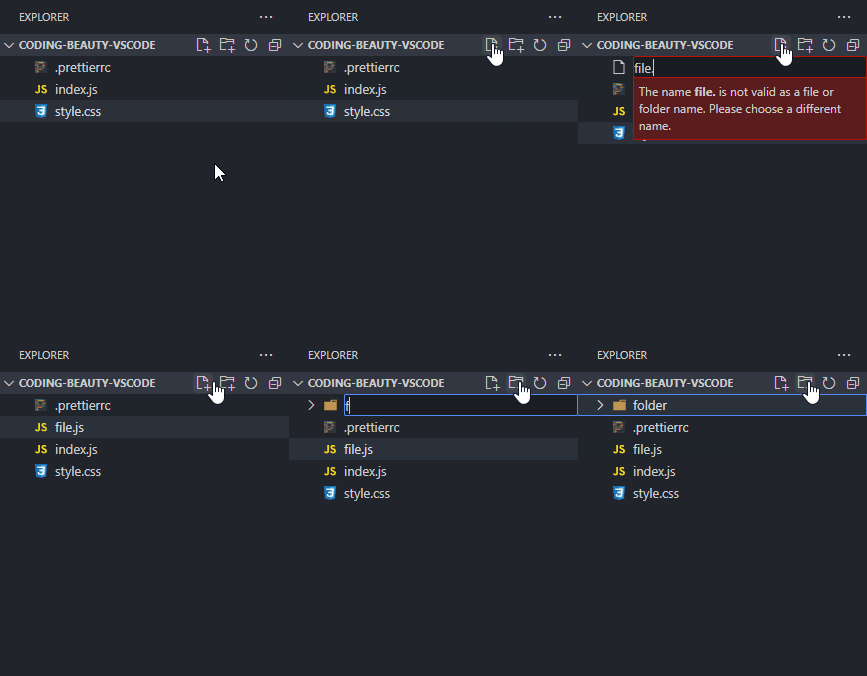
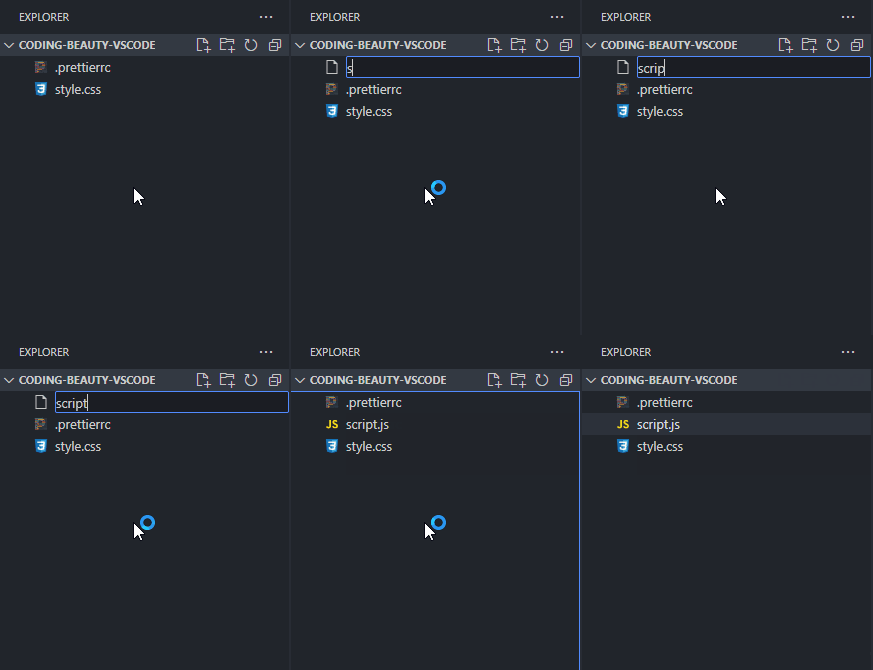
Instead of constantly moving your mouse to locate those small buttons, did you know you can just double-click on the Explorer panel to create a new file?

Double-clicking to create a new file in Visual Studio Code.

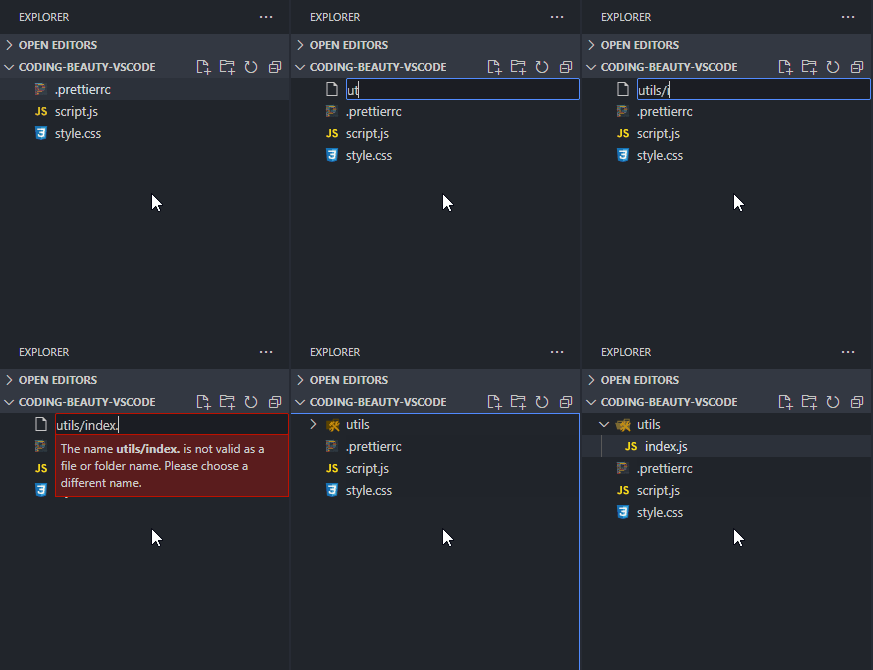
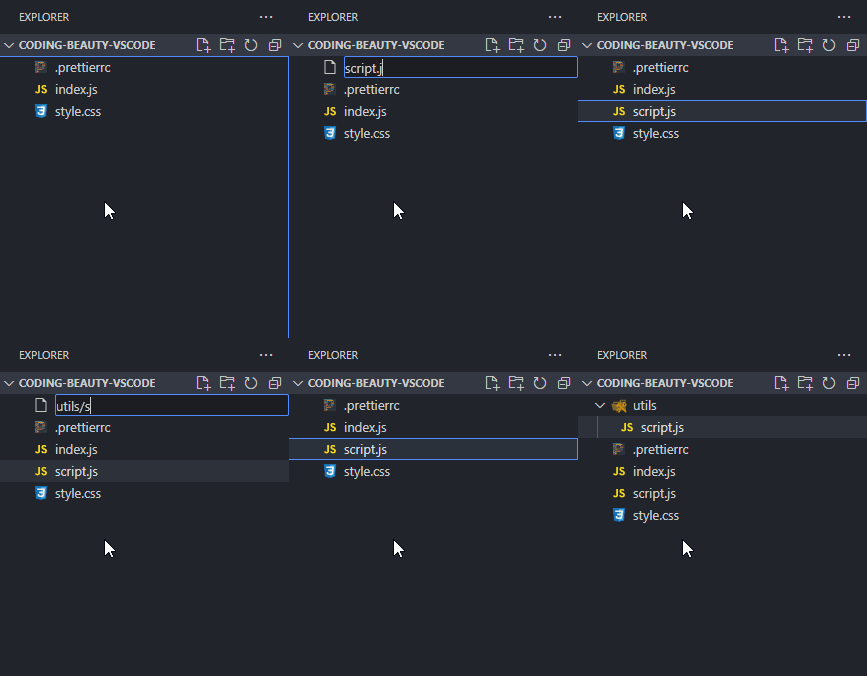
How about a new folder? Well, folders are nothing without files, and when you’re creating a new file, you can easily use the / character to indicate a hierarchy and create new folders and sub-folders to contain that file.

Using the forward-slash (/) to indicate a hierarchy and create new folders and sub-folders to contain that file
The utils folder is created to contain index.js.

It would be even more efficient to use keyboard shortcuts, which is what I did.

As a former Atom fan, I had quickly gotten used to the A and Shift + A shortcuts for creating new files and folder respectively; I knew what I had to do.

Creating a new file/folder in VS Code with keyboard shortcuts.
Create shortcuts to create a new file/folder in VS Code.

Since A and Shift + A are obviously keys used to code, I included the when values here to make sure they only create a new file/folder when the Explorer pane has focus and there’s no active cursor in the current editor.

So to use these shortcuts when typing, you’ll have to focus on the explorer pane first; click on it, or use Ctrl/Command + Shift + E.

Key takeaways

  • Enable local source control with Timeline view; available in Explorer pane by default.
  • Autosave files with File > Autosave.
  • Run commands in Command Palette with Ctrl + Shift + P or Shift + Command + P.
  • Go to a file with Ctrl + P, navigate between open files with Alt + Left/Right or Ctrl + Tab.
  • Go to a line with Ctrl + G.
  • Delete a line with Ctrl + Shift + K
  • Enable smooth typing with Editor: Cursor Smooth Caret Animation setting.
  • Format code with Format Document command, use Prettier, change shortcut to Ctrl + D, Ctrl + D
  • Use multiple cursors at once with Alt + Click, Ctrl + Alt + Up/Down adds one above/below
  • Move a line up or down with Alt/Option + Up/Down in Windows/Mac
  • Create a new file by double-clicking the Explorer pane or set a custom keyboard shortcut. Create a new file in a new folder with “folder/file.ext

Check out the VS Code Key Bindings docs to learn more about keyboard shortcuts and how to customize them. It includes a complete list of all the default VS Code shortcuts in your operating system.

Final thoughts

Visual Studio Code is more than just a text editor—it’s a powerful tool that, when mastered, can significantly boost your productivity and streamline your coding workflow. The ten tips and tricks we’ve explored are just the tip of the iceberg. As you continue to navigate through VS Code, you will discover a myriad of other features and shortcuts that will further enhance your coding experience. So, keep exploring, keep learning, and remember: the key to efficient coding lies not just in the code itself, but also in the tools you use to write it.

This new ES7 feature made my math 3 times easier

But 5 lines of Java is one line of Python.

How many times have you heard something like that from lovers of the later?

Seems like they love to trash languages they stubbornly believe are verbose. I came to see that “Pythonic” is something truly cherished by our friends in the Python community.

Your Python code works, and so what? Where is elegance? Where is readability?

Think you can write a simple for loop and get away with it?

Python
total = 0 for i in range(1, 11): total += i print("The sum of the first 10 numbers is:", total)

Just wait till one of them find out — to say you’ll face severe criticism is an understatement.

Because apparently — and I kind of agree — it’s just not “beautiful” or concise enough.

To be “Pythonic” is best.

JavaScript
total = sum(i for i in range(1, 11)) print("The sum of the first 10 numbers is:", total)

An ES7 feature that brings syntactic sugar and conciseness

The ** operator.

This one almost always comes up in Python’s favor when talking about language conciseness, up there with generators and the // operator.

It’s good to know JavaScript now has this feature, over 6 years ago in fact.

But it was surprising to know that a sizeable number of our fellow JavaScripters never knew it’s in the language.

It’s now effortless to get the power of a number, with the ** operator. Instead of Math.pow(a, b), you do a ** b.

JavaScript
const result = Math.pow(10, 2); console.log(result); // 100 const result2 = Math.pow(2, Math.pow(3, 2)); console.log(result2); const result3 = 10 ** 2; console.log(result3); // 100 const result4 = 2 ** 3 ** 2; console.log(result4) // 512

We don’t need a function for such a common math operation anymore.

You can even pass a decimal number as a power with **Math.pow() can do this too:

JavaScript
const result = Math.pow(49, 1.5); console.log(result); // 343 const result2 = 49 ** 1.5; console.log(result2); // 343

And it’s not only a drop-in replacement for Math.pow(); ** can take BigInts too:

JavaScript
// ❌ Error: Cannot convert a BigInt value to a number const result1 = Math.pow(32n, 2); console.log(result1);
JavaScript
const result2 = 32n ** 2n; console.log(result2); // 1024n

BigInts let us represent numbers of any size without losing precision or experiencing overflow errors.

JavaScript
const veryLargeNumber = 1234567890123456789012345678901234567890n; console.log(typeof veryLargeNumber); // "bigint" console.log(veryLargeNumber * 2n); // 2469135780246913578024691357802469135780n

You can see that we simply add an n at the end of the digits to make it a BigInt.

Final thoughts

Language wars are a fun programmer pastime.

It’s always fun to debate about which programming language is more elegant and concise.

But at the end of the day, we’ve got to keep in mind that writing readable and maintainable code is what matters most.

In this article, we saw that the ** operator introduced in ES7 for JavaScript is a neat trick that can make your code more concise, and it even works with BigInts!

More features keep getting added every year — ES13 was released in 2022 — to increase and add more syntactic sugar.

So, keep exploring the possibilities of your favorite programming language, and have fun coding!