
tutorial

How to Get the Length of a Map in JavaScript

To get the length of a map in JavaScript, we use it’s size property, e.g., console.log(map.size).

JavaScript
const map = new Map(); map.set('user1', 'John'); map.set('user2', 'Kate'); map.set('user3', 'Peter'); // 👇 Get length of map console.log(map.size); // 3

Map size, set(), and delete() methods

A Map object’s size property stores of key-value pairs in the object.

As the set() method adds elements and delete() removes them, the size property changes accordingly.

When we add a new element to a map with the set() method, the size property goes up by 1. In the same way, when we remove an element from the map with delete() the size goes down by 1.

JavaScript
const map = new Map(); map.set('user1', 'John'); console.log(map.size); // 1 map.set('user2', 'Kate'); console.log(map.size); // 2 map.delete('user1'); console.log(map.size); // 1

Map size vs Array length

Of course, a map and an array serve different purposes, but each has a property that gives the length of items it stores, length for arrays, and size for maps.

One key difference between the two is that you can change an array’s length property directly.

JavaScript
const arr = []; arr.push('Pat'); arr.push('Matt'); console.log(arr.length); // 2 // 👇 Array length changed arr.length = 1; console.log(arr.length); // 1

but you can’t do the same for maps:

JavaScript
const map = new Map(); map.set('user1', 'Pat'); map.set('user2', 'Matt'); console.log(map.size); // 2 map.size = 5; // 👇 length can't be modified directly console.log(map.size); // 2

You can only change size with methods like set() and delete(), as we saw earlier.

When you change Array length to a lesser value directly, elements are chopped off the end.

JavaScript
const arr = ['Pat', 'Matt']; // 👇 Length decreased directly arr.length = 1; // No more 'Matt' console.log(arr); // ['Pat']

On the other hand, when you directly change the Array length to a greater value, empty placeholder elements get added from the end of the array:

JavaScript
const arr = ['Pat', 'Matt']; // 👇 Length increase directly arr.length = 3; // Empty item added console.log(arr); // [ 'Pat', 'Matt', <1 empty item> ]

While this works, I would recommend Array splice() to remove elements from an array, so you have greater control over the deletion and can access the deleted elements.

With splice() you can set the start index for the deletion, the number of elements to delete, and new elements that should be inserted in their place.

JavaScript
const arr = ['Pat', 'Matt']; // Delete 1 element at index 1 (2nd element) const deleted = arr.splice(1, 1); console.log(deleted); // ['Matt'] const arr2 = ['Pat', 'Matt']; // Delete 1 element at index 1 (2nd element) and insert 'John' at index 1 const deleted2 = arr2.splice(1, 1, 'John'); console.log(deleted2); // ['Matt']

Clear Map with clear() method

What the Map clear() method does should be pretty obvious from its name; it clears the map of all its elements:

JavaScript
const map = new Map(); map.set('user1', 'John'); map.set('user2', 'Kate'); map.set('user3', 'Peter'); console.log(map.size); // 3 map.clear(); console.log(map.size); // 0

Key takeaways

  • To get the length of a map in JavaScript, use the size property of the map object.
  • size updates when you add or remove elements with set(), delete() or clear().
  • Unlike arrays, you can’t change the size of a map directly.

How to Easily Handle the onPaste Event in React

To handle the onPaste event on a React element, set its onPaste prop to an event handler. You can get the pasted text from the handler using event.clipboardData.getData('text').

For example:

JavaScript
import React, { useState } from 'react'; export default function App() { const [pasted, setPasted] = useState(''); const handlePaste = (event) => { setPasted(event.clipboardData.getData('text')); }; return ( <div> <input placeholder="Message" onPaste={handlePaste} type="text" id="message" /> <br /> You pasted: <b>{pasted}</b> </div> ); }
Handling the onPaste event on an element in React

The function (event listener) passed to the onPaste prop is called when the user pastes text into the input field.

The event object has various properties and methods used to get more info and take actions concerned with the event.

For the paste event, event has a clipboardData property that stores the data stored on the clipboard.

getData() gives us the data in the clipboard in a particular format. We pass 'text' as the first argument to get text data.

For the purposes of our example, we create a state that’ll be updated to the latest text data pasted in the input field. We display this text to the user.

Note: We used the useState hook to manage the state. This hook returns an array of two values, where the first is a variable that stores the state, and the second is a function that updates the state when it is called.

Handle onPaste event in entire window

To handle the paste event on the entire document window in React, set a paste event handler on the window object with addEventListener():

JavaScript
import React, { useState, useEffect } from 'react'; export default function App() { const [pasted, setPasted] = useState(''); useEffect(() => { const handlePaste = (event) => { setPasted(event.clipboardData.getData('text')); } window.addEventListener('paste', handlePaste) return () => { window.removeEventListener('paste', handlePaste) }; }) return ( <div> Pasted: <b>{pasted}</b> <br /> <input placeholder="Message" type="text" id="message" /> <br /> <input placeholder="Sender" type="text" id="sender" /> </div> ); }
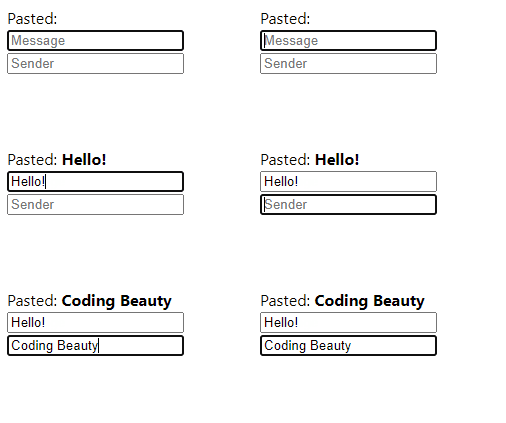
Handling the onPaste event in the entire window in React

The addEventListener() method takes up to two arguments:

  1. type: a string representing the event type to listen for. 'paste' is for a paste event.
  2. listener: the function called when the event fires.

It also takes some optional arguments, which you can learn more about here.

We call addEventListener() in the useEffect hook to register the listener once the component renders as the page loads. We pass an empty dependencies array to useEffect so this registration happens only once. In the cleanup function, we call the removeEventListener() method to unregister the event listener and prevent a memory leak.

As we saw earlier, the event object has many methods and properties that let us get more info and take event-related actions.

For the paste event, event has a clipboardData property that contains the data stored on the clipboard.

The clipboard.getData() is the clipboard data in a specific format. Like before, we pass 'text' as the first argument to get text data.

Get clipboard data without paste

We may not want to wait for the user to do a paste before getting the clipboard data. In a case like this, the clipboard.readText() method from the navigator object helps:

JavaScript
import React, { useState } from 'react'; export default function App() { const [pasted, setPasted] = useState(''); const handlePaste = async (_event) => { const clipboardText = await navigator.clipboard.readText(); setPasted(clipboardText); } return ( <div> Pasted: <b>{pasted}</b><br /> <button onClick={handlePaste}>Paste</button> </div> ); }
Getting the clipboard data without pasting.

Here we wait for a click before getting the text in the clipboard.

readText() is an async method, so we await it in an async event handler to get the Promise‘s result.

Note

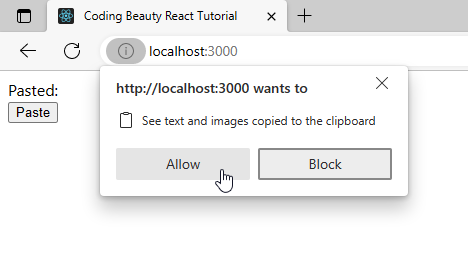
Before the browser can read clipboard data, it’ll show the user a dialog to grant permission first:

Browser shows popup to grant clipboard permissions.

Prevent onPaste event in React

Like for many other events, we can prevent the default UI action of the paste event with event.preventDefault() in the handler:

JavaScript
import React, { useState, useEffect } from 'react'; export default function App() { const [pasted, setPasted] = useState(''); useEffect(() => { const handlePaste = (event) => { // 👇 Prevent default paste UI action event.preventDefault(); setPasted(event.clipboardData.getData('text')); } window.addEventListener('paste', handlePaste) return () => { window.removeEventListener('paste', handlePaste) }; }) return ( <div> Pasted: <b>{pasted}</b> <br /> <input placeholder="Message" type="text" id="message" /> <br /> <input placeholder="Sender" type="text" id="sender" /> </div> ); }
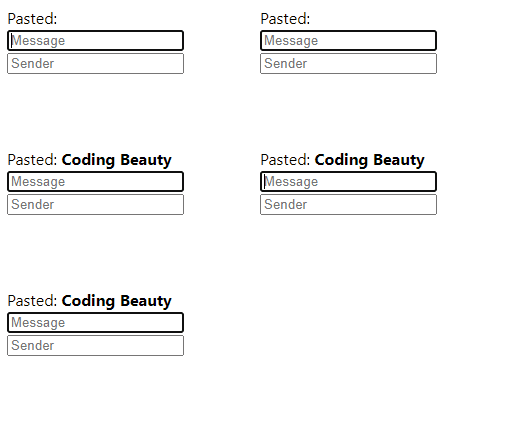
Preventing the default paste action.

Key takeaways

To listen for pastes on an element and get clipboard text, we can use the event.clipboardData.getData() method. We can also handle pasted events on the entire window with window.addEventListener() and prevent the default UI action using event.preventDefault().

To get clipboard data without pasting, we use the clipboard.readText() method. These methods are useful for copying and pasting text between fields and preventing pasting behavior we don’t want.

How to Get the Current Page URL in React

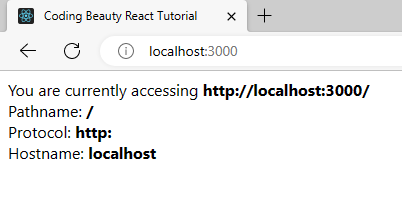
We use the window.location.href property to get the current page URL in React.

For example:

JavaScript
import { useRef } from 'react'; export default function App() { const url = window.location.href; return ( <div> You are currently accessing <b>{url}</b> </div> ); }
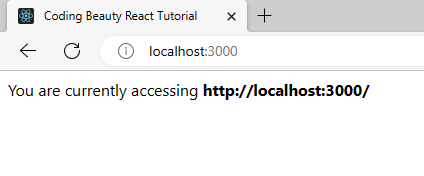
Displaying the current URL in React.

We can use this same approach to get the current URL in Next.js

The window.location.href property returns a string that contains the entire page URL.

window.location contains other properties that give more information on the URL. Some of them are:

  • pathname: the path of the URL after the domain name and any optional port number.
  • protocol: the protocol scheme of the URL.
  • hostname: the hostname portion of the URL.

Here are some examples of using these properties to get various URL properties in addition to the full URL.

JavaScript
export default function App() { const url = window.location.href; const pathname = window.location.pathname; const protocol = window.location.protocol; const hostname = window.location.hostname; return ( <div> You are currently accessing <b>{url}</b><br /> Pathname: <b>{pathname}</b><br /> Protocol: <b>{protocol}</b><br /> Hostname: <b>{hostname}</b> </div> ); }
Displaying various URL properties.

Get current route in React Router

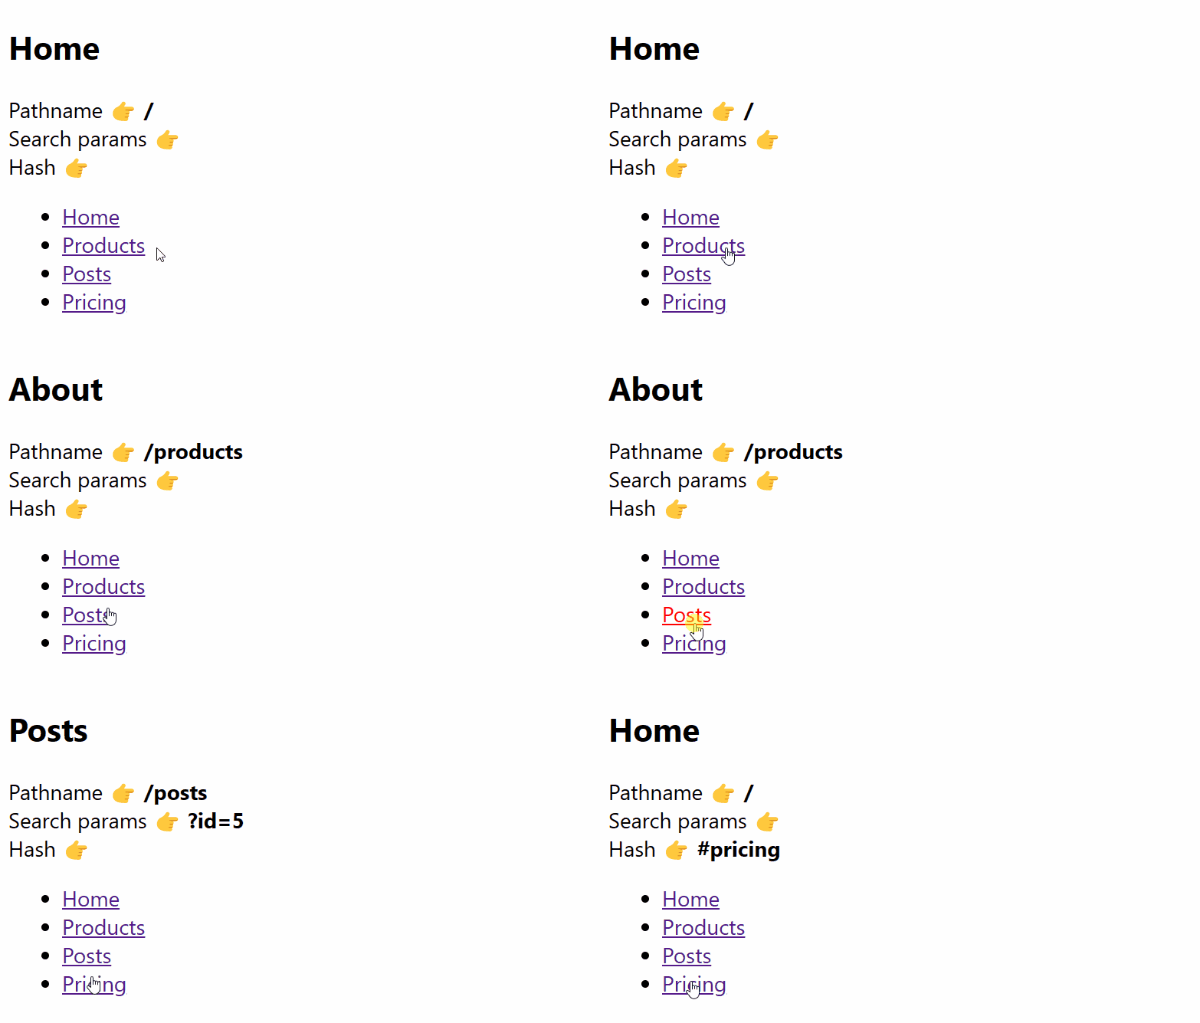
To get the current route in React Router, we use the useLocation() route.

For example:

JavaScript
import React from 'react'; import { Route, Link, Routes, useLocation } from 'react-router-dom'; function Home() { return <h2>Home</h2>; } function Products() { return <h2>About</h2>; } function Pricing() { return <h2>Pricing</h2>; } function Posts() { return <h2>Posts</h2>; } export default function App() { const location = useLocation(); const { hash, pathname, search } = location; return ( <div> <div> <Routes> <Route path="/products" element={<Products />} /> <Route path="/" element={<Home />} /> <Route path="/posts" element={<Posts />} /> <Route path="/#pricing" element={<Pricing />} /> </Routes> Pathname: <b>{pathname}</b><br /> Search params: <b>{search}</b><br /> Hash: <b>{hash}</b> <nav> <ul> <li> <Link to="/">Home</Link> </li> <li> <Link to="/products">Products</Link> </li> <li> <Link to="/posts?id=5">Posts</Link> </li> <li> <Link to="/#pricing">Pricing</Link> </li> </ul> </nav> </div> </div> ); }

useLocation() returns an object that contains information on the current page URL. Some of these properties are:

  • pathname: the part that comes after the domain name, e.g., /products.
  • search: the query string, e.g., ?id=5.
  • hash: the hash, e.g., #pricing.

Note

To get the full URL, we use location.href instead of useLocation().

JavaScript
const url = window.location.href;

Get dynamic route variable in React Router

To access the variables of a dynamic route directly in React Router, we use the useParams() hook.

For example:

JavaScript
import React from 'react'; import { Route, Routes, useParams } from 'react-router-dom'; function Posts() { const { id } = useParams(); return <h2>Settings for post {id} </h2>; } export default function App() { return ( <div> <div> <Routes> <Route path="/posts/:id" element={<Posts />} /> </Routes> </div> </div> ); }
Displaying the dynamic route variable.

The id variable corresponds to its placeholder value in the /posts/:id path. So as you saw in the example, the path /posts/5 will result in the id having a value of 5.

Get current route in Next.js app

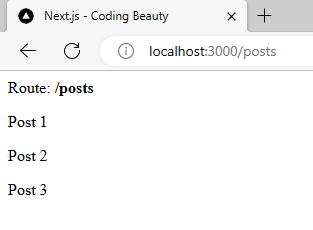
To get the current route in a Next.js React app, we use the useRouter() hook:

The object useRouter() returns has a route property that is the current route in the Next.js app.

pages/posts.tsx
import Head from 'next/head'; import { useRouter } from 'next/router'; export default function Posts() { const posts = ['Post 1', 'Post 2', 'Post 3']; // 👇 Get route data const { route } = useRouter(); return ( <> <Head> <title>Next.js - Coding Beauty</title> <meta name="description" content="Generated by create next app" /> <meta name="viewport" content="width=device-width, initial-scale=1" /> <link rel="icon" href="/favicon.ico" /> </Head> <main> Route: <b>{router}</b> <br /> {posts.map((post) => ( <p>{post}</p> ))} </main> </> ); }
Displaying the current route in Next.js

We use useRouter() to get data and take actions related to the current app route.

Get current dynamic route data in Next.js

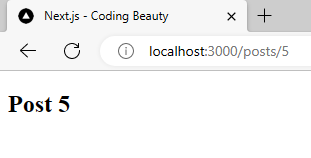
To get data passed to a dynamic route, we use the query property from the useRouter() object:

For instance, we could have a route /posts/5 corresponding to a dynamic route, /posts/:id where 5 is the passed value for id.

Here’s how we’ll access it in the Next.js file that handles requests to the dynamic route:

pages/posts/[id].tsx
import Head from 'next/head'; import { useRouter } from 'next/router'; export default function Posts() { const { query } = useRouter(); // 👇 Get id value from dynamic route const { id } = query; return ( <> <Head> <title>Next.js - Coding Beauty</title> <meta name="description" content="Generated by create next app" /> <meta name="viewport" content="width=device-width, initial-scale=1" /> <link rel="icon" href="/favicon.ico" /> </Head> <main> <h2> Post <b>{id}</b> </h2> </main> </> ); }
Displaying the data passed with the dynamic route in Next.js

For the dynamic route to work, the file structure in the pages folder has to be like this: /pages/[id].tsx. We name the file according to what property we’ll use to access the data from the query, and we wrap the name in square brackets.

We use useRouter() to get data and take actions related to the current app route.

Get query parameter data in Next.js

We can also access URL query parameters (i.e., ?key1=value1) using the query object:

JavaScript
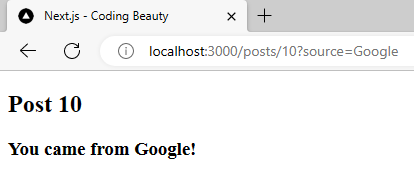
import Head from 'next/head'; import { useRouter } from 'next/router'; export default function Posts() { const { query } = useRouter(); // 👇 Get source from query params const { id, source } = query; return ( <> <Head> <title>Next.js - Coding Beauty</title> <meta name="description" content="Generated by create next app" /> <meta name="viewport" content="width=device-width, initial-scale=1" /> <link rel="icon" href="/favicon.ico" /> </Head> <main> <h2> Post <b>{id}</b> </h2> <h3>You came from {source}!</h3> </main> </> ); }
Display data passed with URL query parameters in Next.js

Key takeaways

In React, we can use window.location.href to get the current page URL, and useLocation() to get information on the current route in React Router. For dynamic routes, useParams() accesses the values of a dynamic route directly.
For Next.js, we use the useRouter() hook to get info on the current route. From the object, it returns, route has the current route, and query gives us info on data passed to the app with the URL, like dynamic route and query parameter data.

[SOLVED] ERR_REQUIRE_ESM: require() of ES Modules is not supported

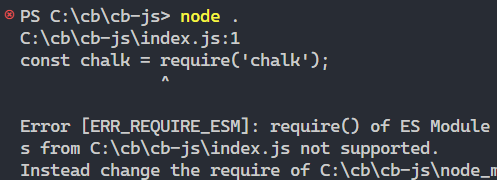
Are you experiencing the “require() of ES modules is not supported” error (ERR_REQUIRE_ESM) in Node.js? This error happens when you try to import a package that is an ES-only module with the CommonJS require() syntax:

The "require() of ES modules is not supported (ERR_REQUIRE_ESM)" error happening.
The “require() of ES modules is not supported” error occurred.

To fix it, use the ES module import syntax for the module, or install a previous version of the package that supports require().

Use ES module import syntax

The ES module system is now the standard method for bundling JavaScript code for sharing and reusing. An ES module can only be used by other ES modules.

So to import ES modules into our project, we first have to define the project as an ES module too. We do this by setting the type field in our package.json file to "module".

JSON
{ "type": "module", // other fields... }

Once we do this, we can use the ES import syntax for the module, like this:

JavaScript
import chalk from 'chalk';

Note

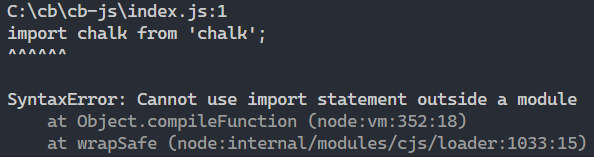
If we don’t make our project an ES module, you’ll get another error:

The "Cannot use import statement outside a module" error occurred.

So this step is required.

Use async import() function

Another way you can fix the “require() of ES modules is not supported” error is to use the async import function that allows you to dynamically load modules:

For example, here’s how we can do it for chalk:

JavaScript
(async () => { const chalk = (await import('chalk')).default; console.log(chalk.blue('Coding Beauty')); })();

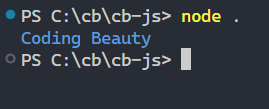
And this works:

Install previous version of package

It’s possible that the package used to support require() but no longer does. Maybe a popular package like chalk or node-fetch. In that case, you can also fix “require() of ES modules is not supported” error in Node.js by installing one of those versions that support require().

As the ES module format become more popular and we saw all the benefits, many popular libraries on NPM started to drop support for CommonJS. Unlike CommonJS, ES modules provide more flexible and powerful module system features like asynchronous loading and tree shaking (removing unused code at build time).

Here are the versions you should install for various well-known NPM packages to use CommonJS and require():

The version of popular packages to install that last supported CommonJS.

node-fetch

Install node-fetch version 2:

JavaScript
npm install node-fetch@2 # Yarn yarn add node-fetch@2

Note: Specify only the major version (use 2, not 2.x.x) so you can get all the latest important bug fixes published for version 2.

got

Install got version 11:

JavaScript
npm install got@11 # Yarn yarn add got@11

Note: Unlike node-fetch, got v11 is not being maintained anymore.

chalk

Install chalk version 4:

JavaScript
npm install chalk@4 # Yarn yarn add got@4

nanoid

Install nanoid version 3:

JavaScript
npm install nanoid@3 # Yarn yarn add nanoid@3

Others

If the package isn’t among the ones above, try browsing through its homepage or NPM package page to find any notices of dropped CommonJS support.

Conclusion

The “require() of ES modules is not supported” error occurs in Node.js when we attempt to use CommonJS require() on a package that is now an ES module. To fix it, we can use the ES module import syntax for the module, use the async import() function, or install a previous version of the package that supports require(). The ES module system is better as it provides powerful features like asynchronous loading and tree shaking, making it the preferred method for bundling JavaScript code.

How to Get the Sum of an Array in JavaScript

To get the sum of an array in JavaScript, call the reduce() method on the array, with two arguments: a callback that takes two arguments and returns their sum, and 0.

For example:

JavaScript
const sum = (arr) => arr.reduce((a, b) => a + b, 0); const arr = [1, 2, 3, 4, 5] const result = sum(arr); console.log(arr); // 15

When we call reduce() method on arr, it loops through the array and adds each element to a sum value When the loop is done, this value will hold the total sum of the array, and reduce() will return it.

The callback argument is called on each array element and takes two arguments, a and b. a represents the total sum value so far and b represents the current element in the iteration. The callback simply adds the current element to the total sum value so far and returns it.

The second argument reduce() takes is an initial value of the total sum. We set it to 0 in this case, but this is the default value anyway, so we can leave it out:

JavaScript
// No need for second argument when it's zero const sum = (arr) => arr.reduce((a, b) => a + b); const arr = [1, 2, 3, 4, 5] const result = sum(arr); console.log(arr); // 15

Get sum of array with for..of loop

Alternatively, we can get the sum of an array in JavaScript using a for..of loop and taking these steps:

  1. Create a variable to store the sum.
  2. Loop over the array.
  3. Add each element to the sum.

For example:

JavaScript
function sum(arr) { let result = 0; for (const item of arr) { result += item; } return result; } const arr = [1, 2, 3, 4, 5] const result = sum(arr); console.log(arr); // 15

Throughout the loop, item will hold the value of each array element, so we add its value to sum in each iteration.

Get sum of numbers with forEach() method

Of course, wherever we can use for..of we can use forEach():

JavaScript
function sum(arr) { let result = 0; arr.forEach(item => { result += item; }); return result; } const arr = [1, 2, 3, 4, 5] const result = sum(arr); console.log(result); // 15

The forEach() loops over each element in the arr array. It takes a callback function as its argument that is called on each element of the array. Like we did with for..of, the callback function simply adds the current element to the result variable.

Get sum of numbers with for loop

And forEach() or for...of can equally be replaced with the traditional for loop:

JavaScript
function sum(arr) { let result = 0; for (let i = 0; i < arr.length; i++) { result += arr[i]; } return result; } const arr = [1, 2, 3, 4, 5] const result = sum(arr); console.log(result); // 15

How do they compare in speed?

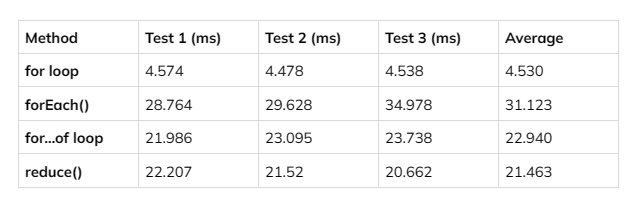
We performed a test to compare the running times of the four different methods above for summing an array in JavaScript: the for loop, forEach(), for...of loop, and reduce() methods.

We tested each method three times and noted how long it took to complete each test. Then we averaged the results to get a more accurate representation of the execution times.

Each test case involved summing an array of the first 1 million positive integers.

Speed comparison of the different methods of getting the sum an array in JavaScript.
Speed comparison of the different methods.

The for loop method was the fastest, taking only an average of 4.530 ms to complete. The forEach() method was the slowest, with an average execution time of 31.123 ms. The for...of loop and reduce() methods were relatively close in execution time, with average execution times of 22.940 ms and 21.463 ms, respectively.

Overall, the for loop method was the most efficient for summing an array in JavaScript, while the forEach() method was the least efficient. Still, the best method to use depends on your specific use case and the array’s size.

When dealing with small arrays, the difference in performance between different methods for summing the array may not be noticeable. But as the size of the array increases, this difference can become more significant and can affect the code’s overall running time.

So for very large arrays, it’s important that we choose the most efficient method for computing the sum to avoid slow execution times. By choosing the most efficient method, we’ll make sure that our code runs as quickly and efficiently as possible, even when dealing with huge amounts of data.

structuredClone(): The Easiest Way to Copy Objects in JavaScript

Cloning objects is a regular programming task for storing or passing data. Until recently, developers have had to rely on third-party libraries to perform this operation because of advanced needs like deep-copying or keeping circular references.

Fortunately, that’s no longer necessary, thanks to the new built-in method called structuredClone(). This feature provides an easy and efficient way to deep-clone objects without external libraries. It works in most modern browsers (as of 2022) and Node.js (as of v17).

In this article, we will explore the benefits and downsides of using structuredClone() function to clone objects in JavaScript.

How to use structuredClone()

structuredClone() works very intuitively; pass the original object to the function, and it will return a deep copy with a different reference and object property references.

JavaScript
const obj = { name: 'Mike', friends: [{ name: 'Sam' }] }; const clonedObj = structuredClone(obj); console.log(obj.name === clonedObj); // false console.log(obj.friends === clonedObj.friends); // false

Unlike the well-known JSON stringify/parse “hack”, structuredClone() lets you clone circular references.

JavaScript
const car = { make: 'Toyota', }; car.basedOn = car; const cloned = structuredClone(car); console.log(car.basedOn === cloned.basedOn); // false // 👇 Circular reference is cloned console.log(car === car.basedOn); // true

Advantages of structuredClone()

So, what makes structuredClone() so great? Well, we’ve been saying it right from the intro; it allows you to make deep copies of objects without difficulty. You don’t need to install any third-party libraries or use JSON.stringify/parse to do so.

With structuredClone(), you can clone objects that have circular references, which is something that’s not possible with the JSON approach. You can clone complex objects and data structures with ease.

structuredClone() can deep copy for as many levels as you need; it creates a completely new copy of the original object with no shared references or properties. This means that any changes made to the cloned object won’t affect the original, and vice versa.

Limitations of structuredClone()

While structuredClone() is a powerful function for cloning objects and data structures, it does have some limitations that are worth noting.

Can’t clone functions or methods

Yes, structuredClone() cannot clone functions or methods. This is because of the structured clone algorithm that the function uses. The algorithm can’t duplicate function objects and throws a DataCloneError exception.

JavaScript
function func() {} // Error: func could not be cloned const funcClone = structuredClone(func);
JavaScript
const car = { make: 'BMW', move() { console.log('vroom vroom..'); }, }; car.basedOn = car; // ❌ Error: move() could not be cloned const cloned = structuredClone(car);

As you can see from the above example, trying to use structuredClone() on a function or an object with a method will cause an error.

Can’t clone DOM elements

Similarly, the structured clone algorithm used by structuredClone() can’t clone DOM elements. Passing an HTMLElement object to structuredClone() will cause an error like the one above.

JavaScript
const input = document.querySelector('#text-field'); // ❌ Failed: HTMLInputElement object could not be cloned. const clone = structuredClone(input);

Doesn’t preserve RegExp lastIndex property

When you clone a RegExp object with structuredClone() the lastIndex property of a RegExp is not preserved in the clone:

JavaScript
const regex = /beauty/g; const str = 'Coding Beauty: JS problems are solved at Coding Beauty'; console.log(regex.index); console.log(regex.lastIndex); // 7 const regexClone = structuredClone(regex); console.log(regexClone.lastIndex); // 0

Other limitations of structuredClone()

  • It doesn’t preserve property metadata or descriptors. For example, If a property descriptor marks an object as readonly, the clone of the object will be read/write by default.
  • It doesn’t preserve non-enumerable properties in the clone.

These limitations shouldn’t be much of a drawback for most use cases, but still, it’s important to be aware of them to avoid unexpected behavior when using the function.

Transfer value with structuredClone()

When you clone an object, you can transfer particular objects instead of making copies by using the transfer property in the second options parameter that structuredClone() has. This means you can move objects between the original and cloned objects without creating duplicates. The original object can’t be used after the transfer.

Let’s say you have some data in a buffer that you need to validate before saving. By cloning the buffer and validating the cloned data instead, you can avoid any unwanted changes to the original buffer. Plus, if you transfer the validated data back to the original buffer, it will become immutable, and any accidental attempts to change it will be blocked. This can give you extra peace of mind when working with important data.

Let’s look at an example:

JavaScript
const uInt8Array = Uint8Array.from({ length: 1024 * 1024 * 16 }, (v, i) => i); const transferred = structuredClone(uInt8Array, { transfer: [uInt8Array.buffer], }); console.log(uInt8Array.byteLength); // 0

In this example, we created a UInt8Array buffer and fill it with data. Then, we clone it using structuredClone() and transfer the original buffer to the cloned object. This makes the original array unusable, ensuring it will be kept from being accidentally modified.

Key takeaways

structuredClone() is a useful built-in feature in JavaScript for creating deep copies of objects without external libraries. It has some limitations, like not being able to clone functions, methods, or DOM elements and not preserving some type of properties in the clone. You can use the transfer option to move objects between the original and cloned objects without creating duplicates, which can be helpful for validating data or ensuring immutability. Overall, structuredClone() is a valuable addition to a developer’s toolkit and makes object cloning in JavaScript easier than ever.

How to Fix the “structuredClone is not defined” Error in Node.js

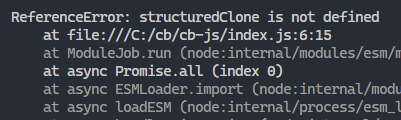
The “structuredClone is not defined” error occurs when you try to use the structuredClone()/ method in JavaScript, but it’s not defined.

The "structuredClone is not defined" error occuring in a terminal.
The “structuredClone is not defined” error occuring in a terminal.

To fix it, install Node.js 17 or a newer version. Once you’ve updated Node.js, you can use structuredClone() to clone objects with all their properties and methods.

What causes the “structuredClone is not defined” error?

If you try to use the structuredClone() method in a script that’s running with a Node.js version lower than 17, you will encounter this error.

The structuredClone() method is used to create a deep copy of an object. It’s a built-in function in JavaScript and is used to clone an object with all its properties and methods.

But when the structuredClone() method is not defined, it means that the server environment doesn’t recognize the function and cannot perform the action.

Fix: update Node.js

To fix the “structuredClone is not defined” error in JavaScript, you need to install Node.js 17 or a newer version. If you’re using an older version of Node.js, it will throw an error when you try to use structuredClone().

Install from website

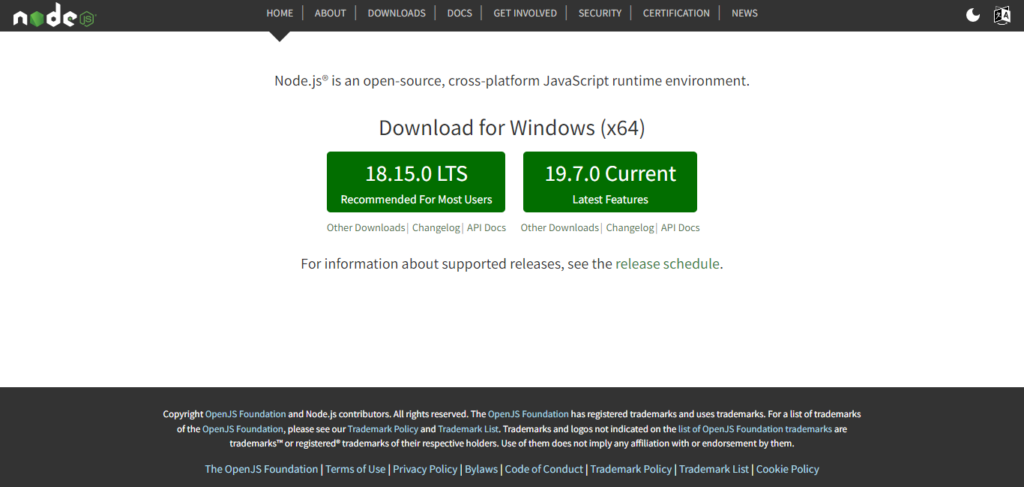
To download Node.js, visit the official website and opt for the LTS version, as it offers superior stability. As of the time of writing this article, the most recent LTS release of Node.js is v18.15.0.

The Node.js download page on the official website.

Install with Chocolatey

If you’re using Chocolatey, Node.js is available as the nodejs package, meaning you can easily install it in a terminal using the following command.

Shell
# Use current LTS version choco install nodejs --version=18.5.0

After installing, you can use the structuredClone method to clone an object:

JavaScript
const obj = { name: 'Mike', friends: [{ name: 'Sam' }] }; const clonedObj = structuredClone(obj); console.log(obj.name === clonedObj); // false console.log(obj.friends === clonedObj.friends); // false

Key takeaways

If you get the “structuredClone is not defined” error when using the structuredClone() method in JavaScript, it means that the method is unavailable. To fix the problem, update your Node.js to a version newer than 17. You can get the latest version from the official Node.js website or install the nodejs package using Chocholatey.

JavaScript: ?? and || Are Not the Same

Have you ever wondered about the differences between the ?? and || operators in JavaScript? These two operators may seem similar, but they have one key difference that set them apart, and that’s what we’ll be talking about in this article.

How ?? and || differ

The || operator returns the first truthy value it encounters, or the last value in the expression if all values are falsy. For example:

JavaScript
const x = undefined || null || '' || 'hello'; console.log(x); // Output: 'hello'

In this example, the || operator returns 'hello' because it is the first truthy value in the expression.

On the other hand, the ?? operator only returns the second operand if the first operand is null or undefined. For example:

JavaScript
const x = undefined ?? null ?? '' ?? 'hello'; console.log(x); // Output: ''

In this example, the ?? operator returns "" because it is the first defined value in the expression.

Tip: Falsy values in JavaScript are null, undefined, false, 0, NaN, and '' (empty string). Every other value is truthy, and will be coerced to true in a Boolean() constructor.

In this example, the ?? operator returns '' because it is the first value that is not null/undefined in the expression.

When to use the null coalescing (??) operator

One common use case for ?? is when you want to treat certain values, such as 0 or empty strings (''), as literal values instead of the absence of a value. In these cases, ?? can be used to provide a fallback value only when a value is strictly null or undefined.

For example, let’s say we have a function paginate that takes an options object as an argument, and returns an array of numbers up to a certain limit. We want to provide a default limit of 3 if no limit is provided, and return an empty array if the limit is set to 0. We can use the ?? operator to achieve this:

JavaScript
function paginate(options = {}) { return ['a', 'b', 'c', 'd', 'e'].splice(0, options.limit ?? 3); } paginate(1); // Output: ['a'] paginate(); // Output: ['a', 'b', 'c'] paginate(0); // Output: []

In this example, if options.limit is null or undefined, the ?? operator falls back to the default value of 3. However, if options.limit is 0, the ?? operator returns 0 instead of the default value. This is because 0 is a literal value, meant to indicate that no pages should be returned in the result. In constrast, if we had used the || operator, paginate would have used the default value of 3 for the pagination.

When to use the logical OR (||) operator

Now that we’ve covered the use cases for the ?? operator, let’s take a look at when to use the || operator instead.

The || operator is useful when we want to provide a default value for a variable or function parameter that is falsy. For example, let’s say we have a function called getUsername that takes in a userInput parameter. If userInput is falsy, we want to return a default value of “Guest”. We can use the || operator to achieve this in a concise way, like so:

JavaScript
function getUsername(userInput) { return userInput || 'Guest'; }

Key takeways

Both the ?? and || operators are useful in providing default values and handling falsy values in JavaScript. However, the ?? operator is better suited for cases where values like 0 and empty strings should be treated literally instead of being treated as an indication of an absent value. On the other hand, the || operator is useful for providing fallback values when a value is missing or falsy. By understanding the differences and appropriate use cases of each operator, you can avoid unexpected bugs in your code.

How to Set Focus on the Next Form Input With JavaScript

To move focus from one input to the next one in a form:

  1. Get a list of all the input elements in the form.
  2. Get the index of the input element in the list that has focus.
  3. Get the index of the next input element in the list.
  4. Focus on it.
JavaScript
function focusNext() { const currInput = document.activeElement; const currInputIndex = inputs.indexOf(currInput); const nextinputIndex = (currInputIndex + 1) % inputs.length; const input = inputs[nextinputIndex]; input.focus(); }

For example:

HTML
<form class="form"> <input type="number" name="num1" id="num1" placeholder="1st Number" maxlength="2" /> <input type="number" name="num2" id="num2" placeholder="2nd Number" maxlength="3" /> <input type="number" name="num3" placeholder="3rd Number" id="num3" maxlength="4" /> <button type="submit" id="submit-btn">Submit</button> </form>
CSS
.form { display: flex; flex-direction: column; width: 200px; } .form input:not(:first-of-type) { margin-top: 10px; } .form #submit-btn { margin-top: 20px; }
JavaScript
// Convert NodeList to Array with slice() const inputs = Array.prototype.slice.call( document.querySelectorAll('.form input') ); inputs.forEach((input) => { input.addEventListener('keydown', (event) => { const num = Number(event.key); if (num && num >= 0 && num <= 9) { // Only allow numbers if (input.value.length >= input.maxLength) { event.preventDefault(); focusNext(); } } }); }); function focusNext() { const currInput = document.activeElement; const currInputIndex = inputs.indexOf(currInput); const nextinputIndex = (currInputIndex + 1) % inputs.length; const input = inputs[nextinputIndex]; input.focus(); }
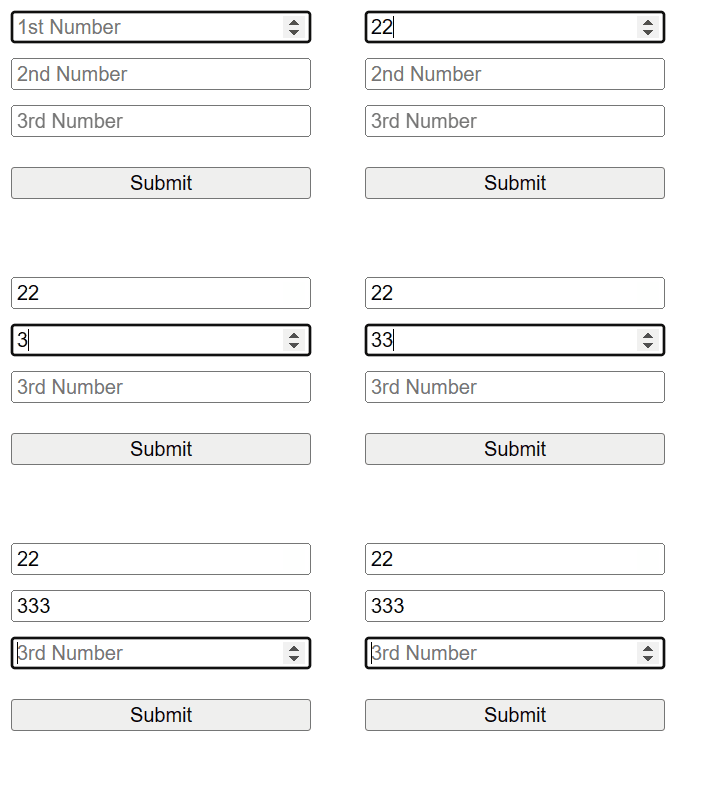
The next input gains focus when the input limit is reached.

We use the document.querySelectorAll() method to obtain a collection of all the input elements in the form. This method in JavaScript allows you to find all the elements on a web page that match a certain pattern or characteristic, such as all elements with a particular class name or tag name.

We use the forEach() method to iterate over the array of input elements we obtained using document.querySelectorAll(). For each input element, we add an event listener to listen for the keydown event.

When a key is pressed down, we check if the key pressed is a number between 0 and 9. If it is, we check if the length of the input’s value is equal to its maxLength attribute. If it is, we prevent the default action of the event and call the focusNext() function to move the focus to the next input element.

The forEach() method is a higher-order function in JavaScript that allows you to run a function on each element of an array.

Tip: A higher-order function is a function that can take in functions as arguments and/or return a function.

In the focusNext() function, we first get the currently focused input element using document.activeElement. We then get the index of this input element in the inputs array we created earlier using inputs.indexOf(currInput).

We then calculate the index of the next input element in the array using (currInputIndex + 1) % inputs.length, where % is the modulo operator. This ensures that if the currently focused input element is the last one in the array, we wrap around to the first input element.

Finally, we get a reference to the next input element using inputs[nextinputIndex] and call the focus() method on it to move the focus to the next input element.

Set focus on next input on enter

Sometimes, we want to move the focus to the next input element when the user presses the Enter key instead of waiting for the input’s maxLength to be reached. To do this, we can add an event listener to listen for the keydown event on each input element. When the Enter key is pressed, we prevent the default action of the event and call the focusNext() function to move the focus to the next input element.

JavaScript
inputs.forEach((input) => { input.addEventListener('keydown', (event) => { if (event.key === 'Enter') { event.preventDefault(); focusNext(); } }); });

Now, when the user presses the Enter key, the focus will move to the next input element. This can be especially useful in forms where the user needs to quickly move through a series of inputs without having to manually click on each one.

How to Get the Current Mouse Position in JavaScript

To get the current position of the mouse in JavaScript, add a mousemove event listener to the window object and access the clientX and clientY properties of the MouseEvent object in the listener to get the X and Y coordinates of the mouse respectively.

For example:

HTML
<p> Mouse pos: <b><span id="mouse-pos"></span></b> </p>
JavaScript
const mousePosText = document.getElementById('mouse-pos'); let mousePos = { x: undefined, y: undefined }; window.addEventListener('mousemove', (event) => { mousePos = { x: event.clientX, y: event.clientY }; mousePosText.textContent = `(${mousePos.x}, ${mousePos.y})`; });
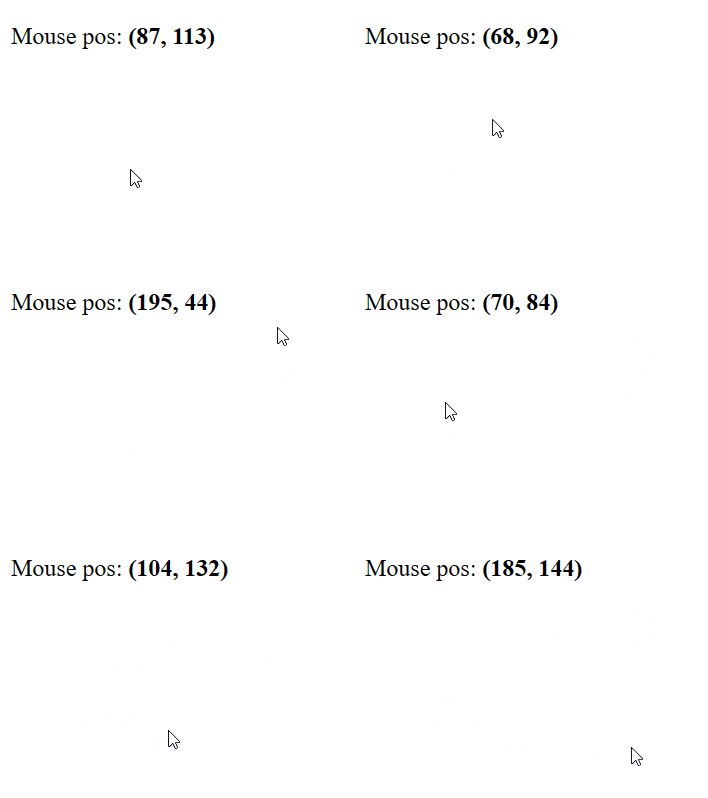
The current mouse position is shown.

The mousemove event is triggered on an element when the mouse hovers it. To be more precise, it is fired when the mouse is moved and the cursor’s hotspot is within the element’s bounds.

We attach the event listener to the window object to trigger the event whenever the mouse has moved anywhere on the page.

The mousemove event listener receives a MouseEvent object used to access information and perform actions related to the event. We use the clientX and clientY properties of this object to get the position of the mouse on the X-coordinate and Y-coordinate respectively in the application’s viewport.

Get current mouse position relative to element in React

In the first example, we get the current mouse position in global coordinates. In global coordinates, position (0, 0) is at the top-left of the webpage and position (Xmax, Ymin) is at the bottom right.

We might instead want to get the mouse position within the region of an element.

To get the current mouse position relative to an element, set a mousemove event handler on the element, then calculate the local X and Y positions using properties of the MouseEvent object passed to the event handler.

For example:

HTML
<div> <div class="local"> Local <br /> <b><span id="local-mouse-pos"></span></b> </div> <p> Global <br /> <b><span id="global-mouse-pos"></span></b> </p> </div>
CSS
.local { border: 1px solid #c0c0c0; padding: 75px; text-align: center; display: inline-block; margin-left: 100px; margin-top: 100px; }
JavaScript
const globalMousePosText = document.getElementById('global-mouse-pos'); const localMousePosText = document.getElementById('local-mouse-pos'); let localMousePos = { x: undefined, y: undefined }; let globalMousePos = { x: undefined, y: undefined }; window.addEventListener('mousemove', (event) => { const localX = event.clientX - event.target.offsetLeft; const localY = event.clientY - event.target.offsetTop; localMousePos = { x: localX, y: localY }; globalMousePos = { x: event.clientX, y: event.clientY }; globalMousePosText.textContent = `(${globalMousePos.x}, ${globalMousePos.y})`; localMousePosText.textContent = `(${localMousePos.x}, ${localMousePos.y})`; });

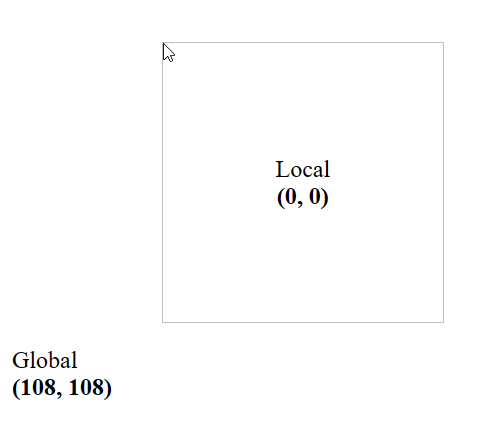
Now the resulting X and Y coordinates will be relative to the element. For example, position (0, 0) will be at the top left of the element, not the viewport:

The current mouse position relative to the element in shown.
The current mouse position relative to the element is shown.

We subtract the offsetLeft property of the element from the clientX property of the MouseEvent object to get the position on the X-axis relative to the element.

Similarly, to get the position on the Y-axis, we subtract the offsetTop property from the clientY property of the MouseEvent object.

JavaScript
window.addEventListener('mousemove', (event) => { const localX = event.clientX - event.target.offsetLeft; const localY = event.clientY - event.target.offsetTop; localMousePos = { x: localX, y: localY }; // ... });

The offsetLeft property returns the number of pixels between the left position of an element and its parent.

Likewise, the offsetTop property returns the number of pixels between the top position of an element and its parent.