
tutorial

How to quickly get the height or width of an element in React

To get the height or width of an element in React, use the useRef, useEffect, and useState hooks to access the element’s offsetWidth or offsetHeight property:

JavaScript
import React, { useEffect, useState, useRef } from 'react'; function ExampleComponent() { const [width, setWidth] = useState(0); const [height, setHeight] = useState(0); const elementRef = useRef(null); useEffect(() => { setWidth(elementRef.current.offsetWidth); setHeight(elementRef.current.offsetHeight); }, []); return ( <div ref={elementRef} style={{ width: '50%', height: '50%', border: '1px solid black' }} > <p>Coding Beauty</p> <p>{`Element size: (${width}, ${height})`}</p> </div> ); } export default function App() { return ( <div> <ExampleComponent /> </div> ); }
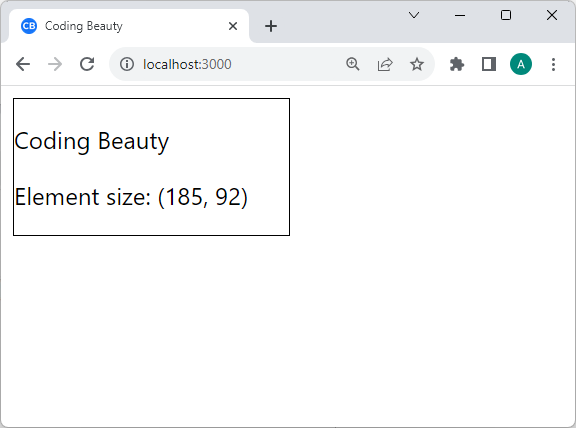
The height and width of the element is displayed with React.

useEffect() runs after the component mounts or re-renders, but useLayoutEffect() runs before. They both have a dependency array that triggers them when any of those dependencies change.

We create a ref for the target element with useRef(), and assign it to its ref prop, so we can access the HTMLElement object for this React element.

useRef returns a mutable ref object that doesn’t change its value when a component is updated. Also, modifying the value of this object’s current property does not cause a re-render. This is in contrast to the setState update function returned from useState.

We use useState() to create a state that we update when useEffect() gets called. This update makes the element’s width and height display on the page.

Get height and width of element with clientHeight and clientWidth

You can also get an element’s height and width in React with clientHeight and clientWidth. Unlike offsetWidth, it includes padding but excludes borders and scrollbars.

JavaScript
import React, { useRef, useState, useEffect } from 'react'; function ExampleComponent() { const [width, setWidth] = useState(0); const [height, setHeight] = useState(0); const elementRef = useRef(null); useEffect(() => { setWidth(elementRef.current.clientWidth); setHeight(elementRef.current.clientHeight); }, []); return ( <div ref={elementRef} style={{ width: '50%', height: '50%' }}> <p>Coding Beauty</p> <p> <b>{`Element size: (${width}, ${height})`}</b> </p> </div> ); } export default function App() { return ( <div> <ExampleComponent /> </div> ); }
Getting the size of an element in React with clientWidth and clientHeight.

Get height and width of element dynamically

You can get the height and width of an element dynamically, which means the height and width updates on window resize.

We do this with a resize event listener:

JavaScript
import React, { useEffect, useState, useRef } from 'react'; function ExampleComponent() { const [width, setWidth] = useState(0); const [height, setHeight] = useState(0); const elementRef = useRef(null); useEffect(() => { const handleResize = () => { setWidth(elementRef.current.offsetWidth); setHeight(elementRef.current.offsetHeight); }; handleResize(); window.addEventListener('resize', handleResize); return () => { window.removeEventListener('resize', handleResize); }; }, []); return ( <div ref={elementRef} style={{ width: '50%', height: '50%' }}> <p>Getting element width dynamically</p> <p><b>{`Element size: (${width}, ${height})`}</b></p> </div> ); } export default function App() { return ( <div> <ExampleComponent /> </div> ); }

We call addEventListener() in useEffect() to set the resize event listener on the element before it renders on the screen.

The resize event listener is called whenever the user resizes the window. In the listener, we update the state that stores the element’s width and height, and this causes a re-render.

We call removeEventListener() in useEffect‘s clean-up function to stop listening for resize events when the component is unmounted or when the dependencies change to prevent memory leaks and unintended side effects.

Get element height and width before render in React

To get the width and height of an element before render in React, we can combine two React hooks: useRef and useLayoutEffect.
JavaScript
import React, { useRef, useLayoutEffect, useState } from 'react'; function ExampleComponent() { const [width, setWidth] = useState(0); const [height, setHeight] = useState(0); const elementRef = useRef(null); useLayoutEffect(() => { setWidth(elementRef.current.offsetWidth); setHeight(elementRef.current.offsetHeight); }, []); return ( <div style={{ width: '50%', height: '50%' }}> <p>Coding Beauty</p> <div ref={elementRef}> Element size: ({width}, {height}) </div> </div> ); } export default function App() { return ( <div> <ExampleComponent /> </div> ); }

So the difference between “before render” and “after render” is useLayoutEffect() and useEffect().

useLayoutEffect() works just like useEffect(), but the key difference is that it fires before the browser repaints the screen – before React renders the component.

We pass an empty dependencies array to useLayoutEffect() to make sure it only gets called once.

Here we create a ref for the target element with useRef(), and assign it to its ref prop, so we can access the HTMLElement object for this React element.

useRef returns a mutable ref object that doesn’t change its value when a component is updated. Also, modifying the value of this object’s current property does not cause a re-render. This is in contrast to the setState update function returned from useState.

We do use useState() though, to create a state that we update when useLayoutEffect() gets called. So calling setWidth() will cause the component to be re-rendered.

To get the actual width and height, we use the offsetWidth and offsetHeight properties, which include borders, padding, and any scrollbars.

Key takeaways

  1. To get the height or width of an element in React, combine the useRef, useEffect, and useState hooks to get the value of offsetWidth and offsetHeight.
  2. clientWidth and clientHeight are similar to offsetWidth and offsetHeight, but they include padding and exclude borders and scrollbars.
  3. To get the dimensions of the element dynamically, create a window resize event listener to automatically update the size when the user resizes the browser window.
  4. To get the size of the element before render, replace useEffect with useLayoutEffect.
[SOLVED] 0308010C:digital envelope routines::unsupported

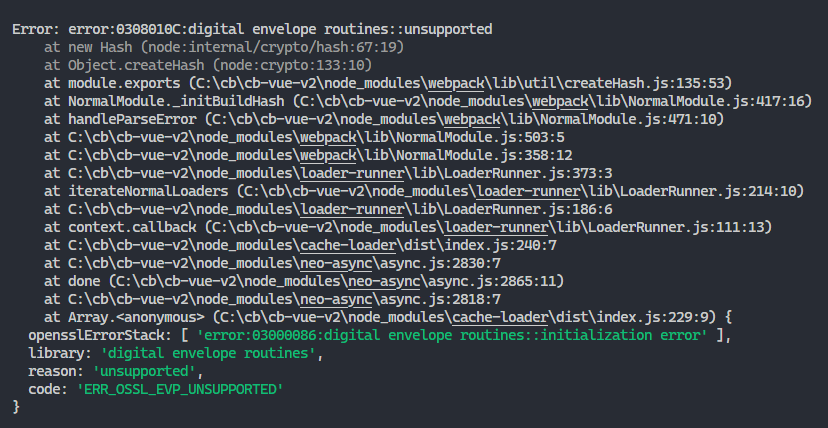
The error:0308010C:digital envelope routines::unsupported error happens in Node.js when a JavaScript module still uses a flawed OpenSSL version that is incompatible with the version Node.js uses.

The "error:0308010C:digital envelope routines::unsupported" error occurring in Vue.js.
The error:0308010C:digital envelope routines::unsupported error occurring.

To fix it, downgrade to Node.js v16.13.0, or use the npm audit fix --force command to upgrade your packages to versions that use the updated OpenSSL version.

Why does the error:0308010C:digital envelope routines::unsupported error occur in Node.js?

In Node.js v17, the Node.js team patched an OpenSSL security vulnerability. This fix introduced a breaking change; if you try to use OpenSSL in Node.js v17 or later versions without also updating those modules that use previous OpenSSL versions, you’ll get this error.

And you’ll get it the next time Node.js is updated to use a newer OpenSSL version with breaking changes and you haven’t updated the OpenSSL-dependent libraries.

Fix: Upgrade NPM packages

To fix the error:0308010C:digital envelope routines::unsupported error, update the Node.js packages causing the error to the latest version.

Run npm audit fix to fix vulnerabilities

You can run the npm audit fix command to identify those packages using the outdated OpenSSL version and fix them automatically.

Shell
npm audit fix

npm audit fix reviews the project’s dependency tree to identify packages that have known vulnerabilities, and attempts to upgrade and/or fix the vulnerable dependencies to a safe version.

npm audit fix --force

If you want to install semver major updates to vulnerable packages, you can use the --force option. 

Shell
npm audit fix --force

Be cautious with this option: it could potentially break your project.

yarn-audit-fix

If you’re a Yarn user, you can use the yarn-audit-fix package to do what npm audit fix does.

Upgrade Webpack to v5

If you’re using Webpack directly to bundle your files, you can upgrade it to version v5 – specifically, v5.61.0 – to fix the error:0308010C:digital envelope routines::unsupported error.

Shell
npm i webpack@latest # Yarn yarn add webpack@latest

If instead, you’re using a tool like Create React App and the Vue CLI that uses Webpack internally, you’ll upgrade the tool to a version that doesn’t have this error.

Fix for Create React App: Upgrade react-scripts to v5

If you’re using Create React App then you can fix the error:0308010C:digital envelope routines::unsupported error by upgrading react-scripts to version 5, which comes with the newer Webpack version 5.

Install version 5 or later with this command:

Shell
npm i react-scripts@latest # Yarn yarn add react-scripts@latest

Fix for Vue CLI: Upgrade to v5

Similarly for the Vue CLI, you can fix the error:0308010C:digital envelope routines::unsupported error by upgrading the Vue CLI to version 5 which also comes with the newer Webpack version 5.

Install Vue CLI version 5 or later with this command:

Shell
npm update -g @vue/cli # OR yarn global upgrade --latest @vue/cli

More info on how to upgrade the Vue CLI here.

Fix: Use --openssl-legacy-provider option

To fix the error:0308010C:digital envelope routines::unsupported error in Node.js, you can also use the --openssl-legacy-provider option when running the script.

This solution is more of a hack though: it leaves your app open to security threats.

The --openssl-legacy-provider option is only available in Node version 17 or later.

Run with script

So for the start script, you’ll use this command:

Shell
export NODE_OPTIONS=--openssl-legacy-provider && npm run start # Windows set NODE_OPTIONS=--openssl-legacy-provider && npm run start

Modify script

You can also set this directly in the script to avoid needless repetition.

On Linux/Mac:

JSON
{ ... "scripts": { "start": "export NODE_OPTIONS=--openssl-legacy-provider && webpack serve", "build": "webpack --mode production" } ... }

On Windows:

JSON
{ ... "scripts": { "start": "set NODE_OPTIONS=--openssl-legacy-provider && node .", "build": "set NODE_OPTIONS=--openssl-legacy-provider && node build.js" } ... }

Make sure the script is cross-platform

But now the scripts aren’t cross-platform.

They’ll obviously be problematic when collaborating and team members use other operating systems. What do we do? We install the cross-env NPM module and run the script with it.

Shell
npm i cross-env # Yarn yarn add cross-env
JSON
{ ... "scripts": { "start": "cross-env NODE_OPTIONS=--openssl-legacy-provider webpack .", "build": "cross-env NODE_OPTIONS=--openssl-legacy-provider node build.js" }, "devDependencies": { "cross-env": "^7.0.3" } ... }

Now the script runs successfully on every platform.

Fix for Vue CLI

So to fix the error:0308010C:digital envelope routines::unsupported error when using Vue with the Vue CLI, install the cross-env module and set the --openssl-legacy-provider option:

JSON
{ ... "scripts": { "serve": "cross-env NODE_OPTIONS=--openssl-legacy-provider vue-cli-service serve", ... }, "devDependencies": { "cross-env": "^7.0.3" ... } ... }

Fix for Create React App

And to fix the error:0308010C:digital envelope routines::unsupported error when using React with Create React App, install the cross-env module and set the --openssl-legacy-provider option.

JSON
{ ... "scripts": { "serve": "cross-env NODE_OPTIONS=--openssl-legacy-provider ", ... }, "devDependencies": { "cross-env": "^7.0.3" ... } ... }

Fix: Downgrade to Node.js v16.13.0

To fix the error:0308010C:digital envelope routines::unsupported error in Node.js, downgrade your Node.js version to 16.13.0.

This solution is more of a hack though, as it leaves your app open to security threats.

Install from the official website

Use this official link to download Node.js v16.13.0.

Install with Chocolatey

If you’re using Chocolatey, Node.js is available as the nodejs package, meaning you can easily install it in a terminal using the following command.

Shell
# Use current LTS version choco install nodejs --version=18.5.0

Install with nvm

If you’re using nvm or nvm-windows, use these commands to quickly install and switch to Node.js v16.13.0.

Shell
nvm install 16.13.0 nvm use 16.13.0

How to Quickly Reveal the Current File in Explorer in VS Code

You either want to reveal the current file in the VS Code Explorer sidebar view or in your OS file manager. We cover both in this article.

Reveal current file in Explorer view in VS Code

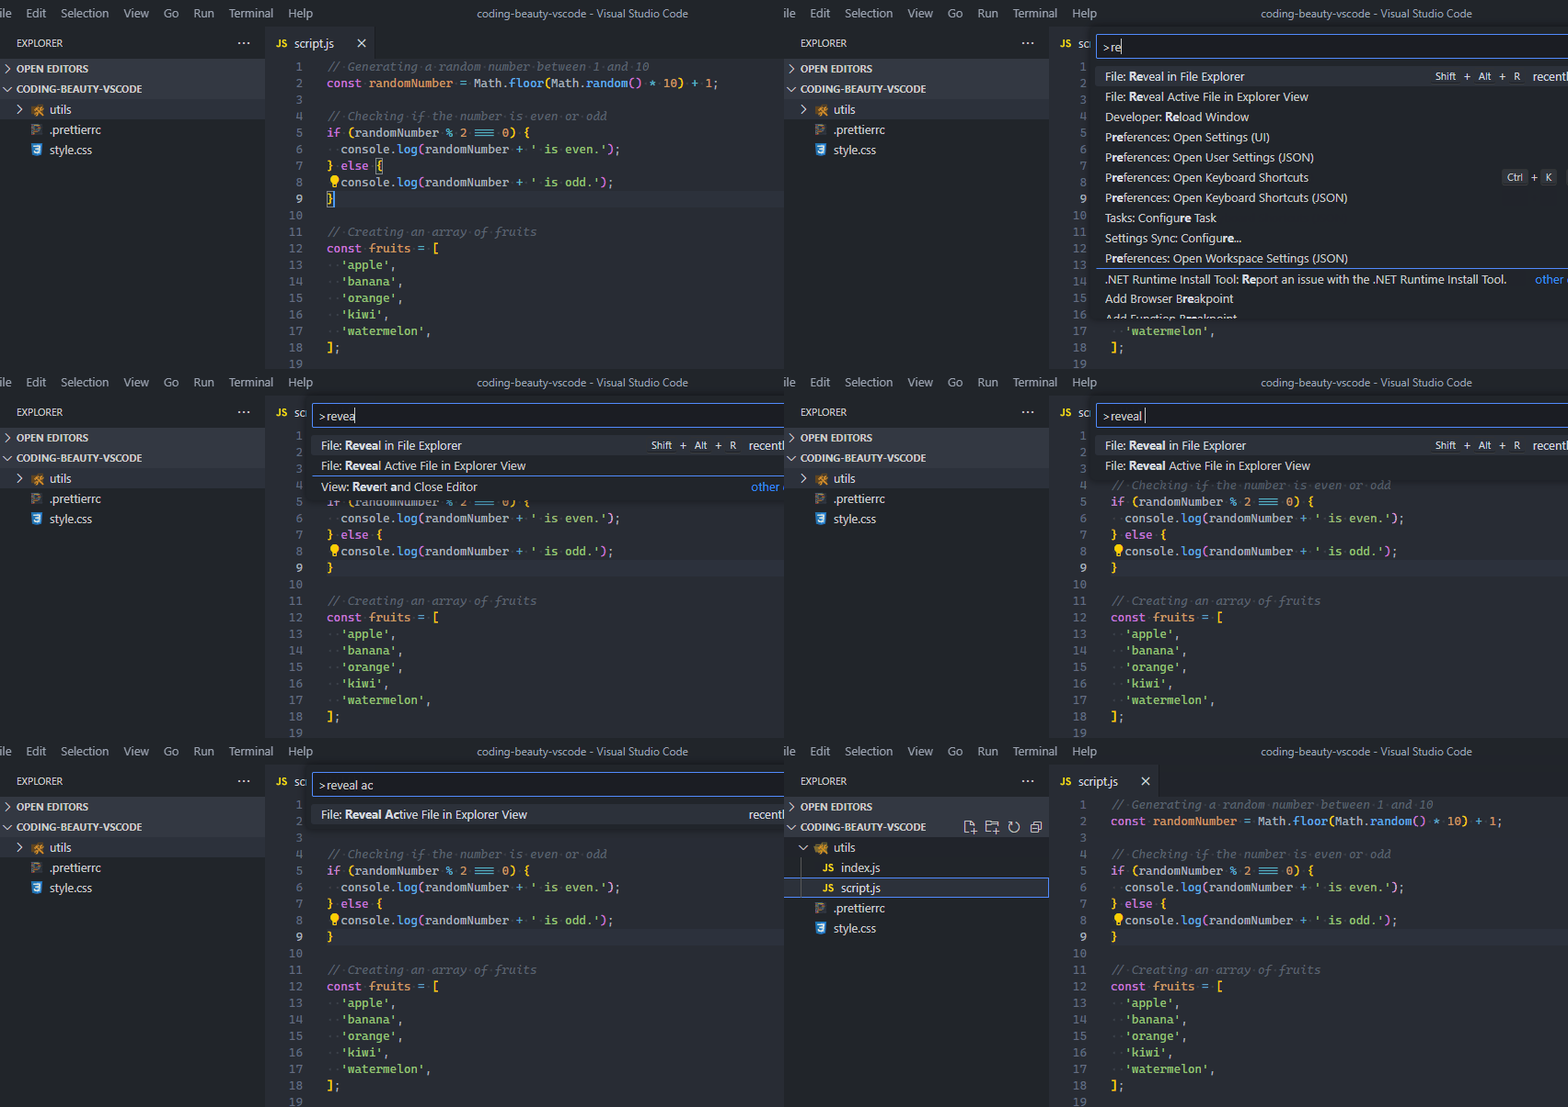
To reveal the current file in the Explorer view of Visual Studio Code, use the Reveal Active File in Explorer View command, accessible from the Command Palette.

Revealing the active file in the VS Code Explorer view.

Why is it useful to reveal the current file in the VS Code Explorer view?

When working on a project with numerous files and directories, it can sometimes be challenging to remember the exact location of a specific file. Revealing the current file in the VS Code Explorer view allows you to quickly locate the file’s position within the project structure.

  1. Context: This is particularly useful when you want to gain a broader context of where the file is located in relation to other files and folders.
  2. Navigation: And you can easily navigate to these related files.
  3. File management: VS Code’s Explorer view provides file management capabilities, such as renaming, moving, and deleting files. If you’re currently editing a file and you want to perform a management action on it, revealing the file in the Explorer view makes it easier to perform these actions without having to manually navigate through the directory structure.
  4. Version control: If your project is under version control like Git, revealing the current file in the Explorer view can help you understand the file’s status in the context of version control. You can see if the file has been modified, staged, or is part of a particular branch, which can aid in your development workflow.
  5. Collaboration: When working on a project with others, revealing the current file can help your team members easily find and access the same file you’re working on. This is especially useful if you’re discussing a specific file in a conversation or during a code review.

Use the Reveal in File Explorer View command

To reveal the current file in the Explorer view in VS Code, run the Reveal Active File in Explorer View command.

Reveal the active file in the VS Code Explorer view.

In VS Code, we have commands – defined actions that carry our various operations in the editor.

We can easily run a command with the Command Palette, which we can access with these keyboard shortcuts:

  • Windows / LinuxCtrl + Shit + P
  • Mac: Command + Shift + P

Reveal current file in Explorer with active editor context menu

You can also reveal the current file in the VS Code Explorer sidebar with the Reveal in Explorer View option in the context menu that shows up when you right-click the filename at the top.

Reveal the current file with the VS Code active editor context menu.

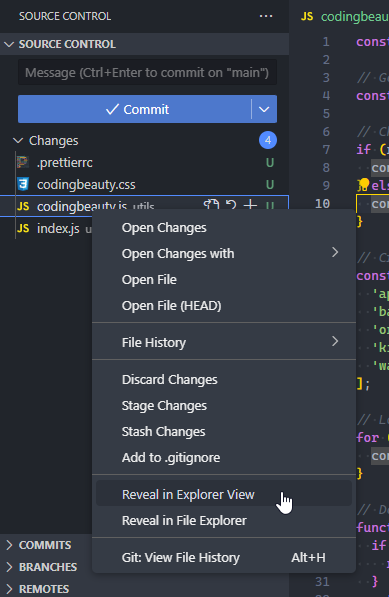
This item is also there in the context menu that shows when you right-click the file in the Source Control view.

This Reveal in Explorer View item is in the Source Control view context menu.

Reveal current file in Windows File Explorer / Mac Finder

To reveal the current file in your operating system’s file manager, use the Reveal in File Explorer command, accessible from the Command Palette.

The Reveal in File Explorer command in VS Code.

By the way, if you’re on Windows 11 and you’re dealing with File Explorer clutter, this tiny utility called WinENFET can help, by automatically opening File Explorer in a new tab, instead of a new window.

Why is it useful to reveal the current file in File Explorer/Finder?

When managing a project that includes many files and folders, it can occasionally become difficult to recall the precise location of a particular file. By displaying the current file in your operating system’s file manager, you can swiftly identify the file’s place within the project hierarchy.

This is useful for several reasons:

  1. Context: Helps you understand and navigate your project’s larger file hierarchy. This is especially helpful in large projects with complex file structures.
  2. External operations: You can perform actions not available in VS Code, like viewing file properties (creation date, size, etc.) or file permissions.
  3. Data transfer: Allows you to quickly locate the path for file transfers. If you need to send the file as an email attachment or upload it to a server, you can quickly find it in the operating system’s file manager.
  4. Easy access: If you’re working with a file in VS Code and you want to quickly open it in another application, revealing the file in the file manager makes this easy.
  5. Collaboration: If you’re working with a team, it’s easy to reveal the file in the file manager, zip it, and send it to team members as needed.

Use the Reveal in File Explorer command

To reveal the current file in your OS’s file manager in VS Code, run the Reveal in File Explorer command.

The Reveal in File Explorer command in VS Code.

In VS Code, we have commands: defined actions that carry out various operations in the editor.

We can easily run a command with the Command Palette, which we can access with these keyboard shortcuts:

  • Windows / Linux: Ctrl + Shit + P
  • Mac: Command + Shift + P

Reveal current file in File Explorer with active editor context menu

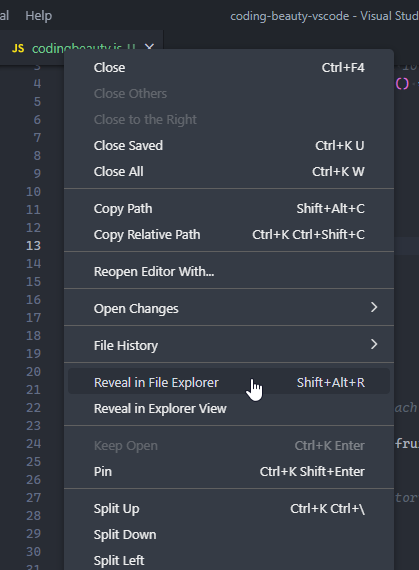
Alternatively, you can reveal the current file in your OS’s file manager with the Reveal in File Explorer option in the context menu that shows up when you right-click the filename at the top.

Revealing the current file in File Explorer/Finder from VS Code.

Set custom keyboard shortcuts for commands in VS Code

To set a custom keyboard shortcut for the Reveal in File Explorer or Reveal Active File in Explorer View command, change the keybinding for the command in the Keyboard Shortcuts page.

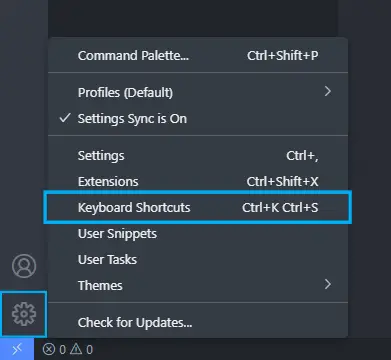
To get this page, you can click the Keyboard Shortcuts item on the Manage popup shown below or use the shortcut next to the text (Ctrl + K, Ctrl + S here).

Opening the Keyboard Shortcuts page from the Manage popup in VS Code.

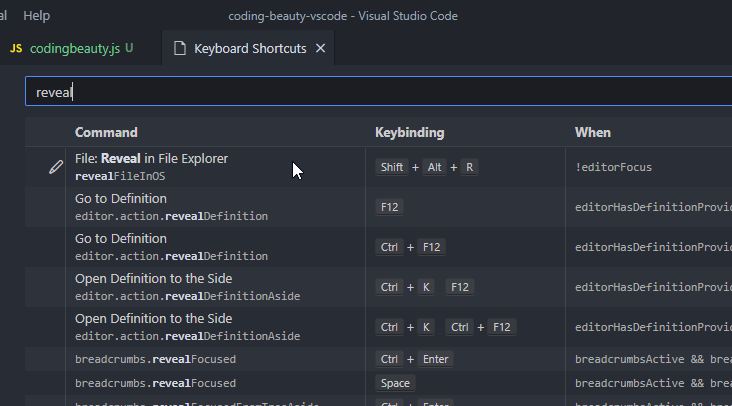
Once you get there, search for the Reveal in File Explorer or Reveal Active File in Explorer View command in the search bar.

Searching for the Reveal in File Explorer keyboard shortcut.

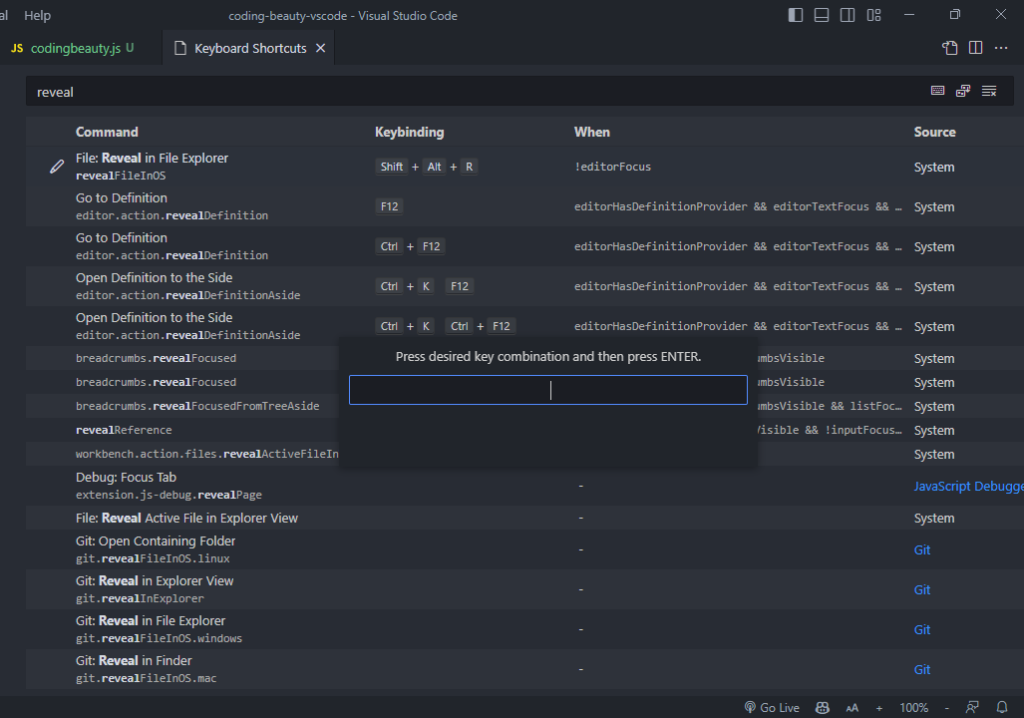
Then double-click the command, type a new keyboard shortcut, and press the Enter key to carry out the change.

Changing the Reveal in File Explorer keyboard shortcut in VS Code.

Key takeaways

  • To reveal a file in the VS Code Explorer view, run the Reveal Active File in Explorer View command. You can do this with the Command Palette, or by setting a custom keyboard shortcut.
  • To reveal a file in your OS file manager (Windows File Explorer, Mac Finder, etc.), run the Reveal in File Explorer command. You can also do this with the Command Palette, or by setting a custom keyboard shortcut.
  • To set a keyboard shortcut for a command in VS Code, open the Keyboard Shortcuts page, select the command, type the new short, and confirm with Enter.

How to quickly get the union of two Sets in JavaScript

To get the union of two Sets in JavaScript, convert the sets to arrays and merge them, then create a Set from the merged array, i.e., new Set([...set1, ...set2]).

For example:

JavaScript
function getUnion(set1, set2) { return new Set([...arr1, ...arr2]); } const set1 = new Set([1, 2, 3, 4]); const set2 = new Set([3, 4, 5, 6]); const union = getUnion(set1, set2); console.log(union); // Set(6) { 1, 2, 3, 4, 5, 6 }

Set() constructor

The Set() constructor creates a new Set object from an iterable like an array. As a Set can only contain unique values, it removes any possible duplicates that may be in the array it receives.

JavaScript
const set = new Set([1, 1, 2, 3, 3, 4]); console.log(set); // Set(4) [1, 2, 3, 4]

Spread syntax (...)

The array we pass to Set() is a merge of two arrays that represent the two Sets. The spread syntax (...) unpacks the value of each Set into the array.

JavaScript
const array1 = [10, 20, 30]; const array2 = [40, 50, 60]; const mergedArray = [...array1, ...array2]; console.log(mergedArray);

Use Array concat() to merge arrays

If you like, you can use the Array concat() method to join the arrays. Here the spread syntax only converts the Sets to arrays.

JavaScript
function getUnion(set1, set2) { // Using Array concat() in place of spread syntax return new Set([...set1].concat([...set2])); } const set1 = new Set([1, 2, 3, 4]); const set2 = new Set([3, 4, 5, 6]); const union = getUnion(set1, set2); console.log(union); // Set(6) { 1, 2, 3, 4, 5, 6 }

Use Array from() to convert Set to array

You can use the Array from() method in place of the spread syntax (...) to convert the Sets to arrays before merging them:

JavaScript
function getUnion(set1, set2) { // Using Array concat() in place of spread syntax return new Set(Array.from(set1).concat(Array.from(arr2)); } const set1 = new Set([1, 2, 3, 4]); const set2 = new Set([3, 4, 5, 6]); const union = getUnion(set1, set2); console.log(union); // Set(6) { 1, 2, 3, 4, 5, 6 }

We can use a similar approach to easily get the union of two arrays in JavaScript.

Get union of two arrays in JavaScript

To get the union of two arrays in JavaScript, merge the arrays, create a new Set object from the merged result to remove the duplicates, then convert it back to an array, i.e., Array.from(new Set([...arr1, ...arr2])).

For example:

JavaScript
function getUnion(arr1, arr2) { return Array.from(new Set([...arr1, ...arr2])); } const array1 = [1, 2, 3, 4, 5]; const array2 = [4, 5, 6, 7, 8]; const union = getUnion(array1, array2); // [1, 2, 3, 4, 5, 6, 7, 8] console.log(union);

Key takeaways

  • To get the union of two Sets in JavaScript, convert the Sets to arrays, merge them, and convert the merged array back to a Set object, i.e., new Set([...set1, ...set2]).
  • You can get the union of two arrays in JavaScript in a similar way, i.e., [...new Set([...arr1, ...arr2])].

How to quickly get the union of two arrays in JavaScript

To get the union of two arrays in JavaScript, merge the arrays, create a new Set object from the merged result to remove the duplicates, then convert it back to an array, i.e., Array.from(new Set([...arr1, ...arr2])).

For example:

JavaScript
function getUnion(arr1, arr2) { return Array.from(new Set([...arr1, ...arr2])); } const array1 = [1, 2, 3, 4, 5]; const array2 = [4, 5, 6, 7, 8]; const union = getUnion(array1, array2); // [1, 2, 3, 4, 5, 6, 7, 8] console.log(union);

Array.from() method

The Array from() method converts Sets and other iterable objects to arrays.

JavaScript
const set = new Set(['Paul', 'John', 'George', 'Ringo']); const arr = Array.from(exampleSet); console.log(arr); // ['Paul', 'John', 'George', 'Ringo'] const map = new Map(); map.set('Bob', 'Marley'); map.set('Mick', 'Jagger'); let arr2 = Array.from(map); console.log(exampleArray2); // [ ['Bob', 'Marley'], ['Mick', 'Jagger'] ]

Set() constructor

We create these sets with the Set constructor, which can only contain unique values, so it removes any possible duplicates that may be in the array it receives.

JavaScript
const set = new Set([1, 1, 2, 3, 3, 4]); console.log(Array.from(set)); // [1, 2, 3, 4]

Spread syntax (...)

To pass this array to the Set() constructor, we use the spread syntax (...) to merge the two arrays together. The spread syntax unpacks the value of each array into another array:

JavaScript
const array1 = [10, 20, 30]; const array2 = [40, 50, 60]; const mergedArray = [...array1, ...array2]; console.log(mergedArray);

Use Array concat() to merge arrays for Set()

We could use the Array concat() method in place of the spread syntax:

JavaScript
function getUnion(arr1, arr2) { return Array.from(new Set(arr1.concat(arr2))); } const array1 = [1, 2, 3, 4, 5]; const array2 = [4, 5, 6, 7, 8]; const union = getUnion(array1, array2); // [1, 2, 3, 4, 5, 6, 7, 8] console.log(union);

Use Array from() to convert Set back to array

And we could use this spread syntax to replace the Array from(), although this may make the code a bit less readable:

JavaScript
function getUnion(arr1, arr2) { return [...new Set([...arr1, ...arr2])]; } const array1 = [1, 2, 3, 4, 5]; const array2 = [4, 5, 6, 7, 8]; const union = getUnion(array1, array2); // [1, 2, 3, 4, 5, 6, 7, 8] console.log(union);

We can use the same principles to easily get the union of two sets in JavaScript.

Get union of two sets in JavaScript

To get the union of two sets in JavaScript, convert the sets to arrays and merge them, then create a Set from the results of the merge.

For example:

JavaScript
function getUnion(set1, set2) { return new Set([...set1, ...set2]); } const set1 = new Set(['a', 'b', 'c', 'd']); const set2 = new Set(['c', 'd', 'e', 'f']); const union = getUnion(set1, set2); console.log(union); // Set(6) { 'a', 'b', 'c', 'd', 'e', 'f' }

Key takeaways

  • To get the union of two arrays in JavaScript, create a new Set object from the merge of the two arrays, then convert this Set object to an array again, i.e., Array.from(new Set(arr1.concat(arr2))).
  • We can do a similar thing to get the union of two sets, i.e., new Set([...set1, ...set2]).

How to prevent form submission in Vue.js

To prevent a page refresh on form submit in Vue.js, use the .prevent event modifier in the submit event listener.

App.vue
<template> <div id="app"> <form @submit.prevent="handleSubmit"> <label> Email <br /> <input type="email" v-model="email" required /> </label> <br /> <label> Password <br /> <input type="password" v-model="password" required /> </label> <br /> <button type="submit" style="margin-top: 16px" > Submit </button> </form> </div> </template> <script> export default { name: 'App', data() { return { email: '', password: '', }; }, methods: { handleSubmit() { this.email = ''; this.password = ''; alert('Form submitted'); }, }, }; </script>
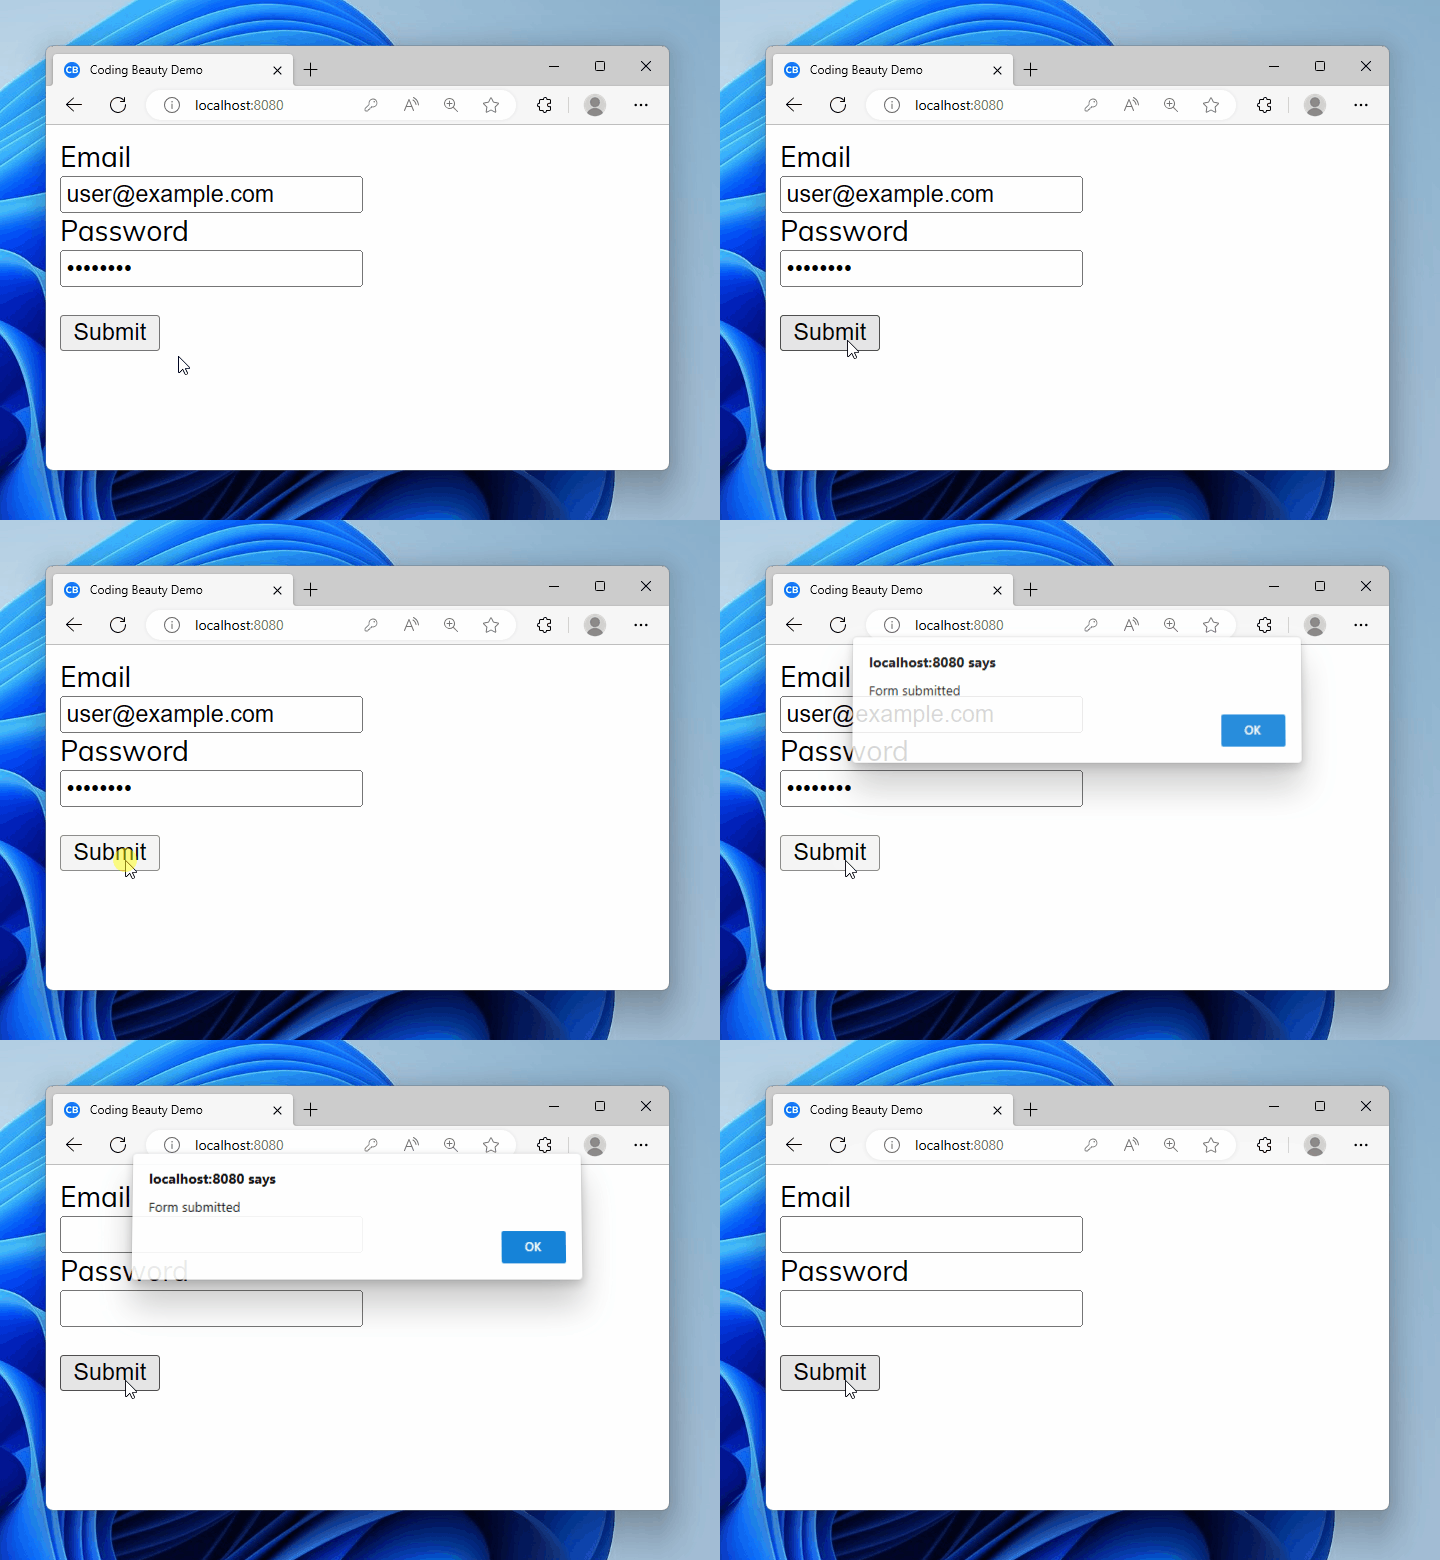
The page refresh is prevented in Vue.js when the button submits the form.

We use the .prevent modifier to stop the default action of the event from happening. In this case, that action was a page refresh, so .prevent stopped the page refresh on the form submission.

App.vue
<form @submit.prevent="handleSubmit">

.prevent is a Vue.js event modifier, which lets us access and modify event-related data.

We use the @submit directive to add a submit event listener to the form; this listener runs when the user clicks the button to submit the form.

In this case we only reset the form; in practical scenarios you’ll likely make an AJAX request to a server with the form data.

App.vue
<template> ... </template> <script> export default { ... methods: { async handleSubmit() { const user = { email: this.email, password: this.password, }; try { const response = await axios.post('http://your-api-url.com', user); console.log(response.data); } catch (error) { console.error(error); } this.email = ''; this.password = ''; } } }; </script>

For the button to submit the form, we must set its type attribute to "submit"

App.vue
<button type="submit" style="margin-top: 16px;"> Submit </button>

With type="submit", the browser also submits the form when the user presses the Enter key in an input field.

Remove type="submit" from the button to prevent page refresh

To prevent page refresh on form submit in Vue.js, you can also remove the type="submit" from the button.

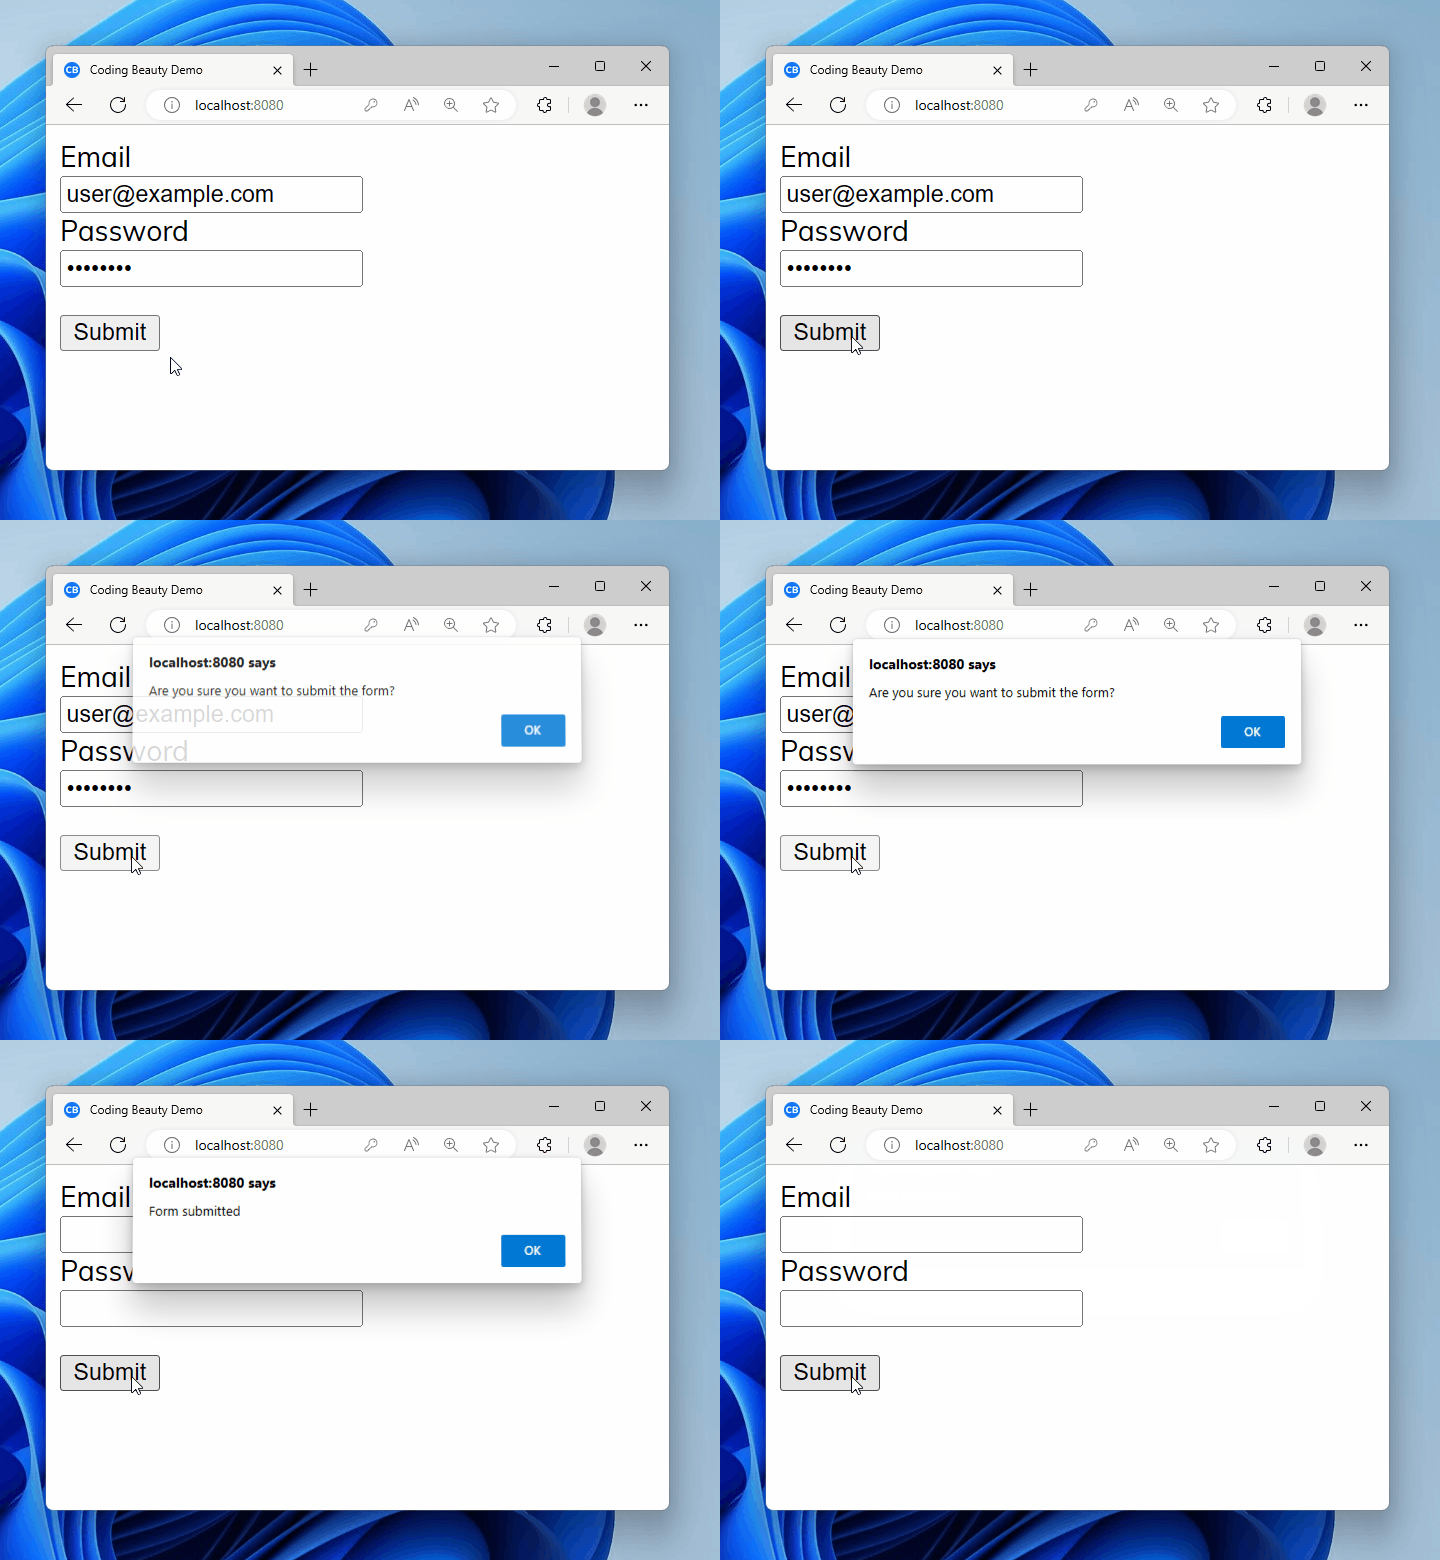
When is this useful? You may want to show an alert message or something before submission. In this case, we wouldn’t want type="submit" since it submits the form on button click.

App.vue
<template> <div id="app"> <form> <label> Email <br /> <input type="email" v-model="email" required /> </label> <br /> <label> Password <br /> <input type="password" v-model="password" required /> </label> <br /> <button type="button" @click="handleSubmit" style="margin-top: 16px" > Submit </button> </form> </div> </template> <script> export default { data() { return { email: '', password: '', }; }, methods: { handleSubmit() { // Perform custom actions before form submission alert('Are you sure you want to submit the form?'); // Simulate form submission by clearing input fields this.email = ''; this.password = ''; alert('Form submitted'); }, }, }; </script>
Preventing a page refresh on form submit in Vue.js to show an alert dialog before submission.

We used type="button" on the button, but that’s as good as not having a type attribute. It doesn’t do anything on click.

Key takeaways

  • To prevent page refresh on form submit in Vue.js, use the .prevent modifier in the submit event listener.
  • Set type="submit" to ensure the form submits on button click or Enter press. Remove it when you don’t want this.
  • Remove type="submit" when something needs to happen after the button click before submitting the form, e.g., show a dialog, make an initial request, etc.

How to check if a variable is null or undefined in React

To check if a variable in null or undefined in React, use the || operator to check if the variable is equal to null or equal to undefined.

JavaScript
import { useState } from 'react'; export default function App() { const [variable] = useState(undefined); const [message, setMessage] = useState(undefined); const nullOrUndefinedCheck = () => { // Check if undefined or null if (variable === undefined || variable === null) { setMessage('Variable is undefined or null'); } else { setMessage('Variable is NOT undefined or null'); } // Check if NOT undefined or null if (variable !== undefined && variable !== null) { setMessage('Variable is NOT undefined or null'); } }; return ( <div> <button onClick={() => nullOrUndefinedCheck()}>Check variable</button> <h2>{message}</h2> </div> ); }
Checking if a variable is null or undefined in React.

The logical OR (||) operator

The logical OR operator (||) results in true if either the value at the left or right is true.

JavaScript
const isTrue = true; const isFalse = false; const result1 = isTrue || isFalse; console.log(result1); // Output: true const result2 = isFalse || isFalse; console.log(result2); // Output: false

When you use || on non-boolean values, it returns the first truthy value:

JavaScript
const str = ''; const num = 0; const result1 = str || 'Default String'; console.log(result1); // Output: 'Default String' const result2 = num || 42; console.log(result2); // Output: 42

The falsy values in JavaScript are undefined, null, 0, NaN, '' (empty string), and false. Every other value is truthy.

Checking if NOT null or undefined with De Morgan’s laws

From De Morgan’s law, not (A or B) = not A and not B, where A and B are boolean conditions.

That’s why we used this condition to check if the variable is not null or undefined:

JavaScript
// not A and not B if (variable !== undefined && variable !== null) { setMessage('✅ Variable is NOT undefined or null'); }

And why we could just as easily do this:

JavaScript
// not (A or B) if (!(variable === undefined || variable === null)) { setMessage('✅ Variable is NOT undefined or null'); }

null and undefined are the same with ==

It’s important you use === over == for the check, if you want null and undefined to be treated separately. == is known as the loose equality operator, can you guess why it has that name?

JavaScript
console.log(null == undefined); // true console.log(null === undefined); // false

Loose equality fails in cases where undefined and null don’t mean the same thing.

Imagine a shopping cart application where a user adds items the cart, represented by a cartItems variable.

  • If cartItems is undefined, it’ll mean that the shopping cart hasn’t been initialized yet, or an error occurred while fetching it, and we should load this data before proceeding.
  • If cartItems is null, it’ll mean that the shopping cart is empty – the user hasn’t added any items yet.

Here’s a simplified example of how you might handle this in a React component:

JavaScript
import React, { useEffect, useState } from 'react'; const ShoppingCart = () => { const [cartItems, setCartItems] = useState(); // ... useEffect(() => { // Assume fetchCartItems() returns a promise that resolves to the cart items fetchCartItems() .then((items) => setCartItems(items)) .catch(() => setCartItems(null)); }, []); if (cartItems === undefined) { return <div>Loading cart items...</div>; } else if (cartItems === null) { return <div>Your shopping cart is empty! Please add some items.</div>; } else { return ( <div> <h2>Your Shopping Cart</h2> {cartItems.map((item) => ( <p key={item.id}>{item.name}</p> ))} </div> ); } }; export default ShoppingCart;

If we had used the == operator, only the first comparison to undefined or null would have run.

Check for null, undefined, or anything falsy in React

Instead of checking explicitly for null or undefined, you might be better off checking if the variable is falsy.

JavaScript
import { useState } from 'react'; export default function App() { const [variable] = useState(undefined); const [message, setMessage] = useState(undefined); const falsyCheck = () => { // Check if falsy if (!variable) { setMessage('✅ Variable is falsy'); } else { setMessage('❌ Variable is NOT falsy'); } }; return ( <div> <button onClick={() => falsyCheck()}>Check variable</button> <h2>{message}</h2> </div> ); }

By passing the variable to the if statement directly, it is coalesced to a true or false boolean depending on whether the value is truthy or falsy.

The falsy values in JavaScript are undefined, null, 0, NaN, '' (empty string), and false. Every other value is truthy.

How to Fix the “Unexpected reserved word ‘enum'” Error in JavaScript

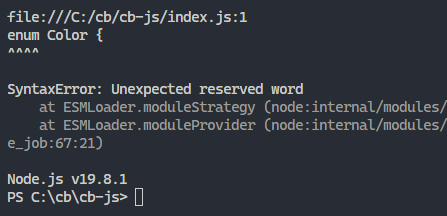
The “Unexpected reserved word ‘enum'” syntax error happens in JavaScript happens because enum is not a valid keyword in JavaScript, but it is reserved.

The "Unexpected reserved word 'enum'" syntax error happening in JavaScript.

It was reserved in the ECMAScript specification in case it may become valid in the future.

If it wasn’t reserved, devs could start using it as variable names in their code – making future keyword use impossible!

JavaScript
// ❌ SyntaxError: Unexpected reserved word 'enum' enum Color { Red, Blue, Green } const color = Color.Red;

To fix it, represent the enumeration in another way, or change the file to TypeScript.

Fix: Create a JavaScript enum the right way

Enums are useful stuff, but since there’s no enum keyword in JS, we’ll have to find others way to create and use them.

One powerful way to create an enumeration is with an object with JavaScript symbol properties:

JavaScript
const daysOfWeek = { Mon: Symbol('Mon'), Tue: Symbol('Tue'), Wed: Symbol('Wed'), Thu: Symbol('Thu'), Fri: Symbol('Fri'), Sat: Symbol('Sat'), Sun: Symbol('Sun'), }; const dayOfWeek = daysOfWeek.Tue;

With JavaScript symbols, we make sure that the constants are always different values, as every symbol is unique.

No need to worry duplicates – pretty convenient, right?

If we used this:

JavaScript
const daysOfWeek = { Mon: 'Mon', Tue: 'Tue', Wed: 'Wed', Thu: 'Thu', Fri: 'Fri', Sat: 'Sat', Sun: 'Sun', }; const dayOfWeek = daysOfWeek.Tue;

Someone could easily reassign the object’s properties to something else, giving us something more to worry about.

Fix: Just use TypeScript

Ah, TypeScript.

Alway there for us. Filled to the top with juicy modern stuff.

I mean enums aren’t so modern, but it’s one thing TS has that JS doesn’t.

Our first JS code runs flawlessly in TypeScript.

TypeScript
// ✅ No error - enums all the way! enum Color { Red, Blue, Green } const color = Color.Red;

So, if you really need that enum keyword – even though much of the TypeScript community seems to frown on it – change that file extension.

Oh, it could even be that it’s TypeScript you wanted all along. As it happened here.

Here, this person was new to TypeScript on Node (we’ll all been there) and ran his TS file with the node command directly.

Well, Node didn’t care about the extension and just treated the entire thing like a JavaScript file.

The easy solution was to compile it first with tsc before running node on the JS output. Or to use ts-node on the TypeScript file directly.

Key takeaways

So, the few things to keep in mind on fixing the “Unexpected reserved keyword ‘enum'” error in JavaScript:

  1. enum is a no-go in JavaScript (for now): JavaScript doesn’t have enum. It’s reserved for future use.
  2. Use objects with symbol properties: Want to create enumerations in JavaScript? Use objects with symbol properties.
  3. Symbols keep your code safe: Symbols are unique. They stop others from messing with your object’s properties.
  4. TypeScript has enum: Need enum? Switch to TypeScript. It’s got your back.
  5. Remember to compile TypeScript: Using TypeScript for Node.js? Compile your TypeScript files first. Or quickly use ts-node.

How to Fix the “Unexpected strict mode reserved word ‘yield'” Error in JavaScript

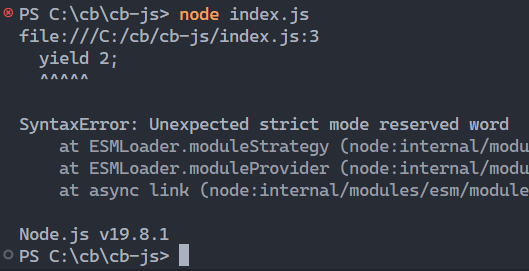
The “Unexpected strict mode reserved word ‘yield'” syntax error happens in JavaScript when you use the yield keyword outside a generator function.

The unexpected strict mode reserved word 'yield' error happening in JavaScript

Here’s an example of the error happening:

JavaScript
function* numberGen() { // ❌ SyntaxError: Unexpected strict mode reserved word 'yield' yield 2; yield 4; } const gen = numberGen(); console.log(gen.next().value); console.log(gen.next().value);

Note: As this is a syntax error, we don’t need to call the function for it to happen, and no part of the code runs until we fix it.

To fix the “SyntaxError unexpected strict mode reserved word ‘yield'” error, ensure that the innermost enclosing function containing the yield keyword is a generator function.

JavaScript
function* numberGen() { // ✅ Runs successfully - no error yield 2; yield 4; } const gen = numberGen(); console.log(gen.next().value); // 2 console.log(gen.next().value); // 4

We create generator functions with function*; the * must be there.

Make sure innermost function is generator function

A common reason why the “Unexpected strict mode reserved word ‘yield'” happens is using yield in an inner function that’s in a generator function.

This could be a callback or closure.

JavaScript
function* numberGen() { return () => { for (let i = 0; i < 30; i += 10) { // ❌ SyntaxError: Unexpected strict mode reserved word 'yield' yield i; } } } const gen = numberGen()(); console.log(gen.next().value); console.log(gen.next().value);

You may think the outer function* will let the yield work, but nope – it doesn’t!

You have to make the innermost function a generator:

JavaScript
function numberGen() { return function* () { for (let i = 0; i < 30; i += 10) { // ✅ Runs successfully - no error yield i; } }; } const gen = numberGen()(); console.log(gen.next().value); // 10 console.log(gen.next().value); // 20

Note we removed the * from the outer one, so it acts like a normal function and returns the generator.

Also we change the arrow function a normal one, because arrow functions can’t be generators.

Here’s another example, seen here:

JavaScript
function* generator() { const numbers = [1, 2, 3, 4, 5]; // ❌ SyntaxError: Unexpected strict mode reserved word numbers.map((n) => yield(n + 1)); } for (const n of generator()) { console.log(n); }

Here the goal was to consume the generator in the for loop, printing out each number one by one.

But the callback is the innermost function that has the yield, and it’s not a generator. Let’s fix this:

JavaScript
function* generator() { const numbers = [1, 2, 3, 4, 5]; // ✅ Runs successfully - no error yield* numbers.map((n) => n + 1); } for (const n of generator()) { console.log(n); }

yield* keyword

Wondering about the * in the yield*? It’s a shorter way of looping through the array and yielding each item.

A shorter way of this:

JavaScript
function* generator() { const numbers = [1, 2, 3, 4, 5]; // ✅ Runs successfully - no error for (const num of numbers.map((n) => n + 1)) { yield num; } } for (const n of generator()) { console.log(n); }

Key takeaways

The “Unexpected strict mode reserved word ‘yield'” error can happen in JavaScript when you mistakenly use the yield keyword outside a generator function.

To fix this error, make sure that the innermost enclosing function containing the yield keyword is actually a generator function.

One common reason for meeting this error is using yield in an inner function that’s not a generator.

Remember, the yield* syntax lets us easily loop through an array and yield each item. No need for a traditional for loop with yield statements.

By understanding and correctly applying these concepts, you can avoid the “Unexpected reserved word ‘yield'” error and ensure smooth execution of your generator functions in JavaScript. Happy coding!

How to easily get the current route in Next.js

Getting the current route in a web application is important for managing user sessions, handling authentication, and dynamically displaying UI elements.

Let’s how see how easy it is to get the current route or pathname in our Next.js app.

In this article

Get current route in Next.js Pages Router component

We can get the current route in a Next.js component with the useRouter hook:

src/pages/blog.tsx
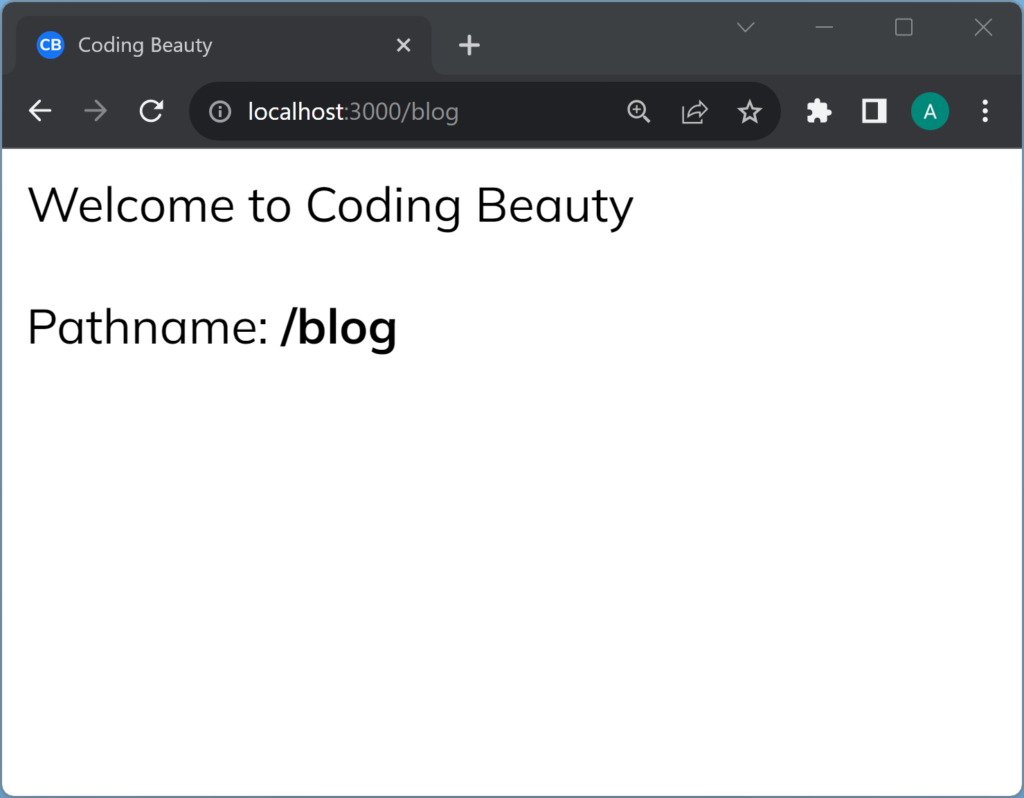
import Head from 'next/head'; import { useRouter } from 'next/router'; export default function Page() { const { pathname } = useRouter(); return ( <> <Head> <title>Next.js - Coding Beauty</title> <meta name="description" content="Next.js Tutorials by Coding Beauty" /> <meta name="viewport" content="width=device-width, initial-scale=1" /> <link rel="icon" href="/favicon.ico" /> </Head> <main> Welcome to Coding Beauty <br /> <br /> Pathname: <b>{pathname}</b> </main> </> ); }

Get current route in Next.js App Router component

To get the current route in a Next.js app router component, use the usePathname hook from next/navigation:

src/app/amazing-url/page.tsx
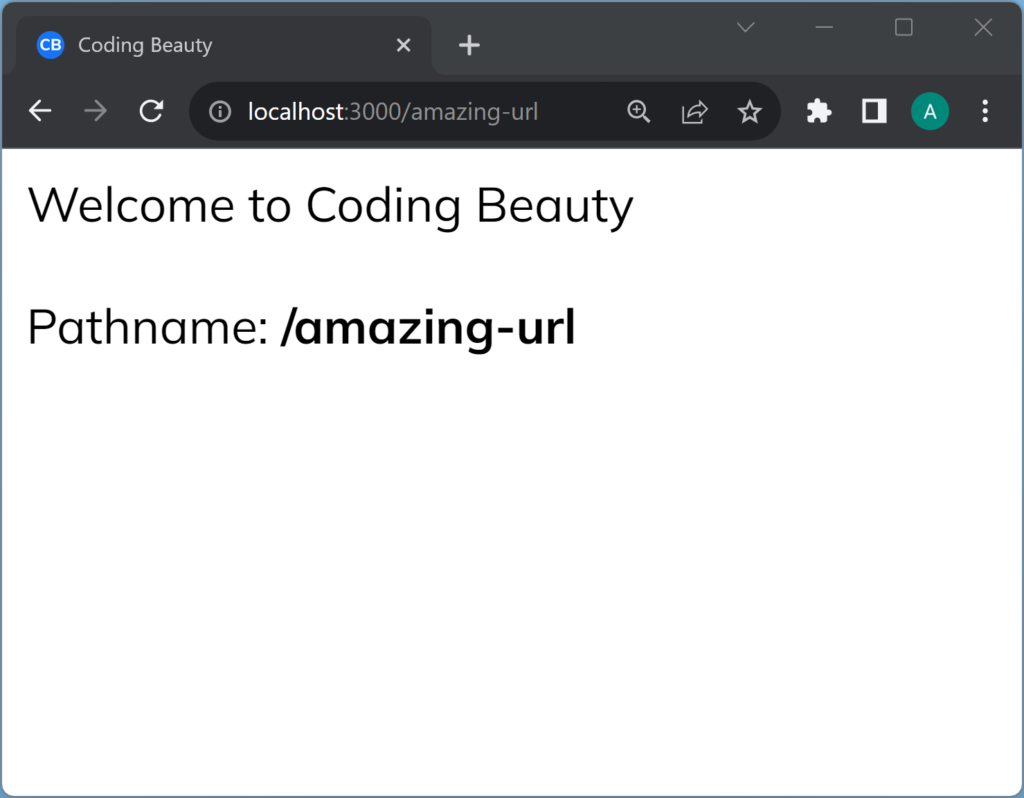
'use client'; import React from 'react'; import { Metadata } from 'next'; import { usePathname } from 'next/navigation'; export const metadata: Metadata = { title: 'Next.js - Coding Beauty', description: 'Next.js Tutorials by Coding Beauty', }; export default function Page() { const pathname = usePathname(); return ( <main> Welcome to Coding Beauty 😄 <br /> <br /> Route: <b>{pathname}</b> </main> ); }

We need 'use client' in Next.js 13 App Router

Notice the 'use client' statement at the top.

It’s there because all components in the new app directory are server components by default, which means we can’t access client-side specific APIs.

We’ll get an error if we try to do anything interactive with useEffect or other hooks, as it’s a server environment.

Get current route in Next.js getServerSideProps

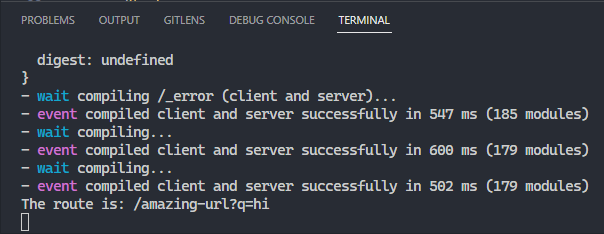
To get the current route in getServerSideProps, use req.url from the context argument.

src/pages/amazing-url.tsx
import { NextPageContext } from 'next'; import Head from 'next/head'; export function getServerSideProps(context: NextPageContext) { const route = context.req!.url; console.log(`The route is: ${route}`); return { props: { route, }, }; } export default function Page({ route }: { route: string }) { return ( <> <Head> <title>Next.js - Coding Beauty</title> <meta name="description" content="Generated by create next app" /> <meta name="viewport" content="width=device-width, initial-scale=1" /> <link rel="icon" href="/favicon.png" /> </Head> <main> Welcome to Coding Beauty 😃 <br /> Route: <b>{route}</b> </main> </> ); }
The current route printed in the console