Tari Ibaba is a software developer with years of experience building websites and apps. He has written extensively on a wide range of programming topics and has created dozens of apps and open-source libraries.
Great news – OpenAI just released GPT-4 Turbo, an upgraded version of the GPT-4 model with a context window up to 128K tokens – more than 300 pages of text, and a fourfold increase in regular GPT-4’s most powerful 32K context model.
The company made this known at its first-ever developer conference, touting a preview version of the model and promising a production-grade GPT-4 Turbo in the next few weeks.
Users will be able to have longer, more complex conversations with GPT-4 Turbo as there’ll be more room to remember more of what was said earlier in the chat.
DALLE-3 prompt: “A beautiful city with buildings made of different, bright, colorful candies and looks like a wondrous candy land”
Also exciting to hear, GPT-4 Turbo is now trained on real-world knowledge and events up to April 2023, allowing us to build greater apps utilizing up-to-date data, without needing to manually keep it in the loop with custom data from embeddings and few-shot prompting.
Even better, the greater speed and efficiency of this new turbocharged model have made input tokens 3 times cheaper and slashed the cost of output tokens in half.
So, upgraded in capability, upgraded in knowledge, upgraded in speed, all with a fraction of the previous cost. That’s GPT-4 Turbo.
An innovative feature currently in preview, you can now pass image inputs to the GPT-4 model for processing, making it possible to perform tasks like generating captions, analyzing and classifying real-world images, and automated image moderation.
Then there’s the new DALL-E 3 API for automatically generating high-quality images and designs, and an advanced Text-to-speech (TTS) API capable of generating human-level speech with a variety of voices to choose from.
DALLE-3 outclasses Midjourney! Especially when it comes to creating complex images from highly detailed and creative prompts.
DALLE-3 (top) vs Midjourney (bottom). Prompt: “A vast landscape made entirely of various meats spreads out before the viewer. tender, succulent hills of roast beef, chicken drumstick trees, bacon rivers, and ham boulders create a surreal, yet appetizing scene. the sky is adorned with pepperoni sun and salami clouds”. Source: DALL-E 3 vs. Midjourney: A Side by Side Quality Comparison
And we can’t forget the ambitious new Assistants API, aimed at helping devs build heavily customized AI agents with specific instructions that leverage extra knowledge and call models and tools to perform highly specialized tasks.
It’s always awesome to see these ground-breaking improvements in the world of AI, surely we can expect developers to take full advantage of these and produce even more intelligent and world-changing apps that improve the quality of life for everyone.
The spread syntax (...) converts the set to an array for filter() to work.
The Set() constructor converts the result of filter() back to an Set.
Get symmetric difference between two sets
The method above only gives the elements in the second set that aren’t in the first.
JavaScriptCopied!
function getDifference(setA, setB) {
  return new Set(
    [...setA].filter((element) => !setB.has(element))
  );
}

const set1 = new Set([2, 4]);
const set2 = new Set([1, 2, 3, 4]);

// Every item in set1 is also in set2, but the sets are different
console.log(getDifference(set1, set2)); // {}
Sometimes you want this, especially if set2 is supposed to be a set1‘s subset.
But other times you may want to find the symmetric difference between the sets, regardless of which one comes first.
To do that, we simply merge the results of two getDifference() calls, each with the order of the Sets reversed.
JavaScriptCopied!
function getDifference(setA, setB) {
  return new Set(
    [...setA].filter((element) => !setB.has(element))
  );
}

function getSymmetricDifference(setA, setB) {
  return new Set([
    ...getDifference(setA, setB),
    ...getDifference(setB, setA),
  ]);
}

const set1 = new Set([2, 4]);
const set2 = new Set([1, 2, 3, 4]);

console.log(getSymmetricDifference(set1, set2)); // {1, 3}
console.log(getSymmetricDifference(set2, set1)); // {1, 3}
Yes, it’s no longer the recommended tool for starting React apps. Some of us were surprised, but many of us knew it was a long time coming.
There are much faster and leaner alternatives available today.
Why shouldn’t you use Create React App anymore?
Create React App was great.
Setting up React apps become as easy as ever without any need to bother with tedious Webpack and Babel configs. But despite the convenience, it had notable issues we just couldn’t ignore:
1. Bulky and slow
Create React App is a bloated tool.
It installs an unbelievable number of packages and takes forever to finish. If you’re a long-time CRA user like me, you’ve probably gotten used to this process, but it’s far from normal.
Once you enter the command to start a new project, you will quickly realize the insane number of packages CRA needs to set up.
Look at how large the node_modules folder is for CRA compared to Vite, a superior alternative. And both folders were just newly set up.
Many packages mean longer install times, even if you’re using PNPM or Yarn 2.
2. Insecure and outdated packages
Bundling so many packages makes it harder to keep track of them all, and many become abandoned and insecure later.
Things improved but any insecure package is something to worry about, and there are still quite a few.
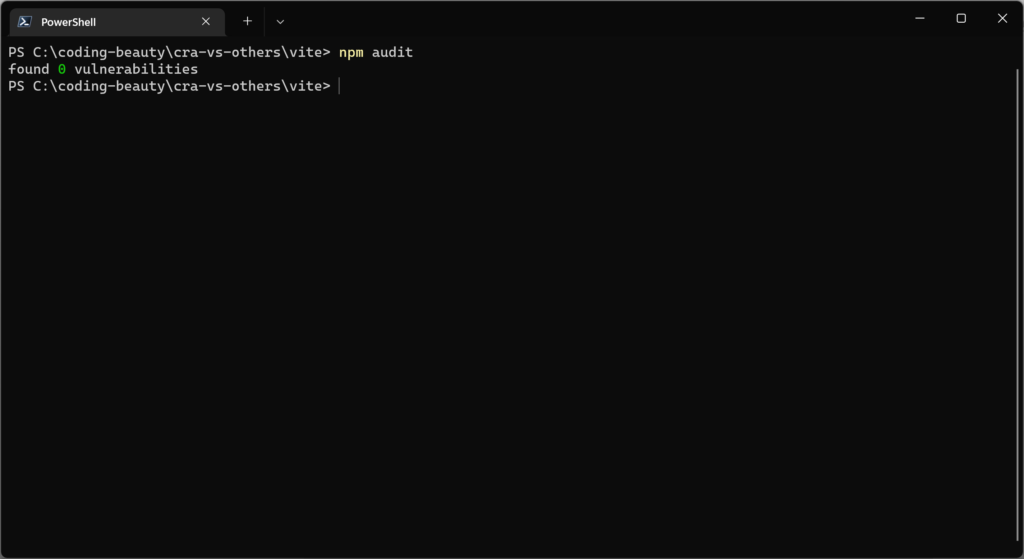
8 high security vulnerabilities! And that’s even better than what it used to be.
In my GitHub repos using CRA, I get several Dependabot alerts at every turn – even from one of my first GitHub projects.
And they’re almost always about security flaws in packages CRA installed.
3. Limited customization options
Create React App is a black box.
To add new libraries and customize it you usually have to depend on libraries like Craco – heck, before CRA version 5, Craco was pretty much our only way to get Tailwind CSS support.
I remember my earlier days of creating various Electron + React desktop apps, where I had to install react-app-rewired just to set the target to 'electron-renderer' to access Node modules in the React part of the app.
For total control, you can always do npm eject, but of course, then you become responsible for all the dependencies installed by CRA, which has trade-offs that may not be worth it for you.
What to use instead of Create React App
Old habits die hard, sure.
If you’ve been hesitating to switch to a superior tool, hopefully, the React team dumping CRA should finally do it for you. There are far more modern and better-maintained alternatives out there; let’s check out some of the most popular ones:
It’s a zero-config bundler with no setup required, yet it’s still more flexible than Create React App.
Parcel supports all the latest web technologies, including React, Vue, and TypeScript, and it can bundle any type of asset, from images and CSS to HTML and JavaScript.
Plus, it has excellent performance, thanks to its use of worker threads, which allows it to parallelize tasks and speed up builds.
Parcel also has HMR support and is updated often with the latest features and optimizations like Vite. You can trust the team to keep up with the latest web technologies and best practices.
And what’s the result: your projects are built with the best tools available.
Webpack is still king if you know what you’re doing.
The level of control of flexibility it gives you is unmatched as there are a massive number of options you can set, far more than just path and filename.
Another benefit to note: Webpack can generate a development build without a local server, unlike Parcel and others.
This particular feature saved me when I was debugging React in a VSCode extension. Loading data from localhost didn’t work properly for a Webview; I had to build to a local file and read the contents.
With source maps enabled and dev mode turned on, I could easily see the exact line where the error occurred in the TS code. Unlike with Parcel, where all I got was a minified build.
Of course, setting up a Webpack config can be complex and more involved – which is why CRA came around in the first place. You must configure various options to get everything working perfectly.
But once you’re set-up, you’ll have a heavily personalized build process for your project. It’s a trade-off that may or may not be worth it for you.
Frameworks to replace Create React App
Need React’s state and UI capabilities without extras? The tools we’ve seen are great.
Want high-performance apps with advanced features like SSR? Then consider frameworks with built-in routing, data fetching, etc.
Another SSR-enable framework with powerful data features like:
Intelligent network error handling
Parallel fetching of CSS, JavaScript, and other assets to save time
Automatically ensuring the UI data is in sync with the server data after a user action.
One stand-out Remix feature is nested routes, which makes it possible to associate a specific section of a page with a particular route segment so that only that section updates when the route segment changes. This accelerates page transitions as no time is wasted re-rendering the entire page.
Gatsby is another awesome one – for scalable & fast-loading static sites.
There are a variety of starter kits and plugins to easily extend your site’s functionality and build a blog, e-commerce site, or portfolio site in no time at all.
With Gatsby, it’s effortless to power up your app with data from a CMS, especially with the GraphQL data layer for rapid integration with various APIs and services.
Final thoughts
CRA was a popular tool.
But it had its issues. It was bulky, outdated, and had limited customization.
Adaptation is crucial in the dynamic landscape of web development. By embracing modern tools, such as Vite, and Parcel, and in-depth frameworks like Next.js, Remix, and Gatsby, we can build faster and more efficient React apps.
The “Cannot read property ‘classList’ of null” error happens in JavaScript when you try to access the classList property on an element that isn’t in the HTML DOM.
Let’s look at various ways to quickly fix this error.
Fix: Ensure correct selector
To fix the “Cannot read property ‘classList’ of null” error in JavaScript, ensure the correct selector accesses an existing HTML element.
HTMLCopied!
<div>Welcome to Coding Beauty</div>
<button class="btn-1">Be amazing</button>
Check for any mistakes in the selector symbols in the script. Check for any mistakes in the ID or class name in the HTML tag. Maybe you forgot to set that id or class attribute at all?
JavaScriptCopied!
// forgot the '.' symbol used for class selectors
const button = document.querySelector('btn-1');

console.log(button); // 👉️ undefined

// ❌ Uncaught TypeError: Cannot read properties of undefined (reading 'classList')
button.classList.add('active');
Fix: Ensure DOM load before .classList access
The “Cannot read property ‘classList’ of undefined” error also occurs when you try to access .classList on an element that the browser hasn’t added to the DOM yet.
Maybe because your <script> is in the <head> tag and executes before the element’s parsing:
HTMLCopied!
<!DOCTYPE html>
<html lang="en">
  <head>
    <title>Coding Beauty Tutorial</title>
    <!-- ❌ Script is run before button is declared -->
    <script src="index.js"></script>
  </head>
  <body>
    <div id="element">
      console.log('Easy answers to your coding questions and more...');
    </div>
  </body>
</html>
The script tag is placed in the <head> tag above where the div is declared, so index.js can’t access the div.
index.jsCopied!
const element = document.querySelector('.element');
console.log(element); // 👉️ undefined

// ❌ Uncaught TypeError: Cannot read properties of undefined (reading 'classList')
element.classList.add('highlight');
Solution: Move script to bottom
To fix the error in this case, move the script tag to the bottom of the body, after all the HTML elements have been declared.
HTMLCopied!
<!DOCTYPE html>
<html lang="en">
  <head>
    <title>Coding Beauty Tutorial</title>

  </head>
  <body>
    <div id="element">
      console.log('Easy answers to your coding questions and more...');
    </div>

    <!-- ❌ Script is run after element is added to the DOM -->
    <script src="index.js"></script>
  </body>
</html>
Now index.js will have access to the div and all the other HTML elements, because the browser would have rendered them by the time the script runs:
index.jsCopied!
const element = document.querySelector('.element');
console.log(element); // 👉️ undefined

// ✅ Works as expected
element.classList.add('highlight');
Solution: Access .classList in DOMContentLoaded event listener
Another way to fix the “cannot read property ‘addEventListener’ of null” error is to add a DOMContentLoaded event listener to the document and access the element in this listener.
HTMLCopied!
<!DOCTYPE html>
<html lang="en">
  <head>
    <title>Coding Beauty Tutorial</title>
    <!-- Script placed above accessed element -->
    <script src="index.js"></script>
  </head>
  <body>
    <div id="element">
      console.log('Coding is more than a means to an end...');
    </div>
  </body>
</html>
The DOMContentLoaded event fires when the browser fully parses the HTML, whether or not external resources like images and stylesheets have loaded.
So regardless of where we place the script, the code in the listener only runs after every element is active in the DOM.
index.jsCopied!
const element = document.querySelector('.element');
console.log(element); // 👉️ undefined

// ✅ Works as expected
element.classList.add('highlight');
Adding a favicon to a website enhances usability and branding. It helps identify the website in browser tabs and bookmarks, improving user recognition and trust.
Let’s learn how to quickly add a favicon image to a Next.js app
Add favicon automatically in Next.js 13 App Router
To add a favicon in Next.js 13 App Router, add a favicon.ico file to the app/ directory. Next.js will automatically detect favicon.ico and display it on the page.
Here we’ve added the favicon.ico to our VS Code Next.js project.
And this is all we need to do – here’s layout.tsx:
And we’ll instantly see the image next to the page title in the browser tab:
Apart from favicon and .ico, Next.js also auto-discovers the following file name and extension combinations in the app/ directory
icon with .ico, .jpg, .jpeg, .png, or.svg extension.
app-icon with .jpg, .jpeg, .png extension.
You can rename PNGs to .ico files and they will still work.
Add favicon automatically in Next.js Pages Router
To add a favicon automatically in the Next.js pages directory, place a favicon.ico file in your public/ directory, and your browser will automatically detect the file for the site icon.
If your image file isn’t a .ico, you’ll need to either rename it to favicon.ico, or manually specify the filename.
Set Next.js favicon statically in Next.js 13 App Router
To add a favicon to a Next.js 13 app, you can also export a Metadata object with an icons property in your layout.tsx file:
The image file should be in your public directory.
Set Next.js favicon with HTML in Pages Router
To add a site icon in the Next.js pages or app directory, use the HTML <link> tag in your _document.tsx or _document.js file, just like in vanilla HTML:
To add a class to the HTML body element in JavaScript on page load, call the classList.add() method on it, i.e., document.body.classList.add(element).
HTMLCopied!
<!DOCTYPE html>
<html>
  <head>
    <title>Coding Beauty Tutorial</title>
  </head>
  <body class="dev coding">
    <div>This is a div element.</div>
  </body>
</html>
JavaScriptCopied!
document.body.classList.add('class-3');
The body property is the HTMLElement object that represents the body tag in the markup.
The classList property is a DOMTokenList object that represents the list of classes an element has.
The add() method of the classList property takes a list of classes and adds them to an element.
JavaScriptCopied!
<!DOCTYPE html>
<html>
  <head>
    <title>Coding Beauty Tutorial</title>
  </head>
  <body class="dev coding beauty">
    <div>This is a div element.</div>
  </body>
</html>
You can pass multiple arguments to add() to add more than one class to the body. For example, we can add both beauty and magic to the body in single statement.
JavaScriptCopied!
document.body.classList.add('beauty', 'magic');
To produce this HTML markup:
JavaScriptCopied!
<!DOCTYPE html>
<html>
  <head>
    <title>Coding Beauty Tutorial</title>
  </head>
  <body class="dev coding beauty magic">
    <div>This is a div element.</div>
  </body>
</html>
If you add class that already exists on the HTML body, add() ignores the class instead of throwing an exception.
Add class to body tag in <head> tag
To add a class to the body element in the <head> tag using JavaScript, use the DOMContentLoaded event and the document.body.classList.add() method.
For example:
JavaScriptCopied!
<!DOCTYPE html>
<html>
  <head>
    <title>Coding Beauty Tutorial</title>
    <script>
      document.addEventListener('DOMContentLoaded', () => {
        document.body.classList.add('beauty', 'magic');
      });
    </script>
  </head>
  <body class="dev coding">
    <div>This is a div element.</div>
    <script src="index"></script>
  </body>
</html>
The DOMContentLoaded event runs when the HTML is completely parse and the DOM has loaded.
The <script> loads and the JavaScript runs before the browser renders the HTML, so without DOMContentLoaded, document.body will be null in the <script>, causing the “Cannot read property ‘classList’ of undefined” JavaScript error.
Add class to body tag on click
If you’d like to add a class to the body tag when the user clicks an element, set a click listener on element and call document.body.classList.add() in this listener.
For example:
HTMLCopied!
<!DOCTYPE html>
<html>
  <head>
    <title>Coding Beauty Tutorial</title>
  </head>
  <body class="dev coding">
    <div>So you can code</div>
    <button class="amazify">Be amazing</button>
  </body>
</html>
Toggling a class on the body element in JavaScript simplifies code implementation by handling the addition and removal of the class in a single line of code.
And this single line of code is a call to the body’s classList.toggle() method:
Setting the page title and meta description helps improve search engine visibility, increase click-through rates, and provide concise summaries of webpage content.
In this article, we’re going to learn how we easily set the page title and meta description in a Next.js project.
Set static page title and meta description in Next.js App Router
To set page title and meta description statically in Next.js 13’s app directory, create a Metadata object in a page.tsx file and export it:
src/app/page.tsxCopied!
import React from 'react';
import { Metadata } from 'next';

export const metadata: Metadata = {
  title: 'Coding Beauty',
  description:
    'api2.codingbeautydev.com: Coding - the art, the science, and the passion.',
};

export default function Page() {
  return (
    <main>
      <h1>Welcome to Coding Beauty</h1>
    </main>
  );
}
The tab will have this title, and the page will have a meta tag containing this description:
We can also do this in a layout.tsx to make every page using this layout have this title and meta description by default – if the page doesn’t have its own.
src/app/layout.tsxCopied!
import { Metadata } from 'next';
import '@/styles/globals.css';

export const metadata: Metadata = {
  title: 'Coding Beauty',
  description: 'The official Coding Beauty home page.',
  icons: {
    icon: '/favicon.png',
  },
};

export default function RootLayout({
  children,
}: {
  children: React.ReactNode;
}) {
  return (
    <html lang="en">
      <body>{children}</body>
    </html>
  );
}
Set title and meta description dynamically in Next.js App Router
You can use the generateMetadata() function to set the page title and meta description using dynamic information we don’t know beforehand, like data from an API.
TypeScriptCopied!
export function generateMetadata({ params }: Props): Promise<Metadata> {
  // fetch data with `params`

  // return a `Metadata` object
  return {
    title: post.name,
    description: post.description,
  }
}
Let’s look at a full example, where we fetch API data for a post in our hypothetical social media app, and we use generateMetadata() to set the page title and meta description for the page based on what we get from the endpoint URL.
src/pages/posts/[id]/page.tsxCopied!
import { Metadata } from 'next';

type Props = {
  params: { id: string };
};

export async function generateMetadata({
  params,
}: Props): Promise<Metadata> {
  const id = params.id;
  const url = `https://api.mysocialapp.com/posts/${id}`;

  const post = await fetch(url).then((res) => res.json());

  return {
    title: post.title,
    description: post.description,
  };
}

export default async function Page({ params }: Props) {
  const { id } = params;
  const url = `https://api.mysocialapp.com/posts/${id}`;

  // fetch again!
  // But don't worry, Next.js caches the `fetch()` calls
  const post = await fetch(url).then((res) => res.json());

  return (
    <>
      <h1>{post.title}</h1>
      <div>{post.content}</div>
    </>
  );
}
We fetch data from the same endpoint twice, one for the title and meta description, and another to display the title and other information to the actual users on the page.
Next.js caches the results of the fetch in generateMetadata() for use in Page to prevent multiple requests and avoid performance hits.
If you export a Metadata object and also have generateMetadata() function, Next.js will use generateMetadata()‘s return value.
Set page title and meta description in Next.js Pages Router (<= 12)
To set the page title and meta description in the Next.js pages directory, create a Head component, and place meta and title tags in it, like you would in vanilla HTML:
pages/index.tsxCopied!
import Head from 'next/head';

export default function Home() {
  return (
    <>
      <Head>
        <title>Coding Beauty</title>
        <meta
          name="description"
          content="A brand all about coding passion and success"
        />
        <meta name="viewport" content="width=device-width, initial-scale=1" />
        <link rel="icon" href="/favicon.png" />
      </Head>
      <main>
        <h1>Welcome to Coding Beauty</h1>
      </main>
    </>
  );
}
We can also set the page title and meta description in your _app.tsx or _app.jsx file to make each page without a title or description use this as a default.
pages/_app.tsxCopied!
import '@/styles/globals.css';
import type { AppProps } from 'next/app';
import Head from 'next/head';

export default function App({ Component, pageProps }: AppProps) {
  return (
    <>
      <Head>
        <title>Coding Beauty</title>
        <meta
          name="description"
          content="A page on the Coding Beauty website"
        />
      </Head>
      <Component {...pageProps} />
    </>
  );
}
Set page title and meta description dynamically in Next.js Pages Router (<= 12)
You can also set the page title and meta description in the pages directory based on some data not known ahead of time.
For instance, to set the meta information based on API data, you’ll fetch the data in getServerSideProps and display it in the title and meta tags that are in the Head tag.
function writeTransactionsToFile(transactions) {
  let writeStatus;

  try {
    fs.writeFileSync('transactions.txt', transactions);
    writeStatus = 'success';
  } catch (error) {
    writeStatus = 'error';
  }

  // do something with writeStatus...
}
It’s yet another instance where we want a value that depends on whether or not there’s an exception.
Normally, you’d most likely create a mutable variable outside the scope for error-free access within and after the try-catch.
But it doesn’t always have to be this way. Not with a functional try-catch.
A pure tryCatch() function avoids mutable variables and encourages maintainability and predictability in our codebase. No external states are modified – tryCatch() encapsulates the entire error-handling logic and produces a single output.
Our catch turns into a one-liner with no need for braces.
JavaScriptCopied!
function writeTransactionsToFile(transactions) {
  // 👇 we can use const now
  const writeStatus = tryCatch({
    tryFn: () => {
      fs.writeFileSync('transactions.txt', transactions);
      return 'success';
    },
    catchFn: (error) => 'error';
  });

  // do something with writeStatus...
}
The tryCatch() function
So what does this tryCatch() function look like anyway?
From how we used it above you can already guess the definition:
To properly tell the story of what the function does, we ensure explicit parameter names using an object argument – even though there are just two properties. Because programming isn’t just a means to an end — we’re also telling a story of the objects and data in the codebase from start to finish.
TypeScript is great for cases like this, let’s see how a generically typed tryCatch() could look like:
And we can take it for a spin, let’s rewrite the functional writeTransactionsToFile() in TypeScript:
JavaScriptCopied!
function writeTransactionsToFile(transactions: string) {
  // 👇 returns either 'success' or 'error'
  const writeStatus = tryCatch<'success' | 'error'>({
    tryFn: () => {
      fs.writeFileSync('transaction.txt', transactions);
      return 'success';
    },
    catchFn: (error) => return 'error';
  });

  // do something with writeStatus...
}
We use the 'success' | 'error' union type to clamp down on the strings we can return from try and catch callbacks.
Asynchronous handling
No, we don’t need to worry about this at all – if tryFn or catchFn is async then writeTransactionToFile() automatically returns a Promise.
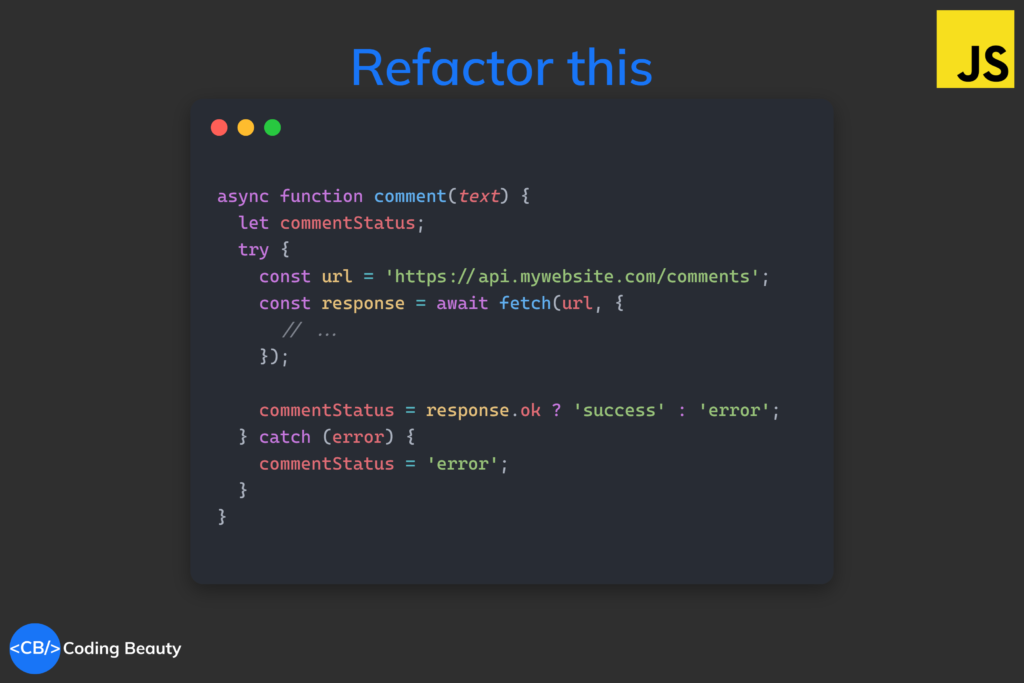
Here’s another try-catch situation most of us should be familiar with: making a network request and handling errors. Here we’re setting an external variable (outside the try-catch) based on whether the request succeeded or not – in a React app we could easily set state with it.
Obviously in a real-world app the request will be asynchronous to avoid blocking the UI thread:
JavaScriptCopied!
async function comment(comment: string) {
  type Status = 'error' | 'success';
  let commentStatus;
  try {
    const response = await fetch('https://api.mywebsite.com/comments', {
      method: 'POST',
      headers: {
        'Content-Type': 'application/json',
      },
      body: JSON.stringify({ comment }),
    });

    if (!response.ok) {
      commentStatus = 'error';
    } else {
      commentStatus = 'success';
    }
  } catch (error) {
    commentStatus = 'error';
  }

  // do something with commentStatus...
}
Once again we have to create a mutable variable here so it can go into the try-catch and come out victoriously with no scoping errors.
We refactor like before and this time, we async the try and catch functions thereby awaiting the tryCatch():
JavaScriptCopied!
async function comment(comment: string) {
  type Status = 'error' | 'success';
  // 👇 await because this returns Promise<Status>
  const commentStatus = await tryCatch<Status>({
    tryFn: async () => {
      const response = await fetch<('https://api.mywebsite.com/comments', {
        method: 'POST',
        headers: {
          'Content-Type': 'application/json',
        },
        body: JSON.stringify({ comment }),
      });
      // 👇 functional conditional
      return response.ok ? 'success' : 'error';
    },
    catchFn: async (error) => 'error';
  });
  // do something with commentStatus...
}
Readability, modularity, and single responsibility
Two try-catch rules of thumb to follow when handling exceptions:
The try-catch should be as close to the source of the error as possible, and
Only use one try-catch per function
They will make your code easier to read and maintain in the short- and long-term.
Look at processJSONFile() here, it respects rule 1. The 1st try-catch is solely responsible for handling file-reading errors and nothing else. No more logic will be added to try, so catch will also never change.
And next try-catch in line is just here to deal with JSON parsing.
JavaScriptCopied!
function processJSONFile(filePath) {
    let contents;
    let jsonContents;

    // First try-catch block to handle file reading errors
    try {
        contents = fs.readFileSync(filePath, 'utf8');
    } catch (error) {
        // log errors here
        contents = null;
    }

    // Second try-catch block to handle JSON parsing errors
    try {
        jsonContents = JSON.parse(contents);
    } catch (error) {
        // log errors here
        jsonContents = null;
    }

    return jsonContents;
}
But processJsonFile() completely disregards rule 2, with both try-catch blocks in the same function.
So let’s fix this by refactoring them to their separate functions:
Side note: When naming identifiers, I say we try as much as possible to use nouns for variables, adjectives for functions, and… adverbs for higher-order functions! Like a story, the code will read more naturally and could be better understood.
If you’ve used @mui/styles or recompose, you’ll see how a ton of their higher-order functions are named with adverbial phrases — withStyles, withState, withProps, etc., and I doubt this was by chance.
Final thoughts
Of course try-catch works perfectly fine on its own.
We aren’t discarding it, but transforming it into a more maintainable and predictable tool. tryCatch() is even just one of the many declarative-friendly functions that use imperative constructs like try-catch under the hood.
If you prefer to stick with direct try-catch, do remember to use the 2 try-catch rules of thumb, to polish your code with valuable modularity and readability enhancements.